RaspTI: Convert a Vintage Computer (TI-99/4A) Into a RaspPi Workstation - Part 1 - Keyboard
Intro: RaspTI: Convert a Vintage Computer (TI-99/4A) Into a RaspPi Workstation - Part 1 - Keyboard
This is the first in a series of Instructables that document the process of converting a vintage computer (in this case, a TI-99/4A) into a RaspberryPi workstation. You should know that the only thing we're preserving about the old computer is its physical form. We will not be using any original hardware or software, with the exception of the awesome keyboard.
Part 1 will show you how to convert the TI's passive keyboard matrix to a USB keyboard. We will be re-installing it into the TI-99 body, but once it's been programmed, it can be used for anything.
NOTE: this process can be used to convert any push-button matrix into a USB keyboard input device.
Thanks and Salutes:
Ido Gendel for his advice on how the code should be structured.
Sean McIntyre for his help with debugging the code.
Code for the Teensy can be found here: https://github.com/matthewepler/raspTI_keyboard
Supplies:
Teensy++ 2.0 microcontroller
Micro USB cable
Bread board and standard gauge wire
30x female headers
55x male headers
ribbon cable (regular wire will do but this will make your project less of a wire nest. you need at least 7 wires in the ribbon)
10x 10K resistors
Wire cutters and stripper
Solder and Iron
4x small zip ties
TI-99/4A or any vintage computer keyboard with wired output similar to the one shown here.
If you have questions, feel free to contact me via the address on my site: http://mepler.com
STEP 1: Break Open the TI
The screws aren't hidden. Just unscrew the ones on the case to get inside. Then liberate the logic and power boards by unscrewing them from the plastic base.
Carefully unhook the keyboard as shown in the picture. Your connector cable may not be exactly like mine, but it will work the same.
Save all the pieces and screws!!!
[image coming]
Carefully unhook the keyboard as shown in the picture. Your connector cable may not be exactly like mine, but it will work the same.
Save all the pieces and screws!!!
[image coming]
STEP 2: Prepare the Breadboard and Teensy
1. Solder male headers to every pin on your Teensy.
2. Add wires to the bread board that will connect the power and ground lines on either side.
3. Add wires for power and ground to the Teensy.
4. Insert Teensy, aligning the power and ground pins with the wires you put in the breadboard.
5. Insert a row of 15 male headers further down on the breadboard.
6. Insert a 10K resistor for each of these headers and connect it to ground.
7. Make two sets of cable using the ribbon cable and female headers. One should have 7 wires, the other 8. Solder the stripped ends of the wire into the female end of the header.
8. Connect the first 8 male header lines (counting from left) to the Teensy:
Header 1 -> C0
Header 2 -> C1
Header 3 -> C2
Header 4 -> C3
Header 5 -> C4
Header 6 -> C5
Header 7 -> C6
Header 8 -> C7
9. Connect the last 7 male header lines to the bottom
Header 9 -> F7
Header 10 -> F6
Header 11 -> F5
Header 12 -> F4
Header 13 -> F3
Header 14 -> F2
Header 15 -> F1
10. Connect the keyboard's connector cable to the male headers.
11. Connect the Teensy to your computer.
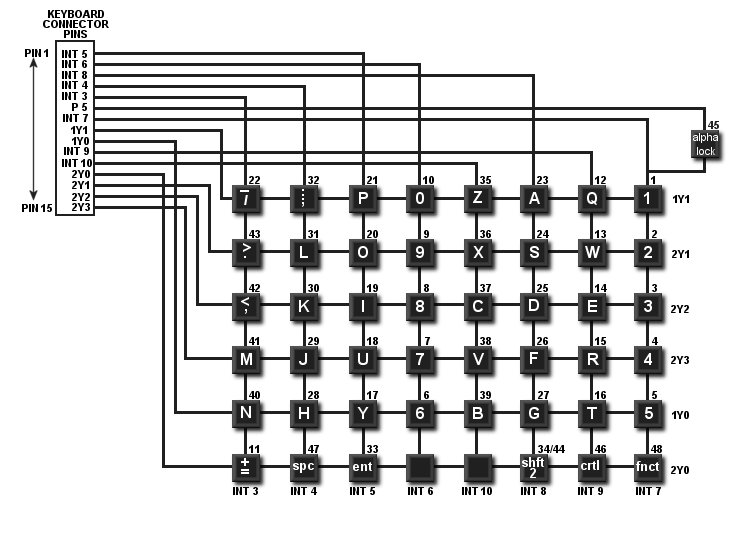
STEP 3: Understanding the Matrix
Before we get to the code, let's take a look at how this keyboard works. As you'll see in the diagram (found here), the keyboard is made up of 8 rows and 7 columns in the circuit. The connector pins are for the original chip, NOT the Teensy. Ignore the pin numbers shown in the diagram.
Notice on the diagram the columns and rows are attached to pins that are numbered 1 through 15 from top to bottom. We are doing the exact same thing, only from left to right. The reason we split the keyboard's connector wire into 2 groups, one with 8 connections and the other with 7 connections, is to mirror this column/row setup shown in the diagram. Half of the wires will be Outputs, the other half Inputs.
Here's the plain text version of the diagram. This appears in the header of the code for your reference:
#12 #13 #14 #15 #9 #8 #6
#5 = . , M N /
#4 spac L K J H ;
#1 entr O I U Y P
#2 9 8 7 6 0
#7 fctn 2 3 4 5 1 lock
#3 shft S D F G A
#10 ctrl W E R T Q
#11 X C V B Z
Watch the video for an explanation of how these circuits are used to detect a connection.
RaspTI Keyboard Matrix from matthew epler on Vimeo.
STEP 4: The Code
RaspTI Code Walkthrough from matthew epler on Vimeo.
If you haven't already, install the latest version of Arduino and the Teensy uploader (available at their website). When installing the Teensy loader, also install all the library options.
Then copy and paste the code at the link below into a new Arduino sketch. Save the sketch then upload it to the Teensy board.
https://github.com/matthewepler/raspTI_keyboard/bl...
Then watch the video for a walkthrough of the code.
STEP 5: It's Alive!!!!
RaspTI demo from matthew epler on Vimeo.
Here is a demo of the keyboard working.
Hope it worked for you. If not, just email me at the address on my site: http://mepler.com
10 Comments
ironsmiter 11 years ago
Do you NEED the extra eeprom programming space to make this work?
or is that simply what you had on hand?
I ask because that is the MOST expensive version of that board, and the
extra eeprom space is the only reason I can fathom for requiring that version for this project.
Since you're using rows and columns, all 3 teensy versions have plenty of I/O pins.
At first, I thought you might have gone with the 2++ and simply wired every key to it's own IO pin... but that's 48 mapped keys, and the 2++ only has 46 i/o pins.
mepler 11 years ago
For folks like me who aren't sure, what would you suggest as a better alternative?
Thanks!
Rabbleraus 3 years ago
mepler 3 years ago
Rabbleraus 3 years ago
Rabbleraus 3 years ago
GregW14 8 years ago
Hello! Thanks for the awesome how to! I am doing the same thing but with an Arduino Leonardo. I have corrected the pins and all is working but I am having an issue with the Bounce Lib and was hoping you had ran into this issue before and had a solution... When a key is pressed like "p" i get that key repeated about 50 times or so. I have updated the code to use Bounce2 but have also tried with Bounce1 with the same result. Any help would be great! Thanks again!
mepler 8 years ago
cbbassett 10 years ago
I bought a Teensy 2.0 ++ and wired up my 1989 Toshiba T3200SX Laptop keyboard to the breadboard just like you showed. But I am having one heck of a time trying to figure out some of the coding stuff. Can you please give me a copy of the code you used for yours so I can use it as a template. I would reallt appreciate it. I'm building an awesome desktop PC inside of an old fasion laptop and the keyboard it the last part.
If you can't post it here, can you please email it to me. It would help so much.
casey.b.bassett@gmail.com
THANK YOIU!
mepler 10 years ago
As a note, I got this to work fine on my Mac but when I plugged it into a Linux machine, it repeated keys endlessly and was not usable. Not sure why.