

Introduction: A Beginner's Guide to Canning at Home


This instructable is a lesson in my free Canning and Preserving Class. It's an all-in-one beginner's guide to canning at home. To enroll, click here!
Canning is the new kid on the food preserving block. It's been around for just over 200 years, but due to it's mass production capabilities and long shelf life potential, its become a mainstay in modern grocery store and kitchen culture.
Home canning is a process by which foods are placed in jars and heated to a temperature that destroys microorganisms and inactivates enzymes. This heating and later cooling also forms a vacuum seal which prevents other microorganisms from re-contaminating the food.
There are two popular home canning methods: Boiling Water Bath Canning & Pressure Canning.
Boiling water bath canning is the simplest (and least expensive) of the two methods. It requires very little specialized equipment and is a cinch to do. The only downside to this process is the fact that it can only be used to preserve high-acids foods (with a pH less than 4.6) like whole fruit, jams, spreads, preserves, jellies, and pickled vegetables. It is the acidity of each jar's contents - even more than the heat of this canning process - that safely preserves the food. Though both the heat and the acidity are imperative to the ultimate safety of the canned food.
Pressure Canning involves specialized and somewhat expensive equipment, but once you invest, it will allow you to can foods with low acidity (a pH more than 4.6) that need sterilization under high temperature (116-130 °C) - foods including meats, fish, poultry, vegetables, and all low acid foods. So it's less limiting food wise, but a more complicated process this is limiting pocket book wise. :)
There are pros and cons to both methods. I will only be covering boiling water bath canning in this class, as it's a great starting-off point to get familiar with the canning process and the steps that are necessary to ensure safe preservation. If you find you enjoy canning and want to move on to other foods, then investing in a good pressure canner will make sense. :)
Step 1: Why This Boiling Water Bath Method Works
This method keeps spoilers at bay using a combination of:
- Heat (from the boiling water bath) to kill microorganisms and slow down the enzymes.
- Acidity (from the food itself) to create a hostile environment for the spoilers.
- A vacuum seal that keeps new microorganisms from being able to get in and contaminate the food.
When done properly, this preservation technique gives high acid foods 3 fold protection against spoilage and keeps them edible for up to a year (officially) and sometimes even longer. I've read stories of canned goods being found aboard sunken ships from the late 1800's that when opened and tested by scientists have still been microorganism free!
Of course please don't keep your canned goods for that long before eating them (stick to 1-2 years), but know that when done right, this method for putting food by is very safe and effective.
A NOTE ON SAFETY
There are differing opinions out there on what is safe and what isn't when it comes to canning. Without any intention of insulting what might be your Grandma's way of doing things, please DO NOT do the following:
- Do not use your oven or dishwasher to sterilize your canning jars. Neither of these techniques are as effective as processing them in boiling water for 10-15 minutes. It's not worth the risk.
- Do not use a paraffin wax seal as a substitute to properly precessing your jars of food in a boiling water bath. Without the proper processing time in boiling water, there's no guarantee that the spoilers will be put in check. Also, it's impossible to test for a perfect seal using this technique. Just say no to this petroleum derivitive
Step 2: Botulism & Why It’s No Friend of Yours
A necessary safety announcement about a real, but easily avoided concern:
Clostridium botulinum is the bacterium spoiler that is responsible for botulism poisoning, a very serious and sometimes deadly illness. While the microorganism itself is killed at the temperature of boiling water, its spores are tougher and can survive the boiling water bath process. The other bummer about these small jerks is that they thrive in anaerobic (airless) environments. So a vacuum sealed jar of food that was only heated to the temperature of boiling water is the perfect place for them to grow and proliferate, creating the botulism toxin.
This is where the necessity for using only high acid foods for the boiling water bath canning process comes in. The spores cannot survive in high acid (low pH) environments. That is why is it is VERY IMPORTANT that you never try to can low acid foods using this process. As I mentioned earlier, low acid foods MUST be pressure canned, which can process jars at a much higher temperature than that of boiling water. Neither the bacteria or the spores of Clostridium botulinum can survive those higher temps.
Now for a sigh of relief:
All the recipes in this lesson use either high acid foods or properly acidulated (high acid liquids added) low acid ones and are perfectly safe. My intent isn't to put you off canning with this scary news flash (because safe boiling water bath canning is very easy to achieve), I just want to reiterate the important role that food acidity plays in canning safety.
- Boiling Water Bath Canning + high acid foods* = safe canning
- Pressure Canning + low acid foods = safe canning
*I will go into more detail later about how to identify high versus low acid foods.
Step 3: Altitude Chart & Formula

To satisfy the heat component of a safe canning process*, jars of food MUST be processed for each recipe's prescribed amount of time in BOILING water.
*The acidity of the ingredients and the vacuum seal created during processing are the other major players.
FUN SCIENCE FACT: Water boils at different temperatures depending on altitude. The higher the altitude, the lower the atmospheric pressure, which means water will boil at increasingly lower temperatures the higher the altitude.
Most people live within 0 - 1000 feet above sea level. Within that altitude range, water boils at 212°F / 100°C. Standard boiling water bath recipes will assume that you live within this range and that your water boils at 212°F.
If you live at a higher altitude, you MUST adjust your processing time to make up for your lower boiling temperature, to ensure that any microorganisms (spoilers) in the food will be eliminated.
The following chart will provide all the info you need to properly (and safely) adjust your boiling water bath processing times for higher altitude living.
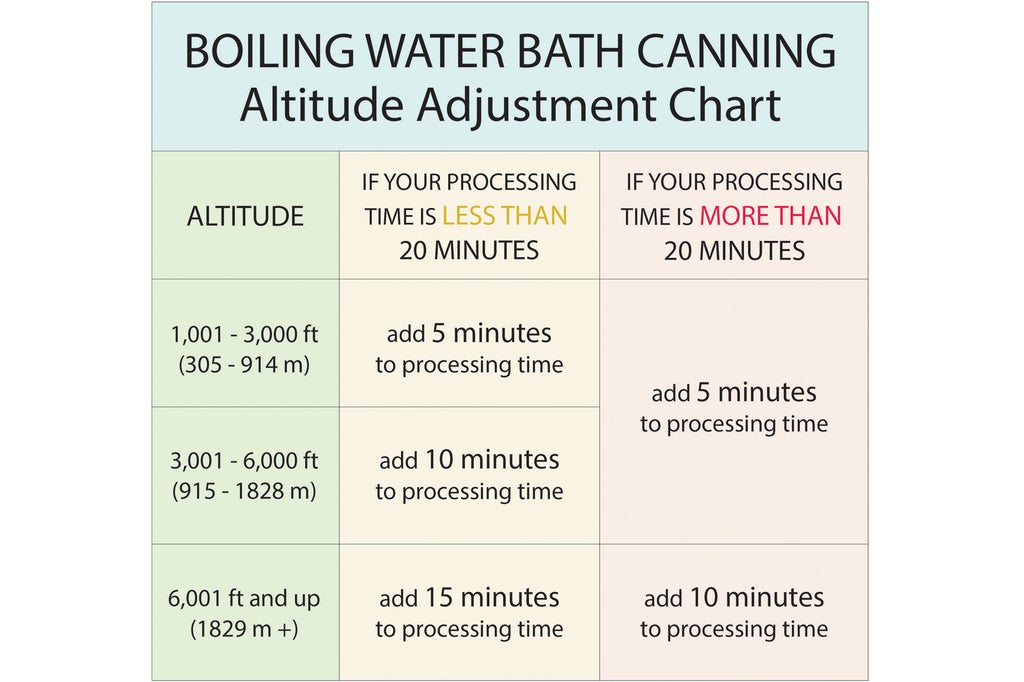
FOR EXAMPLE: The canned peaches we'll be making in this lesson call for a processing time of 20 minutes for pint jars. If you lived at an altitude of 3500 ft, your processing time would be 25 minutes.
If you have any trouble calculating your processing adjustment, just let me know and I'll be happy to help!
Step 4: Tools & Equipment
General Tools:
- Cutting board
- Paring knife
- Colander
- Shallow glass or ceramic bowl
- Measuring cup
- Slotted spoon
- Ladle
- Kitchen towels
- Large non-reactive pot (not aluminum or copper)
- Scale
- cheese cloth
- baker's string
chopstick or steak knife
Canning Specific Tools:
- canning pot w/ round jar rack
- 6 pint jars w/ rings and brand new lids
- 5 half pint jars w/ rings and brand new lids
- canning funnel
- lid lifter
- jar lifter
Step 5: What Foods Are Best (and Not at All) Suited to This Method of Canning

The only foods that are recommended to be canned using the boiling water bath method are those that are high in acid (food with a pH lower than 4.6):
- most whole fruits
- fruit-based jams, spreads, preserves and jellies
- tomatoes with added acidity
- certain vegetables that have been combined with high acid liquids like a vinegar brine for pickling
There are of course always exceptions to a rule, and in this case, that is when low acid foods like cucumbers and carrots are combined with high acid vinegar to create the low PH required for safe boiling water bath canning.
NOTE: The lower the PH the more acidic a food is. The higher, the more alkaline. There are PH test strips and even more precise digital testers that can help you determine the acidity of a food you want to can, but the following is a general rule to follow for what is, and isn't, appropriate to can with this technique.
Foods that you should NEVER BOILING WATER BATH CAN are:

- meats
- fish
- poultry
- lentils and beans
- non-pickled vegetables
- all low acid foods
It's the acid in high acid foods that works in conjunction with the boiling water bath canning temperatures to create a safe food product. The lower temperatures of WB canning as opposed to the higher processing temperatures of pressure canning, are not enough on their own to keep the spoilers at bay. The acid must be present for this technique to work safely.
Step 6: How to Can Using a Boiling Water Bath
Here's a bullet point run down of the boiling water bath canning process with a few notes and how to's added in.
Please try not to feel overwhelmed by this long list and just give it a quick read. Both of the recipes in this lesson illustrate the process clearly, but this can act as a quick reference guide if needed. (I've included a printable pdf of this list for even easier countertop reference.) :)
- Fill your canning pot with water, put it on the stove and set it to boil. It can take up to a ½ hour for that much water to heat up, so that's why I've made this the first step.
- Add a round rack to the pot.
- Wash the jars you'll be using well and submerge them in the canning pot water.
- If the recipe you're using calls for less than 10 minutes of processing time in the boiling water bath, you need to sterilize the jars. This is done by leaving the jars in the water once it's come to a full boil for at least 10 minutes. Once the 10 minutes are up, you can remove the jars and fill them with the recipe's food. I'll go over sterilizing the jars in more detail at the end of this list.
- Lay one kitchen towel next to the stove to place the hot filled jars on when they come out of the pot. Place another towel in an out-of-the-way spot where the jars can remain undisturbed for 12 hours post canning.
- Set out all your tools.
- shallow heat-proof bowl with the sealer lids spread out (unstacked) in it
- lid lifter
- jar lifter
- lid rings
- slotted or un-slotted spoon
- ladle (if necessary)
- wide mouth funnel
- chopstick or steak knife for removing air bubbles from the inside wall of the jars before lidding
- paper towels to wipe the jar rims before lidding
- Follow the recipe to create the food filling.
- Once the filling is ready, use the jar lifter to remove the jars from the hot or boiling water of the canning pot, emptying them before placing them on the kitchen towel you set out. Pour enough water from the last jar onto the lids in the shallow bowl to soften the sealing compound. (DO NOT BOIL THE LIDS!) Pour the rest of the water back into the canning pot and set the jar on the towel. NOTE: You should never boil the sealer lids. This could damage the sealing compound. Adding just boiled or simmered water is fine though.
- Place the canning funnel in the first jar and use the spoon or ladle to transfer the food into the jar. Keep the spoon as low as possible so that you don't introduce unnecessary air bubbles into the food. If you're adding whole fruit, pack it in tightly and leave 3/4" headspace. When adding the liquid that follows, fill it so that there is 1/2" headspace. (Headspace is from the top of the food to the rim of the jar.) If you're adding a preserve, jelly, or jam, leave 1/4" headspace.
- Run the chopstick or plastic knife around the inside of each jar to remove any large air bubbles. (Small ones are ok.)
- Use a damp paper towel to wipe the rims of the jars.
- Using the jar lifter, remove a sealer lid and place it on the jar so that it's centered and the sealing compound lines up with the rim.
- Add and gently hand-tighten the lid ring. Don't tighten it too much, as air needs to be able to escape the jar during processing in order to create the vacuum seal.
- Repeat for the remaining jars.
- Use the jar lifter to carefully place the jars into the canning pot so that they aren't touching each other or the sides of the pot. You want the water to cover the jars by 1-2 inches. If the pot has so much water that it's in danger of overflowing, remove some of the water. The 1-2 inches of water above the jars is necessary, but more than that isn't, as it would just have the potential to bubble over as it processes.
- Set your timer to the processing time suggested in the recipe (plus any additional minutes necessary if you live at an altitude above sea level. See the chart in the next step for how to calculate this.). Once the water returns to a boil, hit start.
- Once the jars have processed for the correct amount of time according to the recipe, use the jar lifter to carefully remove the jars, keeping them level, and set them on the 'out of the way' towel.
- After one hour, it's important to check to see if the lids sealed properly. There are two ways of doing this:
- Press down on the center of the lid with one finger. If there's no give in the lid, it is sealed. If it pops down and then back up again, it hasn't sealed.
- OR remove one of the lid rings and using the tips of your thumb and fingers, grab hold of the edges of the sealing lid and try to lift the jar a few inches off the table. If the lid is sealed properly, the jar will easily lift up by the lid. If it isn't, just the lid will lift off.
*Test each jar using either technique. Any jars that didn't seal properly must go immediately into the fridge and be eaten within 3-4 days.
- Let the jars set for 12 hours on their towel before moving them to the cupboard or pantry.
- Eat them within 1 year.

Step 7: Preparing Your Jars for Canning

Remember, cleanliness is one of the important names of the 'spoiler control' game, so taking the time to properly prep the jars is a necessity.
If the recipe you're using calls for a canning processing time of over 10 minutes, you do not need to sterilize your jars, but they must be clean. If the recipe you're using calls for has a canning processing time that's under 10 minutes, you must clean and sterilize the jars before filling them.
Before adding the hot food to the jars, you also need to heat them up by letting them sit filled with warm or hot water - and dumping out the water just prior to filling them. This prevents cracking due to heat shock from the hot food.
Ok, here's the prepping how-to:
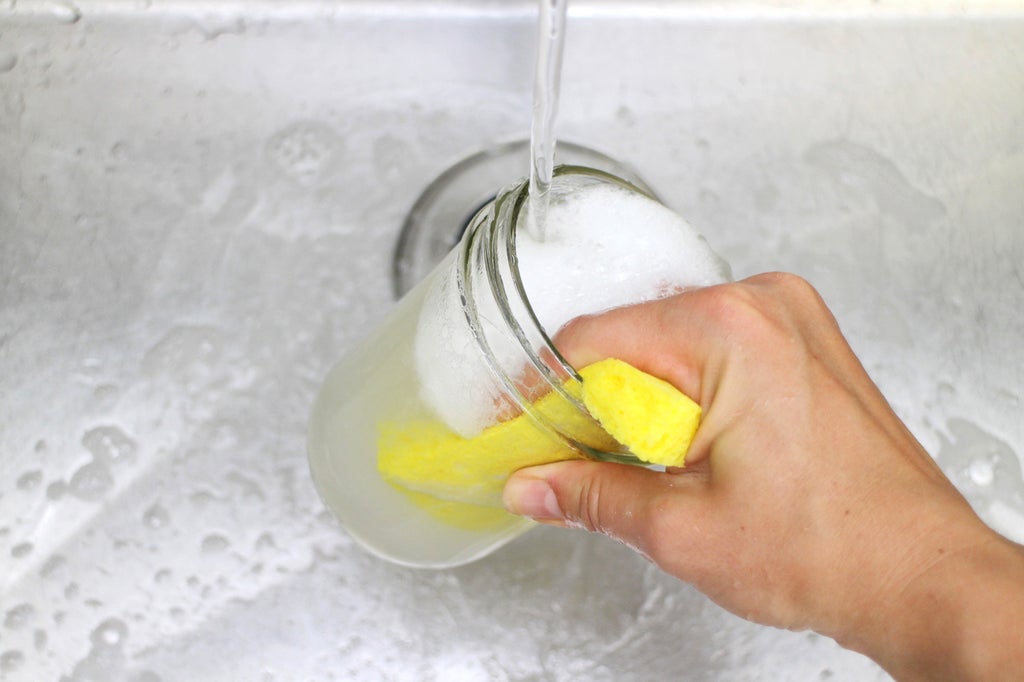
Wash all the jars and sealing lids you plan on using in warm soapy water with a clean cloth or sponge.

Set them on a clean towel, but do not towel dry them.

Fill the canning pot with water and submerge the jars (without lids) in the cool water. Turn on the burner and bring the water to a boil. If you don't need to sterilize your jars, follow all the below instructions but skip the 15 minutes boiling time.
To sterilize the jars: The water must be completely covering the jars. Once the water returns to a full roiling boil, set your timer for 15 minutes.

Once the timer goes off, use the jar lifter to remove the jars, still filled with water, and place them on a kitchen towel next to (but a safe distance from) the pot.

Use the water from the last jar to fill the shallow bowl that contains the sealer lids. The hot water will soften the sealing compound.

Refill that last jar with water and set it to join its friends.

Leave the jars filled with the warm water until just before you're ready to fill them with food.
And that's how to properly prep jars for canning!
Step 8: Whole Fruit Canning

Canned fruit is a pantry classic, and canned peaches are my favorite, so that is what I used to demonstrate this technique. If peaches are no longer in season in your area, you can apply the same steps to other fruits as well, like:
pears
plums
apricots
grapes
nectarines
pineapple
There are two ways to safely prepare the fruit to be canned: raw pack and hot pack. While raw packing (which means washing, slicing and packing the fruit without pre-heating it) is faster and a bit less work, it can result in more buoyant fruit pieces that will float to the surface of the canning liquid. This is know as 'fruit float'. The result is that some of the top layer of fruit pieces will stick above the liquid and turn brown. It does not spoil the fruit, it's just an unappetizing look. I prefer using the hot pack method, as it produces a better quality canned fruit (my opinion) and 'the float' is less likely to occur.
Step 9: How Much Fruit Per Jar?

For most of the fruits listed above, the ratio is:
1 1/4 lbs (567 gr) per pint jar (which was approx. 2 1/2 medium sized peaches for me)
2 1/2 lbs (1.13 kg) per quart jar
There are two exceptions:
Plums = 1 lb (454 gr) per pint jar / 2 lbs (1.13 kg) per quart jar
Pineapple = 1 1/2 lbs (680 gr) per pint jar / 3 lbs (1.36 kg) per quart jar
For this recipe, we'll be making 6 pints of canned peaches, which means we will need 7 1/2 lbs of peaches. (Approx. 12-15 peaches)
Step 10: How to Hot Pack Fruit for Canning

Ingredient List
- 7.5 lbs peaches (approx. 10-12)
- 3 cups white grape juice
- 3 cups water
Picking Your Fruit

As with all foods that you preserve, choose fruit that is blemish and bruise free, and if possible, at the peak of its growing season. Once canned, fully ripe peaches will taste best, but underripe peaches will have a better texture. So try to pick peaches that have a strong 'peach' smell at room temperature, but are still firm when squeezed. This applies to most other fruit, with the exception of pineapple which you want to be fully (but not overly) ripe.
NOTE: Try to never put peaches or any stone fruit in the fridge for an extended period of time. They will become mealy and lose some of their flavor which canning will not be able to restore. Whatever goes into the jars, is what will come out of them, quality wise.
Set Up Your Boiling Water Bath

Fill your deep canning pot with water, add your jar rack, and start heating it up. If it starts to boil before you're ready with the simmered peach slices we'll be prepping in the coming steps, just turn off the burner and turn it back on as you start to simmer the peaches.
Bring Another Large Pot of Water to Boil

Separate from the canning pot, bring a large pot of water to boil. We are going to use this to remove the skins of the peaches and then again for simmering them, which is the 'hot' part of hot packing.
Prep the Peaches for Simmering

Freestone Peach Halving

Clingstone Peach 'X'ing
If you're using freestone peaches (those that come away easily from the pit), use a paring knife to cut them in half and remove the pits. You can also remove the red flesh surrounding the pit now, or post blanching. If you're using clingstone peaches (those that refuse to be easily separated from their pits), use a paring knife to make an 'X' in the skin at one end of each peach (like pictured above).


Place the half or whole peaches into the non-canning pot of boiling water for 30 seconds. This makes the skins easier to remove as well as helping to keep the peaches from browning once sliced before we blanch them.
Remove with a slotted spoon. Immediately run the peaches under cold water for 30 seconds. This makes the skins even easier to remove.


Once the peaches are cool enough to handle, use a paring knife and your fingers to remove the skins from all the peaches. Once all the skins are removed, cut the peaches into slices. (Or leave them in halves if you prefer.) For clingstone peaches, it can be easier to cut the slices right off the pit.
OPTIONAL: You can use a small metal spoon or the paring knife to remove the red flesh that surrounded the pits. This isn't inedible, it just detracts from the classic canned peach look. Whether or not to do this step is totally up to you.
Step 11: Prep Your Canning Station

Next, lay out everything you'll need to pack and lid the jars in preparation for canning.
- large non-reactive pot
- canning pot with round jar rack half filled w/ boiling water
- 6 clean pint jars on a towel
- slotted spoon
- canning funnel
- shallow glass or ceramic bowl
- 6 lids and lid rings
- lid lifter
- jar lifter
- ladle
- chopstick or steak knife
Dump the water out of the simmering pot and wipe out any peach chunks that are lingering from the skin blanching we did in the last section. Set it back on the stove.
NOTE: Once the water in the canning pot is boiling, prep your canning jars. No need to sterilize them for this recipe since the processing time is over 10 minutes.
Step 12: Simmering the Peaches

Traditionally peaches are canned in sugar syrup, but since the added sugar isn't necessary for their safe canning, I prefer using a 50/50 mix of water and unsweetened fruit juice instead. White grape or filtered apple juice are both great choices.
Using only water is also an option, but I find it tends to leach some of the flavor out of the fruit, which is why I combine it with fruit juice. Likewise, it's also ok to use fruit juice with no added water. That's something you can play with over time to find your ultimate flavor ratio.


Add 3 cups of grape juice and 3 cups of water and bring it to a boil.


Once the juice mix is boiling, add in the peach slices and simmer them for 2 minutes.
Step 13: Loading & Lidding the Jars

While the peaches are simmering, dump the warm water out of the jars and put the funnel in the first jar.


Once the 2 minutes are up, use the slotted spoon to transfer the fruit to the jars, remembering to add the contents slow and low so you don't add any unnecessary air bubbles. Pack the fruit down with the back of a spoon as you go.

Leave 3/4" headspace for each jar.


Then use a ladle to fill the jars with the hot grape juice mix until there's ½" of headspace remaining.

Use the back of a spoon to push down on the peaches to force any large air bubbles to the surface. Then run a chopstick or steak knife around the inside walls of each jar, also to release any trapped air bubbles.

Use a damp paper towel to wipe off the jar rims and remove any food bits that could get in the way of a proper seal being created during canning.


Use the magnetic jar lifter to remove the lids from the shallow bowl and place them on the jars so that the sealing compound lines up with the jar rim (like pictured above).


Gently finger tighten the lid rings in place. (Don't tighten them too much, as air needs to be able to escape the jar during processing in order to create the vacuum seal.)
Step 14: Processing the Jars

Remove enough water from the canning pot so that the pot's only half filled. The filled and lidded jars will displace enough water to raise the water level back up where it needs to be for processing. If for some reason you need to add more water in order for it to be 1-2" above the jars, boil some in a kettle and add it from there.


Use the jar lifter to load the jars into the canning pot.

Once the water returns to a FULL BOIL, set your timer to 20 minutes for pint jars and 25 minutes for quart jars. Make sure 1-2" inches of water remain above the jars throughout processing. Add more from a boiled kettle if necessary.
IMPORTANT NOTE: If you live more than 1000 feet above sea level, please refer to the Altitude Adjustment Chart from earlier in this lesson for how to adjust your processing time.


Once the processing time is up, use the jar lifter to remove the jars while keeping them level, and place them on an 'out of the way' towel where the jars can hang out undisturbed to cool and set for 12 hours.

NOTE: Ideally, using the chopstick and the back of spoon, you will have removed most of the trapped air bubbles. But if there are still bubbles post processing, not to worry! It won't affect the safety, flavor, or texture of the canned fruit.


After one hour, perform one of the seal checks on each jar. Any jars that fail the test, put immediately into the fridge and eat within 3-4 days.

After the jars have cooled and set for 12 hours, label them with the canning date and move them to the cupboard, pantry or root cellar. Eat within 1 year.
Step 15: Raspberry Spread

This raspberry concoction is definitely more spread than jam, as I prefer my fruit stuffs to have a more natural texture than the firm gel-ness of traditional jam. So instead of a commercial pectin, I incorporate the naturally occurring pectin in tart green apples (granny smith) into the recipe. If you would prefer a classic jam with store bought pectin, follow this great instructable.
My Favorite Raspberry Spread Recipe:
This recipe makes about 5 half-pint jars of spread.
NOTE: I recommend wearing an apron for this one. The jam likes to sputter and jump as it boils!

- 1 lb (454 gr) of Granny Smith apples (approx. 4 small)
- 3 lbs (1.36 kg) raspberries (approx. 10 cups)
- 2 cups sugar
- 3 tbsp fresh or bottled lemon juice
Measure out your 3 lbs of raspberries, wash them and let them drain and air dry while you prep the other ingredients.

Now we are going to prep our pectin provider in this recipe: the Granny Smith apples.

Quarter and core the apples.

Put a bit of lemon juice on the apple slices as you work so they don't brown.

Put all the cores in the center of 2-3 layers of cheesecloth.

And tie up the bundle with baker's twine.
Note: You don't have to use such big pieces of cheesecloth like I did. I just didn't want to cut mine down.

Put the raspberries in a bowl and mix in the sugar with a spoon. This will give the sugar time to macerate the berries, bringing out their natural juices in prep for being simmered.

Pick your canning pot and jars. I chose to use my slightly smaller canning pot this time which meant that I could only fit 4 half-pint jars and (x1) 4oz jar. That means I'll have some left over spread for immediate use. Oh darn. :)

Set up your canning station and sterilize your jars. (This recipe only processes for 5 minutes, which means we MUST sterilize the jars.)

Put your jars into the water BEFORE turning on the heat, so they heat up along with the water (which will prevent cracking). Make sure the jars are completely covered by a full boil and set your timer for 10-15 minutes.


Once the timer goes off, use a ladle or jar to transfer some just boiled water to the shallow bowl holding the sealer lids.

Let them hang out in the water until it's time to put them on the filled jars.

Reorganize your work station to accommodate the large simmering pot. Add the raspberries and sugar to the pot and turn the burner on medium heat.

Bring it to a simmer, stirring frequently. The heat will start to release even more liquid from the berries, creating a raspberry 'soup'.

Add in the apples and the muslin bag of cores, along with the lemon juice.

Bring to a roiling boil over high heat, stirring very frequently.

WARNING: The boiling jam will sputter and bubble and occasionally jump out of the pot. It doesn't hurt to stir with an oven mitt on your hand to protect your skin from the molten berry lava.
The Gel Point Spoon Test

You will keep the berries at a boil until it passes a gel test. There are two commonly used ways to see if your jam is ready to be jarred.
The spoon method is simple: After about 12 minutes of boiling the mixture, dip a non-reactive spoon (no aluminum or copper) into the pot and lift up a small amount of mix on the spoon. Turn the spoon sideways and watch how the spread falls off the spoon. One drip means it isn't at all ready yet (Stage 1: left image). Two distinct drips means that it is starting to gel (Stage 2: middle image). When it's reached the ideal gel stage for filling the jars, the mix will fall of the spoon in a cascade or sheet with no distinct drips (Stage 3: right image).
Another way is to put a small plate into the freezer before you start making. Drop a small dab of spread onto the frozen plate, return it to the freezer for 1 minute and then pull it out again to see if the spread is firm. Repeat this process until firmness is achieved.
I prefer to use the spoon method simply because it's inconvenient to go back and forth to the freezer when you have an erupting berry volcano on the stove. :)

Once the gel test has informed you that the berry mix is ready to go in the jars, remove the muslin bag of cores and use a spoon to fish out as many of the apple slice remnants as possible. (These are great added to a batch of applesauce to be eaten the same day.)

Empty the warm water out of the jars and use the funnel and ladle to fill the jars, leaving 1/4" headspace.

Like so!

Use a wet paper towel to clean the jar rims.

Add the lids and lid rings to the jars, lightly finger tightening the rings.

Use the jar lifter to put the jars into the canning pot of boiling water.

Boiling Water Bath process the jars of spread for 5 minutes. Then remove and let sit in an out of the way place on a towel for 12 hours before moving the jars to the pantry. (Don't forget to check the seals at the 1 hour mark and add labels!)
IMPORTANT NOTE: If you live more than 1000 feet above sea level, please refer to the Altitude Adjustment Chart from earlier in this lesson for how to adjust your processing time.

Then the only thing left to do is enjoy the fruits of your labor! (Sorry, I couldn't resist!) :)
NOTE: The yummy looking bread in the above photo was made by audreyobscura for her Bread making class! If you've always wanted to know how to bake your own delicious loaves, I highly recommend taking it!
Step 16: Storage Tips

Once your precious jars of preserved yumminess have cooled and sat in place for 12 hours, move them to a dark, cool cupboard, pantry, or root cellar. There they will keep for up to 1 year, but once opened, must be kept in the fridge.
Step 17: To the Pantry and Beyond...
How did it go? Do you have any questions? Photos of your freshly canned goods? Please share both in the comments section below.
If you would like to learn more ways to preserve food, check out the following topics by visiting my Instructables class on Canning & Preserving, the original home of this boiling water bath canning instructable:
Vinegar Pickling (Think Dilly Carrots and Pickles.)
Lacto-Fermentation (We're talking sauerkraut and gut healthy veggies.)
Freezing (There's more to it than you'd think!)
Drying & Dehydrating (Learn my trick for making uniformly thick fruit leather and make faux 'sun' dried tomatoes!)
Happy Making!
Paige


