

Introduction: ABS PASTE MOLDING


When you're printing lots of ABS supports, rafts, brim etc go to waste without being able to reuse them. This instructable shows how to easily turn ABS waste in molded objects, without just throwing it away and litter the planet even more. This instructable can be used by professionals, as well as amateurs users, cause it's quite easy and all the consumables are easy to find.
Step 1: BRIEFING

So, what you first need to do is to collect in a box all your wasted ABS prints. Secondly, you could (or not) categorize them by color. Thirdly, you need enough ACETONE to create the ABS paste. Last but not least, get acquainted with the casting/molding procedures, which you could easily learn through the instuctables lessons.
Step 2: PASTE PREPARATION


Now let's take it step by step, if you have (or not) grouped your ABS waist, you need to cut it down in small pieces. Then you should put them in a glass jar (the bigger the better), with an air tight cap if possible, otherwise you could just use duct tape to ensure that. In our paradigm we used a small one (100ml), because of it's opening, which helped us pour it easily in the mold. This actually depends on your mold model, but we'll get back to it later. Now, put the trimmings in the vase and fill it with ACETON until the trimmings are covered. Then close the vase as tight as you can. The time needed to melt the mixture down to a homogenous paste and the analogy of trimmings/ACETON differs depending on the brand and quality of the ABS you're using. In our case it took 24 hours for the mixture to melt down. Keep in mind that the preferred thickness of the paste is to be like honey.
Step 3: 3D MODELING & 3D PRINTING


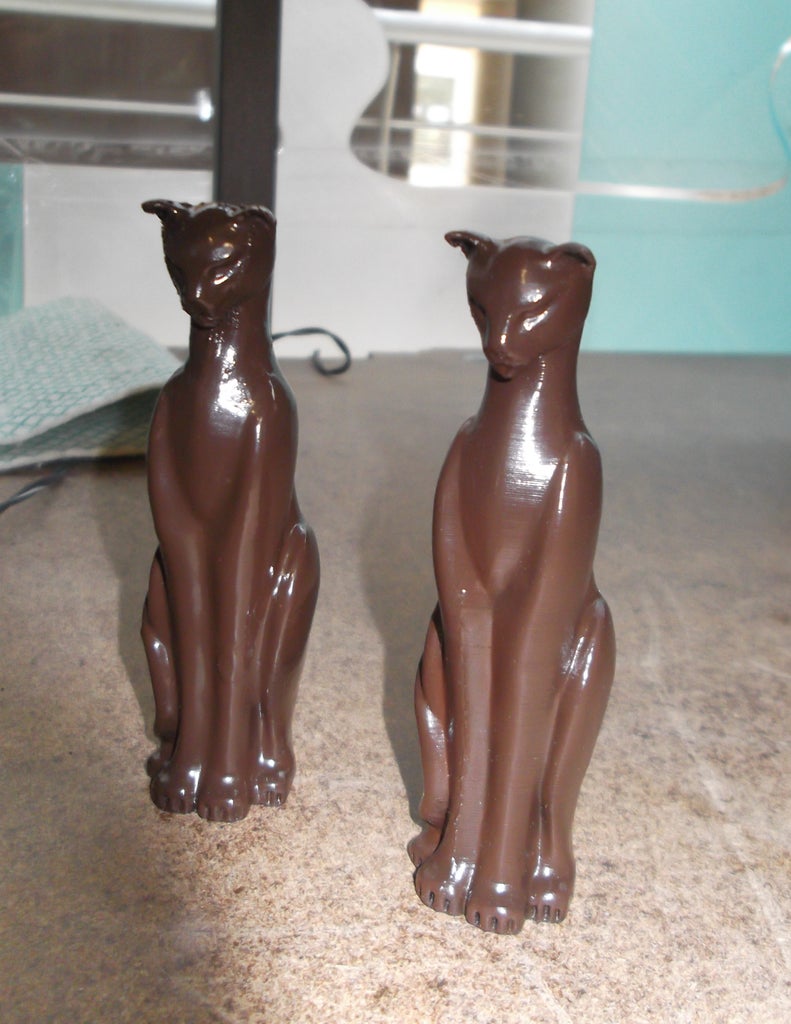
While the trimmings turn into paste in ACETON, prepare your mold's model. What you need is to find or design a model, that prevents the mold from accumulation air blobs and to get easily filled in with paste. In a way designs that approach the geometry of a pyramid (or triangle) are easily turned in to molds for such use. So, in our paradigm we chose this cat, that had 2 "difficult" parts. The first one is the chin and the other on the ears, but we'll tell you more about how we solve that later. And now you need to print your mold, and since flex filaments don't get dissolved by ACETON, you need to use a flex material that has the appropriate elasticity for the mold, so that you can take off your model and also create a water tight mold, with no internal overhangs or stringing, so that you can get a clear model. In our paradigm, we used TPE printed in it's lowest temperature and the fastest speed (that is actually depended on the brand of your filament and your printer). Also we used 3 bottom and top layers, 2 peripheries and 15% infill and 0.15mm resolution to achieve all the necessary characteristics mentioned before. If you use a more elastic flex filament you might need to increase the infill and/or the peripheries and top/bottom layers (these factors depend of your filament, printer and mold model). You may need to make 2-3 prints until you find to the right mold for you.
One thing we added to our mold, is what we called a "seam cut". That is actually a vertical "guide" to help you cut open your mold, like a zipper, which helps very much in taking off the molded object. This can prevent the object from breaking or cracking while taking it out of the mold, especially when the objects have difficult geometries.
In the cat's mold was the first time we used this guide and we were very excited with the object's quality and the mold's ease of use. Also, we added two "air ducts" in the ears in order to ensure that all the air comes out of the mold. This also appeared to be very helpful and a great impact to the quality of the model.
Attachments

Step 4: MOLDING


So now, that you have your mold and paste you are ready to go! For the third step you need to secure your "seam cut" with some strong duct tape and start pouring your paste. Our advice is to pour it in steps, depending on the mold's architecture... So in our case we poured paste in 3 steps, each time slightly tapping the mold so that the air bubbles come up and escape the mold. We also turn the mold a bit, so that the paste sticks on the mold's walls in the difficult parts, creating a cylindrical skin that gets filled with paste afterwards. This helps to ensure that you get a good model in the end of the procedure. This was the second very important solution that we followed to fill the difficult parts of our mold. We waited 12 hours for each part to harden, and for the last part, we left the mold for 3 days to harden as much as possible!
And now it's time to reveal the molded model. We can take off the duct tape, open the "seam cut" and start taking off the mold, carefully if you have small parts that stick out, like, in our case, the ears of the cat. Don't worry if some of the layers from the 3d printed mold are visible on the model. This means that the paste sticks very well on the walls otherwise you will see bubbles, cracks etc. As the whole procedure worked well in the first trial, we repeated the process more carefully, taking an almost perfect outcome this time!
You can experiment with different thicknesses, depending on the mold design (less thick means you let the air escape easier) and also with PLA paste, as ACETONE also dissolves PLA, but theoretically ABS works better. Lastly, you should always have in mind that, as your paste hardens, by evaporating it's acetone, you volume might decrease. That also depends on how thick you've made your paste and that is why this technique needs to be done in parts, as it prevents from leaving hollow, empty spaces and gaps.
Step 5: THE FINAL MODEL


In the end of this instructable, we'd like to add that, another great procedure that you could add to this technique, that really helps a lot, is putting the mold with the paste in an air vacuum, so that you are 100% sure that you have no air in your mold. In this case, you should fill all your mold with less thick paste than we use in this paradigm, vacuum it, refill it if needed, vacuum it again and leave it to dry again for at least 2 days. This should be enough in this case. If not simply repeat the refill-revacuum procedure.
Also, you could fix your model with all the known post processing and painting 3d printing techniques, lots of which you can find in various Instructables.
Thanks a lot for your time. We hope that you'll come up with some beautiful designs with even more details, that can help all the community. We'll be waiting on that and your feedback!!!!

Participated in the
Trash to Treasure


