

Introduction: Adding IP to Vivado
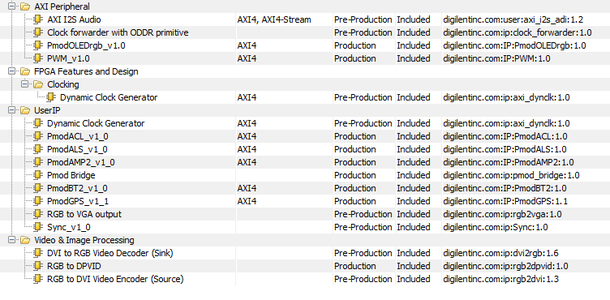


Vivado is a great tool for FPGA development. There are some cases when the built in IP fails to suit your needs. Luckily you can add custom IP cores into Vivado in a few short steps. For this Instructable I am going to use the Digilent IP repository as an example for adding IP cores to Vivado.
It is assumed that you already have Vivado installed on your computer.
Step 1: Get the Repository

The repository is hosted on Github so there are two options for retrieving the files.
- Download a ZIP folder
- Clone with Git
For both methods, go to the repository page (here) and select the Clone or Download button. This will bring up a box with several options. If you want the ZIP folder click Download ZIP. Extract the ZIP file to a place it won't be deleted. I'll assume that if you want to clone the repository that you know how to do so in either the command line or your favorite Git GUI
Step 2: Adding for All New Projects

- Open Vivado
- Navigate to Tools->Options
- Go to the General Tab on the right
- Scroll down to the section titled IP Catalog
- Click the green plus sign to add a search path
- Locate the folder you extracted. It should contain an ip and if folders
- Click OK in both windows that opened to return to the main window of Vivado
Step 3: Adding for Current Projects


- Open the project that you wish to add the IP core to
- Open the project's Project Settings dialog
- Go to the IP tab on the right
- Open the Repository Manager tab from the top of the dialog
- Click the green plus sign
- Find the extracted folder containing the ip and if folders
- Click OK until returning to the main Vivado Window

Participated in the
Makerspace Contest


![Tim's Mechanical Spider Leg [LU9685-20CU]](https://content.instructables.com/FFB/5R4I/LVKZ6G6R/FFB5R4ILVKZ6G6R.png?auto=webp&crop=1.2%3A1&frame=1&width=306)


