

Introduction: Any Color Under the Sun in an Altoids (R) Container


Using 2 AA batteries, potentiometers, some wire and 3 LED's from an old battery powered glitter lamp (instead of Wax in Oil it's Glitter in water which reflects the light) I made one of those awesome mood lights that allow you to make any color you want. PLEASE VOTE FOR ME IN THE EPILOG AND THE US OF EFFIECIENCY CONTESTS!!!!!
Step 1: Materials


2AA Batteries
2AA battery Holder (any kind should work, the smaller the better)
3 trimmers/potentiometers, they are the little blue things with 3 leads, and the brass screw on the end)
1SPST switch (optional, it's for the main power switch
Casing (I used an altoids container)
Small piece of milk jug (or some other type of light diffuser)
Drill (I used a drill press, but only to cut holes)
Epoxy (Hot glue works but not as well
Cardboard (so the potentiometers don't have to sit on the bottom of the altoids case)
Fine screwdriver (for adjusting the lights, not needed if you have a potentiometer with a knob)
1 Ft of wire (yes it really takes that much, if not more)
Breadboard (Highly suggested)
Step 2: Take Out LEDs

I popped the top of the glitter lamp off with some force revealing the tiny circuit board and the somehow nonexistant microcontroller (somehow it ran off of a cyclic circuit) and I put the soldering iron on the ends of each LEDs and pushed it out with the iron, it should pop out and then do that for the other three. Then wire them up by soldering on wires for leads, my red LED actually didn't work so I used a cheap Radioshack one, it works fine now.
Step 3: The Circuit

The basic circuit is on this website http://www.allaboutcircuits.com/vol_6/chpt_3/6.html it also has a quick circuit using pencil lead which kind of explains how they work basically you can wire all of the negative terminals together and all of the positives, then the negatives to the LEDs to the negative from the battery, then the positive of the led goes on a different wiper for each. if you want to insert the power switch do it between the battery and the potentiometers, it will work on either the positive or negative lead. I tested mine out on a breadboard, and then used the fine screwdriver to tune them, it was actually weird, one of my potentiometers increased going clockwise and the other two counter clockwise, but they are 15 turns so keep twisting until you reach the end and if it still doesn't light up check the polarities again.
Step 4: Cram It in the Case

Obviously you need to solder it first, but I glued the SPST switch to the side of the altoids case, then I epoxied the trimmers to cardboard that I glued to the bottom of the case, I then soldered everything and then had to cram it into that tiny case with the battery case being so big, then I glued the LED's to the lid and milk jug material over the light hole, and then aluminum foil over the LED's to reflect it out of the hole.
Step 5: Enjoy It!


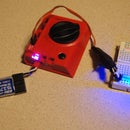
It should be done, and now you can tune the trimmers with the screwdriver, to turn them all of switch off the SPST switch, and here's a quick list of simple colors (Theoretically these are the colors which would result)
Blue+Green=Bluegreen
Red+Green=Yellow/orange
Blue+Red= Purple/Pink
Blue+Red+Green= White (has to be just right)
pictures of some of the colors I've made are below
Participated in the
Epilog Challenge

![Tim's Mechanical Spider Leg [LU9685-20CU]](https://content.instructables.com/FFB/5R4I/LVKZ6G6R/FFB5R4ILVKZ6G6R.png?auto=webp&crop=1.2%3A1&frame=1&width=306)


