

Introduction: Arduino Bluetooth Tank With Custom Android Application (V1.0)


Hello! this is a guide for how to build a simple and cheap Arduino based Bluetooth tank. This is the first stage of this project and only involves the development of a moving tank track based vehicle. The second stage is the Android Application that will be used to control the tank. I intend to build on this project in the future by adding either a controllable turret or a robotic claw! So follow if you want to see future updates! :D
so what you will need to start this project is:
9V Battery Button Clip to 1mm DC Power Plug ~ £2.60
9V Battery (Rechargeable is a good idea) ~ £6.00
L293D Motor Driver Shield Arduino Expansion Board ~ £2.89
Tamiya 70168 Double Gearbox Kit ~ £7.00
Tamiya Tracked Vehicle Chassis ~ £13.00
Arduino HC-06 Bluetooth Transceiver Module 4-Pin serial ~ £6.99
Arduino Uno R3 (Other Uno versions or the duemilanove should be fine) ~ £3.50 - £10.00
This entire project should cost around £42 (Sorry for the UK links at some point i'll add US & CA ones as well)
This is my first Instrucatbles guide so apologies if anything is unclear, please feel free to message me or email me directly at js702@kent.ac.uk
Step 1: Chassis Construction


So the first step of this project is to construct the Tamiya Tracked Vehicle Chassis.
Once the chassis has been constructed instead of installing the single motor gear box you then want to install the Tamiya 70168 Double Gearbox Kit
I apologise that i do not have any images of me constructing the chassis, i advice you follow the instructions included with both of these kits especially with the gear box ones. I constructed my gear box with a gearing ratio of 38.2:1 you can chose another if you wish.
Alternatively you could build your own chassis or use another one as long as it has two separate DC motors the rest of the project onwards should still be applicable!
Step 2: Circuit Design


The Circuit diagram for this project can be seen above, its extremely simple.
First you want to solder wires to each of the motors in the gear box.
You then want to connect one motor to the M1 connections on the L293D Shield then the second motor to the M2 connections. Don't worry about which one goes to which right now you will be able to flip the variable names in the Arduino code later if your tanks motors are connected in reverse.
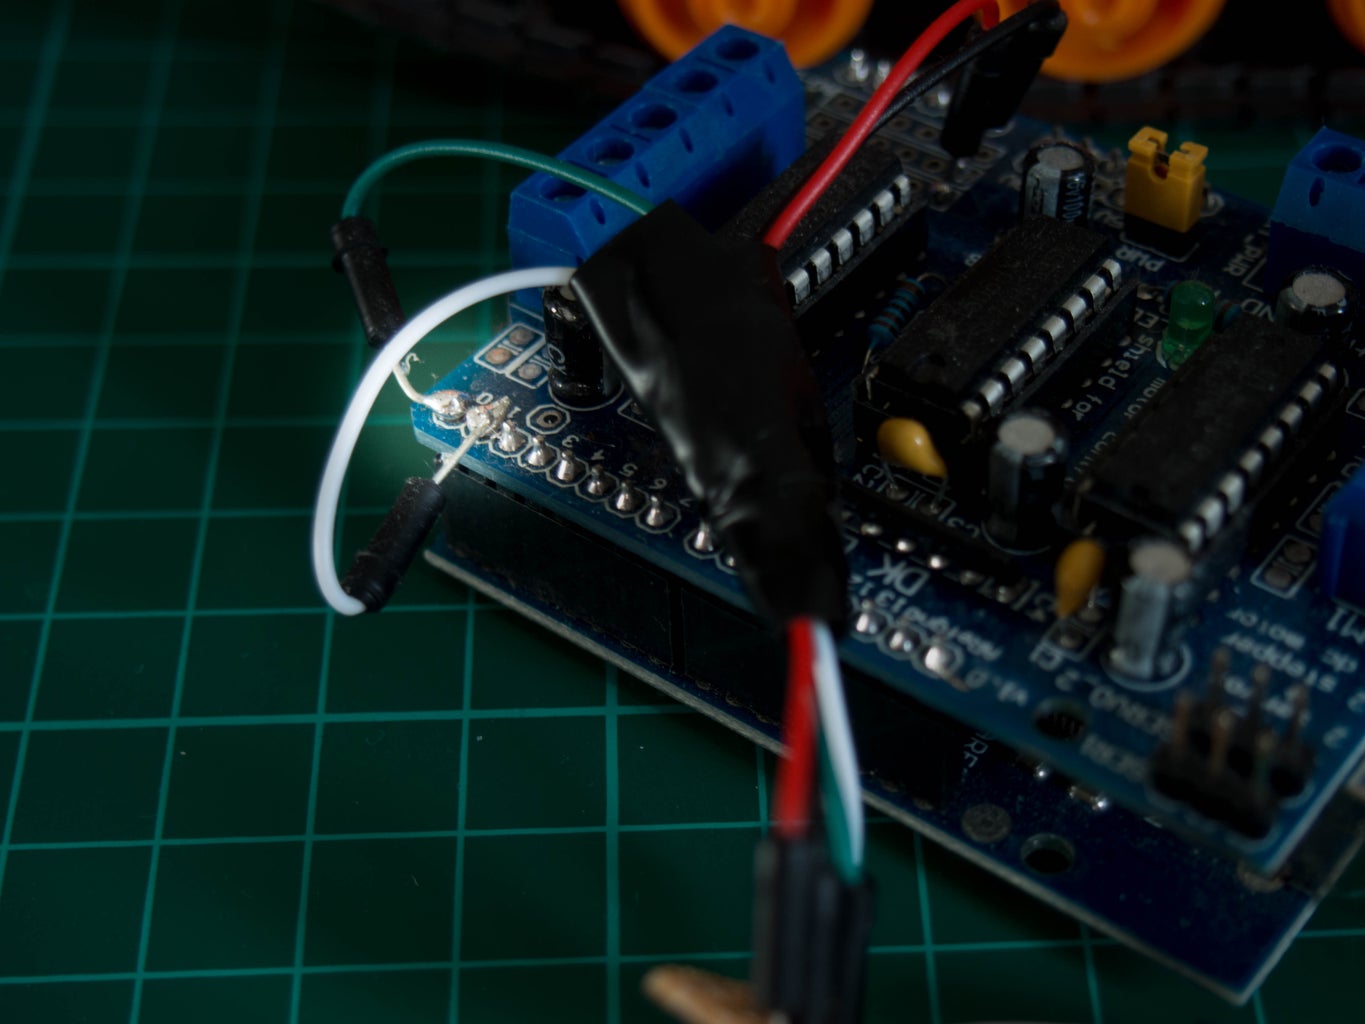
Now that the motors are connected you want to attach the HC-06 Bluetooth Module. As the L293D Shield i chose did not have a pass through for the Rx & Tx connections on the Arduino i had to resort to soldering directly to the header pins as shown in the images above.
You want to connect the Rx of the Bluetooth module to the Tx of the Arduino and the Tx of the Bluetooth module to the Rx of the Arduino.
I wanted to be able to quickly detach and reattach my HC-06 Module so that i could use it in other projects as well so i used some female header pins soldered to some spare Proto-board i had laying around.
Now you want to connect your 9V battery to your DC connection. Optionally you can cut the positive wire and solder an On/Off switch in. Make sure you do this with the positive wire not the neutral, it is good practise to always have switches attached to circuits on the high connection.
Step 3: Finalising Hardware


Now that you have the circuit and chassis assembled its time to put it together.
As i intend to build upon this project and i want to keep the costs down i decided to use some cardboard for mounting and holding the Arduino in place.
I first measured the size of card that i would need to lift the Arduino above the tank tracks, i then cut it out and secured it using electrical tape. This can be seen in the images above.
I then used some sticky Velco tape for holding my Arduino board in place.
To ensure that the Bluetooth module and power cable do not short with the Arduino or Motor Shield i then cut out another small piece of card as a separator seen in the images above.
All of the hardware for this project has now been completed!
Step 4: Arduino Code

The code that was uploaded to the Arduino can be seen bellow. It requires you to install the AFMotor.h Library, this will allow you to use the Motor Shield properly.
In case you do not know how to install Arduino Libraries click here for a quick tutorial.
The way the the program currently works is by setting up the serial communication through the Bluetooth Module. The Arduino monitors the Rx pin to check for changes in state. Once the Bluetooth Module has been sent data from a connected Bluetooth device. If the Arduino recognised the received data as an instruction for motor control it will enter the corresponding part of the if statement I.E if Rx receives "0" the tank will enter the forward motor state until told otherwise. The system flow diagram above roughly shows how this code functions.
Once you have uploaded this code to the Arduino, you can keep the USB-B connection attached and open the Serial-Monitor, you can type 0 - 9 into the command line to test each of the motor states to make sure everythings working as intended.
#include <AFMotor.h>

AF_DCMotor motor2(2, MOTOR12_64KHZ); // create motor #2, 64KHz pwm
AF_DCMotor motor1(1, MOTOR12_64KHZ);
int state = 0;

void setup() <br>{
  Serial.begin(9600);           // set up Serial library at 9600 bps
  Serial.println("Welcome: Forward = 1 Left = 2 Right = 3 Backwards = 4 Stop = 0");
  motor2.setSpeed(200);     // set the speed to 200
  motor1.setSpeed(200);     // set the speed to 200
}

void loop(){   //if some data is sent, read it and save it in the state variable

if(Serial.available() > 0)
  {
    state = Serial.read();
    Serial.print("I received: ");
    Serial.println(state);
    delay(10);</p>
if (state == '0')
    {
      motor2.setSpeed(200);     // set the speed to 200/255
      motor1.setSpeed(200);     // set the speed to 200/255
      motor2.run(RELEASE);      // turn it on going forward
      motor1.run(RELEASE);      // turn it on going forward
      Serial.println("Stopped");
      delay(100);
      state = 0;
    }
else if (state == '1')      // If 1 Forwards
    {
      motor2.run(RELEASE);      // turn it on going forward
      motor1.run(RELEASE);      // turn it on going forward
      motor2.setSpeed(200);     // set the speed to 200
      motor1.setSpeed(200);     // set the speed to 200
      motor2.run(FORWARD);      // turn it on going forward
      motor1.run(FORWARD);      // turn it on going forward
      Serial.println("Forward");
      delay(100);
      state = 0;
    }
else if (state == '2')      // If 2 Turn Left
    {
      motor2.run(RELEASE);      // turn it on going forward
      motor1.run(RELEASE);      // turn it on going forward
      motor1.setSpeed(255);     // set the speed to 200/255
      motor1.run(FORWARD);
      //motor2.run(BACKWARD);
      Serial.println("Left");
      delay(100);
      state = 0;
    }
else if (state == '3') {    // If 3 Turn Right
      motor2.run(RELEASE);      // turn it on going forward
      motor1.run(RELEASE);      // turn it on going forward
      motor2.setSpeed(255);     // set the speed to 255
      motor2.run(FORWARD);
      //motor1.run(BACKWARD);
      Serial.println("Right");
      delay(100);
      state = 0;
    }
else if (state == '4')       // If 4 Backwards
    {
      motor2.run(RELEASE);      // turn it on going forward
      motor1.run(RELEASE);      // turn it on going forward
      motor2.setSpeed(200);      // set the speed to 200
      motor1.setSpeed(200);      // set the speed to 200
      motor2.run(BACKWARD);      // Motor 2 backwards
      motor1.run(BACKWARD);      // Motor 1 backwards
      Serial.println("Backward");
      delay(100);
      state = 0;
    }
else if (state == '5')
    {
      motor2.run(RELEASE);      // turn it on going release
      motor1.run(RELEASE);      // turn it on going release
      motor2.setSpeed(255);     // set the speed to 255
      motor1.setSpeed(140);     // set the speed to 140
      motor2.run(FORWARD);      // Motor 2 forward
      motor1.run(FORWARD);      // Motor 1 forward
      Serial.println("Forward Right");
      delay(100);
      state = 0;
     }
else if (state == '6')
    {
      motor2.run(RELEASE);      // turn it on going release
      motor1.run(RELEASE);      // turn it on going release
      motor1.setSpeed(255);     // set the speed to 255
      motor2.setSpeed(140);     // set the speed to 140
      motor2.run(FORWARD);      // Motor 2 forward
      motor1.run(FORWARD);      // Motor 1 forward
      Serial.println("Forward Left");
      delay(100);
      state = 0;
     }
else if (state == '7')       // If 4 Backwards
    {
      motor2.run(RELEASE);      // turn it on going forward
      motor1.run(RELEASE);      // turn it on going forward
      motor1.setSpeed(255);     // set the speed to 255
      motor2.setSpeed(140);     // set the speed to 140
      motor2.run(BACKWARD);      // Motor 2 backwards
      motor1.run(BACKWARD);      // Motor 1 backwards
      Serial.println("Backward Right");
      delay(100);
      state = 0;
    }
else if (state == '8')       // If 4 Backwards
    {
      motor2.run(RELEASE);      // turn it on going forward
      motor1.run(RELEASE);      // turn it on going forward
      motor2.setSpeed(255);     // set the speed to 255
      motor1.setSpeed(140);     // set the speed to 140
      motor2.run(BACKWARD);      // Motor 2 backwards
      motor1.run(BACKWARD);      // Motor 1 backwards
      Serial.println("Backward Left");
      delay(100);
      state = 0;
    }
else if (state >= '9')
    {
      Serial.println("Invalid");
      delay(100);
      state = 0;
    }
  }
}
<br>
Attachments

Step 5: Android Application


So now that you hopefully have your working Bluetooth Tank its time to work out how to control it.
On the Google Play store there are many options for Bluetooth serial communication applications that would be capable of controlling your tank such as BlueTerm or ArduDroid and many more.
If you wish to download my application that currently offers 8 directional controls you can download it from the Play Store here: Bluetooth Arduino Tank
How i created this application was through App Inventor 2, which is a really awesome way for you to quickly develop Android Applications.
The images above how both the "Designer" & "Block" view of my application so you can build and change thing up if you wish!
If you have never used App Inventor 2 before heres a link to some helpful tutorials to get you started: App Inventor Tutorials
Once you have the application installed there are a few steps before it will work. The images above show all the steps needed to get the Bluetooth Arduino Tank application working. Make sure that the Arduino is powered on before attempting this!
- Go to setting
- Click on the Bluetooth Tab
- Turn Bluetooth on
- Wait for your phone to find the HC-06 Bluetooth module
- Once it has been found click it and input the password by default it should be either "1234" or "1111"
- Now it should say the time that you were last paired with the HC-06 module
- Now enter the Bluetooth Arduino Tank Application and click the "Pick Bluetooth Module" button
- You should see the HC-06 Module (If not re-try the steps above) click on the Module
- The Application will then return automatically to the main screen with directional controls and now under the "Pick Bluetooth Module" Button it should now say "connected"
- At this point the HC-06 Modules Red LED should now be constantly on instead of pulsing meaning a device is currently connected
Step 6: Project Conclusion

So at this point you should have a cool, simple and cheap Bluetooth controlled tank, that you can now use as a starting point for more development.
The Motor shield i selected allows another 2 Motors and 2 Servos to be added, as i mentioned in the Intro i intend to update this guide with any developments i make on this build (Maybe a turret or grabbing claw).
If any of you guys decide to add on to this i'd love to see how it worked out for you!
If you had any issues or questions about this project please feel free to ask, i will do my best to help you!
Thanks for reading!
I have a few ideas for other future projects so i hope you hear from me again soon!

Second Prize in the
Robotics Contest 2016

Participated in the
Make it Move Contest 2016

Participated in the
First Time Author Contest 2016


