

Introduction: Atreyu Riding Falcor From the Neverending Story!

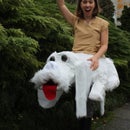

Nothing says Halloween like costumes from cheesy 80s childrens movies! This build took some patience and a lot of spray glue (I pulled a muscle in my forearm from all the spraying!) but Falcor rides again!
Materials for Falcor:
Wire fencing
Wire cutters
Duct Tape
Newspaper/paper bags
1 yard of white fleece
2 yards of white fur
2 Styrofoam balls
Black and Brown Acrylic paint
Red/tan felt
Suspenders
Materials for Atreyu:
Suade shirt
Sissors
Step 1: Creating Falcor's "Skeleton"


-Use garden fencing to create Falcor's Skeleton. First, cut enough fencing to create a cylinder which will become Falcor's body. Make sure it is a bit wider than your hips. When you cut the wire leave enough stay wire so you can wrap the ends to the structure to connect the pieces.
-Cut a hole in the top and bottom of the cylinder. This is where you will be stepping into the body. It should be easy to pull up onto your hips but still snug.
Step 2: Adding Falcor's Legs


-Create a cylinder with apprximatley a 4inch diameter with the wire. This will be one of the legs.
-Mold the wire at one end so it tapers off. This will be the foot. Bend (and cut if necessary) the wire about half of the way up the cylinder to create the leg joint.
-Cut some of the horizontil wires where the upper leg will be touching Falcor's body. Wrap those wire around the body to attach the leg.
-Repeat for the remaining three legs.
Step 3: Falcor's "skull"


-Create a cylinder with the fencing for Falcor's head. Make sure it is porptional to Falcor's body.
-Add a "bridge" to the top of the cylinder. This will be where Falcor's eyes will rest.
-Cut the ends of the cylinder where the mouth will be. Taper the ends a bit to create the mouth.
-When you are done, check to see how Falcor's head will fit with the body. Do not attach the head yet, however.
Step 4: Fur the Body!


-Now that you have the skeleton for the body you need to create a "skin" to attach the fur. If your fencing holes are pretty big, you may want to stuff Falcor's legs with a little newspaper to give them shape.
-Next you will need to cover the entire body with paper that will act as Falcor's skin. I used cut up paper bags. Duct tape them to the wire skeleton.
-For Falcor's fur use spray glue to attach it to the "skin." Do as big of sections of fur as you can manage at a time. This will leave less seems. I chose to put white fleece on Falcor's legs and fur all over his body. You can do any combination of fur and fleece that you like.
-For the tail, I made a cylinder shape with the white fur and tapered it at the end. I used a combination of spray glue and safety pins to get the tail into its shape. I painted the safety pins with white out so they wouldn't show. Make sure you make the tail short enough that it won't drag on the floor.
Step 5: Falcor's Head


-First paint Falcor's eyeballs. I put pens through the back of the styrophom spheres so it was easier to paint and let them dry. I used dark brown paint for the irisis and black for the pupils.
-Stuff newspaper in to the top part of Falcor's head, the space behind where his eyeballs will be.
-Cover the head in paper to create "skin," just like you did with the body.
-Create a "mustache" with some newspaper. This will give Falcor's face more character.
-Create a nose out of newspaper as well. This took me a couple of tries. I suggest studying Falcor's actual nose and use a lot of duct tape to get it into the right shape. Cover the nose in white fleece. It will be a little tricky to get the fleece to fit snug around the nose. Use some epoxy glue to make it stay.
-Attach white fleece to Falcor's paper skin. Leave white fleece over the front of the bridge of his head. Use the white fur for the mustache eyebrows and big old ears. I used epoxy to attach the ears so they are more sturdy.
- Fit the eyeballs into the bridge of his head. I used the wires from the bridge to secure the eyes by sticking them into the Styrofoam Cut and glue the fleece around the eyeballs.
- For the inside of Falcor's mouth, create a wedge of two pieces of beige felt for the top and bottom of his mouth. Then glue in a nice big red felt tongue.
-Attach Falcor's head to the body and there you have it! Be warned, cats love the fur!
Step 6: Atreyu's Shirt


-Used a large man's suade shirt that I bought at Goodwill. Use whatever you can find! If you can find a suede or leather tunic in your size, more power to you!
-Put the shirt on (a friend is helpful with this step). Have a friend safety pin how tight you want the shirt.
-Cut off the sleeves.
-Cut off the sides of the shirt but leave 2 inches past where you put the safety pins. Cut this extra 2 inches in to horizontal slits. Tie the shirt together all along the sides. Make sure you leave the shirt pretty long with slits along the sides. You will want the shirt to cover Falcor's back a bit so you can't see the hole your body will be in. Cats like this.
-Put the shirt on and use safety pins to see how far you would like the neck v to go. Cut the neck v and voila! Atreyu is ready to fly!
Step 7: Finishing Touches!


-Invest in a solid pair of suspenders. Wear them under your shirt.
-I bought the Auryn necklace on Amazon but it could easily be made with bake clay.
-I put a little counter weight in Falcors booty as the head was a bit heavy.
-Best advice... get portable speakers and download "Bastian's Happy Flight" off of iTunes. Hide the speakers in Falcor's body and have a great flight!

Finalist in the
Halloween Easy Costumes Contest


