

Introduction: BASH Dropbox Uploader on OpenWRT


This guide is to provide detailed information on how install BASH Dropbox Uploader to a wireless router flashed with OpenWRT. Dropbox Uploader is a BASH script written by Andred Fabriz that allows you to upload, download, delete files (and more) from Dropbox.
Step 1: Prerequisite
- Router flashed with OpenWRT firmware. I'm using TP-Link TL-Wr103ND V2 & flashed with OpenWRT Barrier Breaker 14.07
- A Dropbox account
Step 2: Dropbox App Key & App Secret
The first step is to sign in to Dropbox app creation page to get a Dropbox App key & App Secret from Dropbox. The App key & App Secret will used by Dropbox API for authorizing access to resources on Dropbox.
Step 3: Create a New Dropbox Platform App

Step 4: Select a Dropbox Package

Step 5: Email Verification

Step 6: Select Type of App

Step 7: Record Down the Permission Type, App Key and App Secret

Step 8: Installing Dropbox Uploader

Next step is to SSH to router and download Dropbox Uploader from github to the router /root directory. Command line below supposed to do the job, unfortunately it is not working. It just download the Dropbox Uploader file (dropbox_uploader.sh) with zero file size as shown in figure above.
opkg update
opkg install bash curl coreutils-statcd /rootcurl -k https://raw.github.com/andreafabrizi/Dropbox-Uplo... > dropbox_uploader.sh
chmod 755 dropbox_uploader.sh
Step 9: Correct Procedures to Installing the Dropbox Uploader

To overcome this problem, I have to download the Dropbox Uploader (dropbox_uploader.sh) to my computer and then transfer it to router. I'm using WinSCP to transfer Dropbox Uploader to the router as shown in figure above.
SSH to the router and enter the following command once the dropbox_uploader.sh file has been uploaded to router.
opkg update
opkg install bash curl coreutils-stat
cd /root
chmod 755 dropbox_uploader.sh
Step 10: Authorizing Access to Resources on Dropbox

SSH to router and run the Dropbox Uploader
./dropbox_uploader.sh -k
Enter the App key and App secret accordingly, enter "a" (lower case) will set Folder Permission type to App Folder. Finally enter "y" to continue.
If everything is OK, it will generated a URL for you to access your Dropbox folder, otherwise it will prompted "bad App key" until you had enter a correct App key & App secret.
Leave the above windows open and then open your web browser, enter the generated URL (https://www.dropbox.com/1/oauth/authorize?oauth_token=??????????) as shown in figure above, this will prompted you to access folder inside your Dropbox.
Step 11: Allowed the Dropbox Uploader Access to Your Dropbox Folder
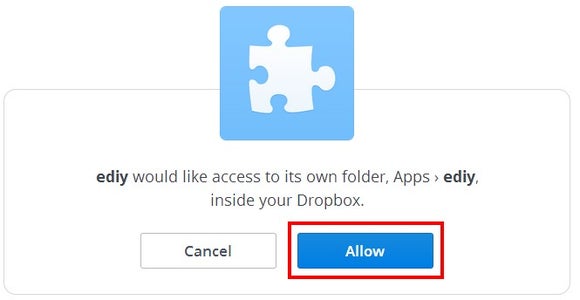
After clicking on the Allow button, you are allowed the Dropbox Uploader access to your Dropbox folder, come back to the SSH window and press the Enter key.
Your Dropbox Uploader is setup completed.
Step 12: Upload File to Dropbox

Example below will upload the test.txt file in /tmp directory to the Dropbox app root folder.
./dropbox_uploader.sh -k upload /tmp/test.txt /
or
/root/dropbox_uploader.sh -k upload /tmp/test.txt /
Step 13: Download File From Dropbox
Example below will download test.txt from Dropbox to router /tmp folder
/root/dropbox_uploader.sh -k download /test.txt /tmp/
Step 14: Delete a File From Dropbox
Example below will delete a file from Dropbox
/root/dropbox_uploader.sh -k delete /text.txt


