

Introduction: Best Support Settings for 3D Printing


Supports in 3D printing are essential to print objects with overhanging parts. But it is really a pain in the annoying to search for the perfect settings, so the supports are easy to remove, and the object not deformed by the supports.
I have tested many settings on the slicer software Cura 2, and came out with great results so I'll share them with you. The goal is to get the best surface finish, as smooth as possible, and the minimum post-processing to try avoiding sanding.
Also make sure to read this article, you'll learn many important things about supports.
In short (because some of you just need the settings), here are the main settings I found to be perfect:
- 3D printer used: MP Select Mini 3D
- Plastic used: PLA Esun
- Temperature: between 180°C (356°F) and 190°C (374°F)
- Interface support ON
- Interface thickness: 0.6mm
- Interface distance from the object: 0.2mm
In long (because some of you might want to see how I have found these settings), here are all the steps:
- Cura and the main settings
- The reference
- Changing the temperature (part 1)
- Changing the temperature (part 2)
- Changing the interface thickness
- Changing the interface distance from the object
- Choosing the best settings
- The smurf test
- Few useful tips for 3D printing
Step 1: Cura Support Settings
To find the best support settings I am using Cura 2. I have tried Cura 15 (which is actually the former version of Cura 2) but it has way less settings. I have also tried Meshmixer and its "tree supports": the branches are interesting but I got some problems because the supports were not placed where they were supposed to...
If I have to conclude about Cura 2 and why I am using it:
- it is free
- it is user friendly
- it has many advanced settings that allows a lot of choices for the print.
Bellow is an image of what the setting interface looks like. In "Print Setup: Advanced" you can add more settings. Just drag the mouse on one grey tab (for example "Quality"), click on the small gear that appears, and tick or untick the settings you want.
As you can see, there are a huge amount of settings and it would take days to test everything... Therefore I have focused on the parameters that seem the most important for me:
- The temperature (see step 3 and 4)
- Basic supports (see step 3)
- Supports + interface (see step 4)
- The interface thickness (see step 5)
The support distance from the object (see step 6)

Step 2: Reference
From this step to step 6, I have printed many similar pieces changing just 1 parameter each time. Note that it is elevated so supports are printed everywhere bellow the piece (I have designed the piece with a small "leg" on 1 face so when it is pointing down, the piece needs supports to be printed).
Of course to better compare all the objects, here is a reference you can refer to. It is a small rectangular piece (30mm x 20mm x 2mm). On the photo bellow you can see the upper face of the object, while the next steps are showing the lower face, in contact with the supports. And inside the black circle you can see the surface closer, with more details.
It has been printed with the following parameters:
- 180°C (no changes visibles on the upper face at higher temperature, up to 210°C)
- Speed 50mm/s
- Resolution 0.1mm (however it does not affect this image because this is the upper part of course...)
- Hotend diameter 0.4mm.

Step 3: Changing the Temperature (Basic Support)
First I have ticked "Enable support" in Cura, in the tab "Support" and tried to print the piece with different temperatures.
There is no need to describe in detail each piece. As you can see, the results are similar, no matter the temperature, the faces are quite rough and it is really disappointing...

Step 4: Changing the Temperature (Basic Support + Interface)
Then I have ticked "Enable support interface" in the "Support" tab, and tried again with different temperatures.
The results a striking:
- The objects are much more smooth with the interface than with basic supports.
- However if the temperature is too high (210°C/410°F or higher), the support is sticking too much to the object and cannot be removed.

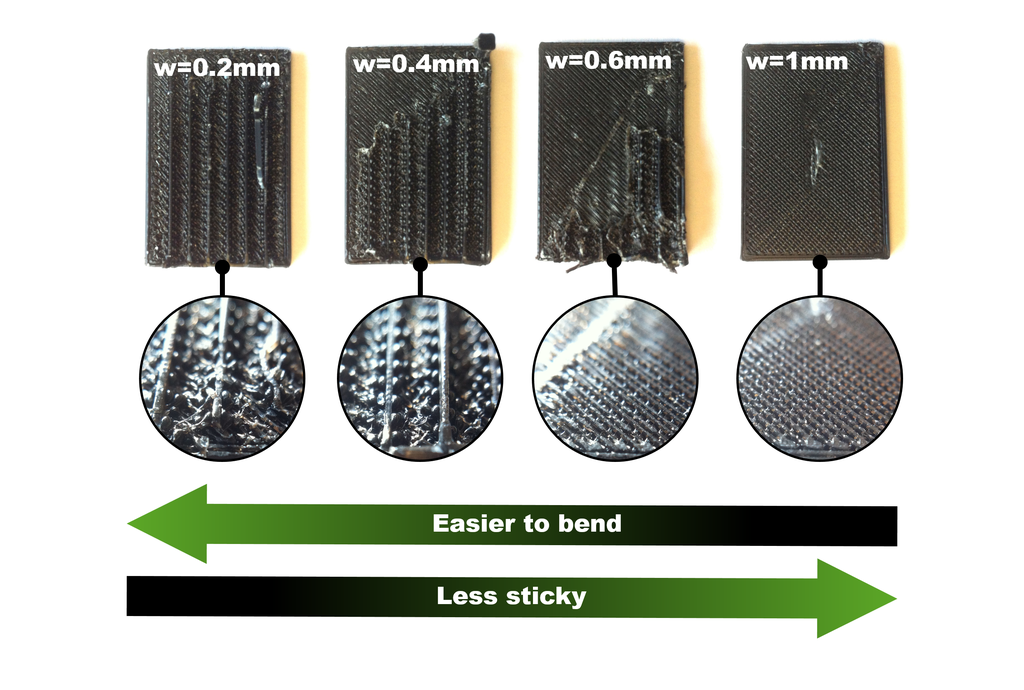
Step 5: Changing the Interface Thickness
According to the previous results, I have decided to keep the interface, and change its thickness. The idea here is to make an interface that is thin enough to bend when it is being peeled off.
Again the results are really impressive:
- As expected the thinner the interface, the easier it bends
- However, the thinner it is, the stronger it stick to the object... And as you can see some parts of the supports remain when the interface is 0.2, 0.4 and 0.6mm thick.
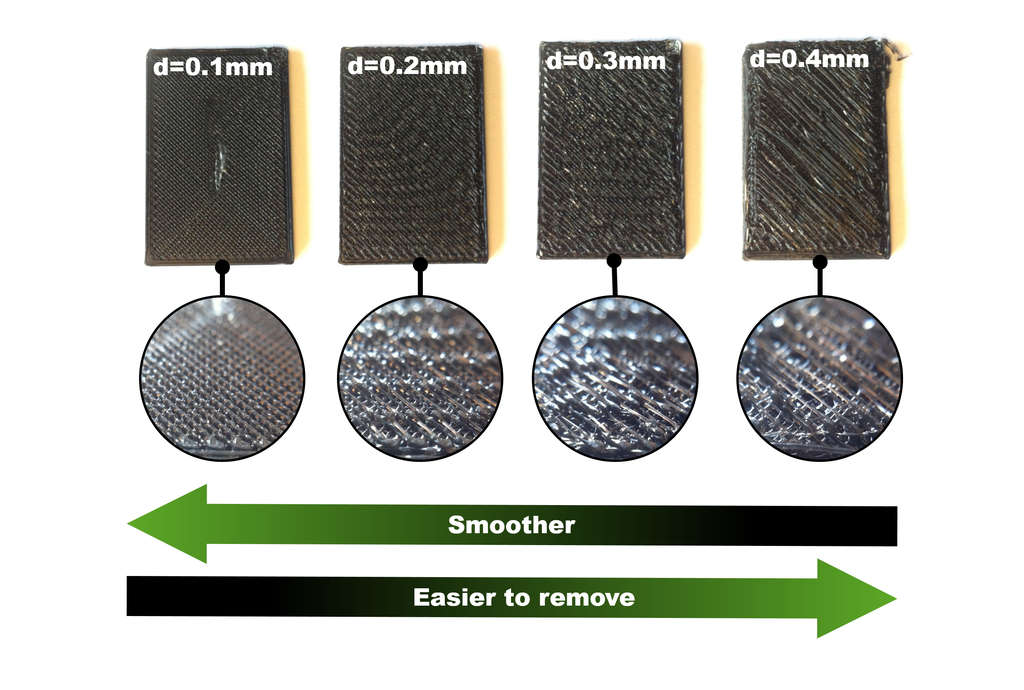
Step 6: Changing the Distance of the Interface
Finally the last setting that seemed really interesting to me was the distance separating the support (or its interface if there is one) and the object.
And again it worth try it:
- When the distance increases, the support is way easier to remove.
- But on the other hand, the object's face in contact with the support is rougher when the distance is higher.
Step 7: Choosing the Best Settings
Based on the previous results, I have decided to keep the following settings after few more tries:
- Temperature: from 180C to 190C. Be careful, if the temperature is too low, the object will be more fragile because the layers will not stick well to each others.
- Support interface ON
- Interface thickness: 0.6mm
- Distance from the support interface and the object: 0.2mm
Bellow there is an image of the piece printed with these settings. And I am really happy with it, it is a good compromise: support easy to remove, and object smooth enough.

Step 8: The Smurf Test


Finally comes the smurf test.
What is the smurf test? Actually I just wanted to try the previous settings with a more complexe piece, and a tiny figurine was perfect. So I choose a smurf, I have placed it face down in Cura 2, and printed it to see if it would be possible to remove the support easily and if the surface would be smooth enough as seen on the previous step.

Results:
- Support easy to remove: less than 1 minutes to remove it entirely.
- Smooth enough. I'd say it looks like it has been printed with a resolution of 0.2mm (instead of 0.1mm). The nose also broke when removing the support, but because it was too small.

Step 9: Print Bed Adhesion Tips
To finish I'd like to give you some tips that I found really useful about print bed adhesion.
What type of bed? I have tried the following:
- Masking tape. Works fine. But tends to unstick and you have to change it more often.
- PEI. Works great. With PLA and the bed at 60°C it works perfectly.
What to do if the object does not stick well to the bed?
- Lower bed level. Make sure the hotend is at a correct height from the bed. If the it is too far, the print will tends to detach.
- Decrease the speed. Lower the speed for the first layers, for example X0.5 or even lower. Stay close to your printer when it is printing the first layer to make sure everything is fine, then once it has been printed go back to the normal speed.
- Use rafts. This way if there is a problem for the first layers, it will just affects the raft and not the object. Plus it makes a big platform on which the object can be printed. Or use a brims. This will increase the surface in contact with the bed, so the object will stick better.

Participated in the
Plastics Contest

Participated in the
GIFs Challenge 2017


