

Introduction: Building a Solder Station Sponge Replacement


The sponge in a solder station has an important role in keeping the tip of the solder iron clean. A normal practice is to run the tip through the damp sponge every time you pick the solder iron up. Over time, the sponge collects small amounts of solder and flux. It will also start to break up from all the times it has dried up and was re-soaked.
A replacement sponge isn’t expensive, but often they come in a quantity that I won’t use in my lifetime. So I sought an alternative and used something that I already had around the house.
Step 1: Collect Stock and Prepare Tools


Some years in the past, I was given some sponges that were basically a business card. One side resembled a business card, the other side was blank. These sponges were compressed and dry and very thin until you soaked them; just like the solder station sponges you would buy. This material is called a Compressed Cellulose Sponge and is availbe in bulk also. They weren’t the right size so I needed to trim them.
To trim and prepare the sponges, I used a wooden straight edge from a home improvement store that I had lying around, and a utility razor knife. A metal straight edge would be better but I didn’t have one that would work well for this. Something to draw markings would be handy but not required.
Step 2: Size, Trim, and Score


Using the old sponge and taking measurements from the solder station, I found I could cut one sponge into two well fitting sponges for my needs.
I mark the sponge for cutting, used the straight edge on the side I want to keep and pressed it firmly down to compress the sponge a little, and then I dragged the utility knife along the edge. When you do this, make sure all your fingers are out of the way and that you are cutting on a surface that the knife won’t damage. You may have to make a few passes to cut all the way through. Repeat for all cuts that are needed. Discard sponge remnants in the trash.
I took the new sponge and compared it to the old sponge to make sure I was close, then I sized it up on the solder station. A little trimming maybe needed, and it is fine if it is a little small as it will expand a little when it dampened. The solder station sponge trough is deep enough to hold the wet sponge, so when I dropped it in it was be hard to remove. I just use the edge of the utility knife and slide it into and edge and pried it out.
The sponge will need to be scored so that it will have slits that allow the solder iron tip to get dragged within. This allows one quick pass to clean almost all sides of the soldering iron at once. Using the straight edge and utility knife again, I lightly scored a line about every ¼” completely across the surface of one side of the sponge. I found it better to press lightly and make multiple passes to get a good depth than to cut all the way though in one stroke.
Sine I made more than one out of a single raw sponge, I stored the currently unneeded one in a dry place and it doesn’t take up much space.
Step 3: And Now for the Fun Part :


I soaked the flat dry sponge with water and watched it grow. While I entertained myself by putting a few ounces in the middle and watching it spread and grow; you can just put it under a faucet for a few seconds to achieve the same thing quickly. My inner child won out in my case.
The lines I scored into the dry sponge were now visible, and they were just deep enough so the sponge retained enough connection to remain as a single sponge.
Step 4: Ready to Solder:


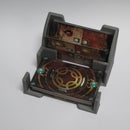
I dropped it into the solder station and I was ready for some marathon soldering.
You can see the before and after photos for how much a good clean sponge can make.
In the future I would like to see if this sponge material can be laser cut, both perimeter and the partial cuts.

Participated in the
Hurricane Lasers Contest


