

Introduction: C-Clamp Wood Shelf


I was inspired by the Areaware wall clamps and wanted to create something similar for my home office. I thought a c-clamp shelf would be a good addition for my home office and felt it would coordinate well with my Pipe Wrench Table instructable. As a maker, I love to be surrounded by creative things that inspire me.
This shelf is really quick to build and, depending on what materials and tools you have on hand, should be very inexpensive to build as well. But, the results are priceless!
Step 1: Gather Materials and Tools


I tried to use minimal tools for this project. Use your imagination and substitute other tools where appropriate to make use of what you have available. Here are the tools I used:
- (sorta optional, but encouraged) Mig welder, you can use any type of welder that you have available. If you don't have a welder, consider buying one...or else find a local welder and have parts welded as it should not cost more then $20.
- Drill and 31/64" drill bit (wood handle), 5/32" drill bit (bracket mount holes), 1/8" drill bit (wood dowel) and wood countersink bit
- Angle grinder
- Miter saw, I used an electric compound miter saw, but any saw will work
- Sand paper, 120 and 220 grit
- Center punch
- Tape measure
- Center finder (I 3D printed mine using a model by Geir from thingiverse)
- Speed square
- Sharpie
And you will need the following materials:
- 2 or 3 c-clamps, I bought 5" deep throat clamps from Harbor Freight for $4.99 each)
- 1 1/4" oak dowel rod (home depot)
- 1" x 1/8" steel flat bar (home depot)
- 3 - 1" wood screws (home depot)
- Flat black spray paint (home depot)
- Steel wool (to scuff the clamp's painted surface prior to painting)
- 4' x 8" x 3/4" wood for shelf (I used a rough sawn piece of walnut, but you can use anything including plywood...it just depends on the look you are trying to achieve)
- Screws and (optionally) drywall handing hardware to hang your new shelf
- Blue painters tape
I bought my c-clamps new and they match perfectly and it looks great. But alternatively, it would be super cool to find an eclectic collection of well used clamps from a flea market and use different clamps to build your shelf. Going this eclectic route, you would have different finishes on each clamp and their worn look would add to the final shelf.
Step 2: Fabricate and Weld Brackets to C-Clamps


The c-clamps need to be fastened to the wall. The route I chose was to weld a tab to act as a bracket that can be screwed to the wall to allow the c-clamp to be securely fastened to the wall. I am creating 3 brackets for my 4' shelf because I want my shelf to be able to hold heavy items.
NO WELD OPTION:
Alternatively, you could choose to fabricate brackets that hold/squeeze your c-clamps to the wall and avoid welding. The only reason to go this route is if don't have access to a welder and don't want to pay a welder to do the welding. I did not do this option, but I included a few drawings of a U shaped bracket that could be made from flat bar steel using a hammer and bench vice (assuming you don't have a bending brake tool). The bracket would essentially clamp the vertical upright section of the clamp to the wall. Let me know if you try this route and how it works for you!
WELDING OPTION:
Start by measuring how long you want your tab to be on your finished c-clamp bracket. The tab is a piece of the 1" x 1/8" flat steel bar. I wanted the tab to be long enough to accommodate two screws being screwed into the wall. My c-clamp has a slightly curved surface where the tab will be attached, so I measured the length that I thought would allow for a weld to secure it. For my clamp, a tab of approximately 3 1/8" was the right length.
I used my angle grinder to grind away the corners of the bracket on the opposite side from where it was being welded. I don't like having sharp ends on anything I build and also thought the rounded corners would look more finished.
Each bracket needs to have two holes drilled in it. These holes will allows two screws to secure the final shelf bracket (c-clamp) to the wall. I like when things are consistent, so I created a template from a scrap piece of paper and marked where I wanted the holes to be located. I poked a pencil through the paper template to allow me to mark each bracket using a sharpie. I used a center punch to create a dimple on my marked points. This dimple helps keep the center point of your drill bit right on the center of the hole location. Using a 5/32" drill bit, going slow, drill two holes in each bracket tab using the center punch dimple as your guide. I used a drill press, but a hand-held drill will work just fine. Use an angle grinder to remove any burrs around the hole that is drilled.
Prior to welding your bracket to your c-clamp, you need to remove some paint to reduce the smoke (paint burning) and create a better weld. I used my angle grinder to remove some paint and made sure all areas where I was to be welding had no paint that would interfere.
Prior to welding, just to be sure, temporarily tighten your wooden shelf in your c-clamps and note how the board wants to sit. Consider where your brackets should be welded to allow your shelf will attach to the wall correctly. You don't want your wooden shelf to be sloped toward or away from the wall. You want your shelf to sit level (meaning 90 degree angle from the wall). Okay, take the shelf out of your c-clamps and continue.
Position your brackets against your c-clamp in the orientation it should be welded. Consider which side of the c-clamp you want the tab to be positioned. I wanted the tabs to be positioned so they are least visible once the brackets are mounted to the wall. So I mounted my tabs on the inside (meaning on the right side of my left bracket and left side of my right bracket).
Use welding magnets to help hold your pieces in position. It is always wise to tack weld your pieces (just a few quick spot welds to hold your piece) and then check that the bracket is positioned properly. It is important that the bracket will allow the shelf to be oriented so it is perfectly perpendicular to the wall. If your bracket is not positioned properly, break your tack weld, grind away the weld, position your pieces again and tack it. Once you are happy with your tack welds, apply a bead to connect the c-clamp and the brackets. Go slow and make sure your brackets are being welded consistently.
Once your piece has cooled, take a moment to inspect and grind any areas that have spatter or sharp edges.
Step 3: Build Wood Handles


I decided that I wanted to put a more decorative and attractive handle on the threaded rod that tightens the c-clamp. This is not required, but I thought it made the shelf look more interesting and more finished.
The first step is to use your angle grinder to cut off a nub from one end of the c-clamp's perpendicular metal rod that acts as a handle to tighten the clamp. Once you cut off one nub, the handle will slide out of the hole. This remaining hole will serve as a point to secure your (about to be built) wooden handle. See photos if this is not clear.
Cut a 2" length from your 1 1/4" oak dowel rod for each handle. You will need a handle for each c-clamp. Next you need to find the center of your dowel pieces. I always find this a lot harder than it seems like it should be. I was initially eyeballing it, but did not like the look if (about to be drilled) center hole was not perfectly centered. So, I downloaded and 3D printed a center finder by Geir from thingiverse.com. Mark your center position and create a dimple in that center location using a center punch.
Using a scrap piece of wood, make sure you know the hole size that will allow your c-clamp's end of its threaded rod to slip into the drilled hole. You want the handle's hole to be as snug as possible, but don't worry if your closest bit leaves a bit of room...it will be okay. Using my Harbor Freight clamp's dimensions, I used a 31/64" drill bit and drilled about 5/8" deep into the center of the top of each piece of dowel rod. This hole will allow the wood handle to slip onto the bottom of the c-clamp's threaded metal rod where the previous perpendicular, metal handle was previously attached.
From the top of each wood dowel rod section, mark 3/8" distance. Drill approximately 1/2" deep using a 1/8" bit. The 1/8" hole will connect with the 31/64" hole that you previously drilled. Using your counter sink bit, drill out enough wood in the 1/8" hole to allow a #8 screw to fasten flush or a bit recessed with the surface.
Step 4: Paint C-Clamps


My clamps were initially painted gloss black, but I thought a flat black finish would be better for their ultimate purpose as shelf brackets. So I scuffed the clamps with steel wool, wiped them down with a rag and carefully taped all of the threaded chrome rods to make sure they would not be hit by paint.
I applied several light coats of paint to the entire clamp to ensure it was all covered by flat black paint and the welded areas were well covered and consistent color and texture as the rest of the piece.
Once the clamps are dry, remove the painters tape and attach your wood handles using a #8 1" screw. Screw the screw into the handle so the screw goes through the hole in the clamp's threaded bar and results in the screw being flush or slightly recessed with the surface of the dowel rod.
Step 5: Cut and Finish Wood Shelf

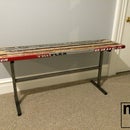
I chose to use a piece of rough sawn walnut that was given to me by a friend. The dimensions of your wood, which forms the shelf, can vary a bit, although you'll want to use something 3/4" or so thick if you are planning to hold anything heavy as you want to avoid having the wood sag over time. My wood shelf dimensions are 7.5" x 1" x 4'.
I left my wood without any finish, but did sand it lightly to remove some rough areas.
I considered cutting the ends of my wood shelf with a chain saw to give it a much rougher appearance, but later decided that would be too rough for what I was envisioning.
Determine how you want your brackets spaced on your wood shelf from an aesthetics perspective and to guard against it sagging over time.
On the floor or a flat surface, secure your wood shelf to your brackets by tightening the wood shelf in the clamps. I cranked my c-clamps as tight as I could using my hands.
Step 6: Hang Your Shelf


Your shelf is complete! Now you need to hang it.
As you are deciding where to hang your shelf, you will undoubtably be holding your entire shelf or a bracket against the wall. Put blue painter's tape on the back side of your bracket while you are finding where it will be mounted on the wall to minimize the chance of the metal brackets scratching or marking your wall.
Once you mark your position for your brackets, remove the blue painters tape before mounting your shelf brackets permanently.
Each shelf bracket has two holes. I installed my shelf to a drywall-based wall and I used a drywall toggle (rated for 100 pounds) for the top holes and a drywall anchor (rated for 50 pounds) for the bottom holes. These anchors may be a bit overkill, but I don't want any chance of the shelf falling as it must weight somewhere around 20 pounds itself.
The last thing you should do is sit back and admire your cool and unique shelf!


