

Introduction: CNC Laser Engraver


Hello there,
Tory at MYDIYCNC again.
Today I want to show you all how you can SIMPLY do laser engraving on your CNC machine. Having a laser head is a BLAST to use. You can engrave anything from wood, plastics, cardboard, etc.... Of course what you engrave or burn in with your laser head is entirely up to you and what you can create. Follow these steps and you will know how to do laser engraving as well.
Step 1: Prepare Your Materials


Alright so first off just get everything all set up and ready to go.
You will need:
1. Your CNC machine, here we are using the MYDIYCNC Machine.
2. Your Laser head.
3. Safety Glasses.
4. The material you will be engraving on, we are using basic balsa wood today.
Step 2: Create Your Engraving Image


Now you need to create the image you want to engrave with your laser head. First you will need to download the program called Inkscape. In Inkscape it is very simple, just clink the add text button and create the space you want to fill with your text. I typed in CALIFORNIA, since that is where we are located :). Then you can choose the type of font that you would like to use, you will see the drop down font menu up towards the top left corner. Once you have created your text, then go ahead and save the SVG file.
Next go to makercam.com, from here you will generate the Gcode for your Text. Go ahead and open your saved SVG file, click on the CAM option and select follow path operation, as you see in the photo I have just basic settings to create the tool path. Once you have that done, under CAM click calculate all, and then click CAM again and select export Gcode.
Your Gcode file is now created.
You must do one more thing, edit the Gcode file in notepad, swap out all of the Z commands with L (Laser) commands. I used L0 to turn off the laser, and L50 to turn on the laser at 50%. Once this is done, you can move on.
Step 3: Set Up Engraving


Now the start of the fun part!
Fire up your CNC software, I am using FabCam with the MYDIYCNC machine. Load your Gcode file in that you have just created. Place your material on the bed of your CNC machine. Now you will want to jog the machine over to a good Home Position, place the home position in a place adequate for the engraving space needed for your project.
Once everything is all loaded, turned on and set to go. Process your Gcode!
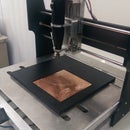
Step 4: Watch That Amazing Machine Go!


Now you can just sit back for a brief amount of time, grab a drink, have a snack, listen to some tunes, your CNC will be done in no time :D. Also as you can see we have rigged up a special little piece on our machine to eliminate to need to wear glasses, same type of lens material that prevents any harmful rays from harming your eyes.
Step 5: Your Done, What a Great Job!

You have successfully created a laser engraved piece in just a few steps! As I said before, what you engrave is ENTIRELY up to YOU. You can do anything from Text to full blown photos or images! Thank you for checking out my Laser Engraving instructable. Be sure to check out my other instructable on acrylic engraving, and check out MYDIYCNC.com, if you have an acount, submit your creations, we would LOVE to see what you have done :)
Tory @ MYDIYCNC


