Introduction: Caffe in Jetson Nano


Caffe is a commonly used deep learning framework, we can install it to Jetson Nano.
Step 1: Things Used in This Project
Step 2: Setup Jetson Nano
Please refer to Unboxing of Jetson Nano & Quick Start-Up of Two Vision Demos to set up your Jetson Nano.
Step 3: Access Jetson Nano
Generally, when the Jetson Nano starts, it will get an IP address automatically. You can get this address in your router's setting page.

Open Putty, and fill Jetson's address to Host Name's text box, then click Open.
When this window shows up, type the user name and password to it, then press Enter.

If you see the cursor disappear in Putty window, congratulations, you access to Jetson Nano's bash already.

Putty is usually used to execute commands in Linux systems, if you want to exchange files with it, you may need WinSCP.
Open WinSCP, the first thing you need to do is Login. As same as Putty, you need to fill Host name, User name and Password, and then click Login.

After logged in, you will see the files in Jetson Nano list in the sub-window on the right.

Step 4: Install Caffe
If you want to install Caffe by apt, you may get an error, it says no installation candidate.

So we need to install it from source, before you building the code, you may need to install the dependencies. Type these commands to Putty:
sudo apt-get install libprotobuf-dev libleveldb-dev libsnappy-dev libopencv-dev libhdf5-serial-dev protobuf-compiler
sudo apt-get install --no-install-recommends libboost-all-dev
After dependencies installed, you can clone the source from GitHub.
git clone https://github.com/BVLC/caffe.git
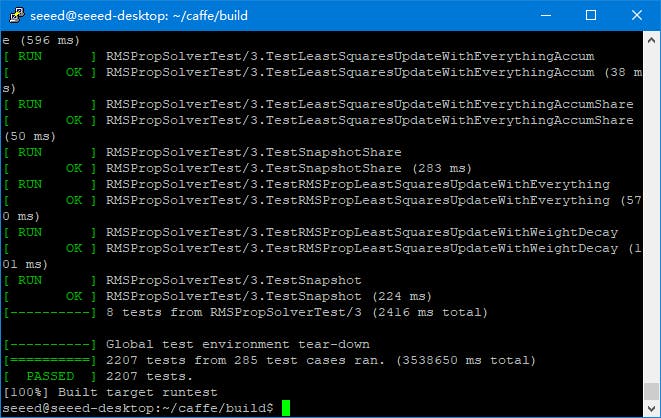
Then you can start to build to source, you can choose Make or CMake as your compilation tool, I used CMake.
mkdir build
cd build
cmake ..
make all
make install
make runtest
It may need some time to complete compilating, if nothing goes wrong, you will see PASSED show in Putty.
Now Caffe is now installed, you can add it to your system path by adding export PYTHONPATH = /python:$PYTHONPATHto file ~/.bashrc, and source ~/.bashrc to enable it. In Python interactive command line, type import caffe, if system path setting right, you will see caffe is correctly import.
Step 5: Trouble Shooting
When you installing Caffe, you may encounter many troubles, these solutions may be useful to you.
#1
/usr/bin/ld: cannot find -lhdf5
/usr/bin/ld: cannot find -lhdf5_hl
This problem caused by the linker can not find hdf5, you can add its path to Makefile by changing
INCLUDE_DIRS := $(PYTHON_INCLUDE) /usr/local/include
LIBRARY_DIRS := $(PYTHON_LIB) /usr/local/lib /usr/lib
to
INCLUDE_DIRS :=  $(PYTHON_INCLUDE) /usr/local/include /usr/include/hdf5/serial
LIBRARY_DIRS := $(PYTHON_LIB) /usr/local/lib /usr/lib /usr/lib/aarch64-linux-gnu /usr/lib/aarch64-linux-gnu/hdf5/serial
#2
.build_release/lib/libcaffe.so: undefined reference to `cv::imread(cv::String const&, int)'
.build_release/lib/libcaffe.so: undefined reference to `cv::imencode(cv::String const&, cv::_InputArray const&, std::vector<unsigned char, std::allocator<unsigned char> >&, std::vector<int, std::allocator<int> > const&)'
This problem caused by the version of OpenCV does not compatible with Caffe, you can use
pkg-config --modversion opencvto check your OpenCV version, and uncomment
OPENCV_VERSION := 3in Makefile.
Step 6: LeNet on MNIST
MNIST can be used to classify the number you write in a paper. Before you using MNIST, you need to download datasets of it.
./data/mnist/get_mnist.sh./examples/mnist/create_mnist.sh
Then you will see two folders, mnist_train_lmdb andmnist_test_lmdb disappear in /examples/mnist.
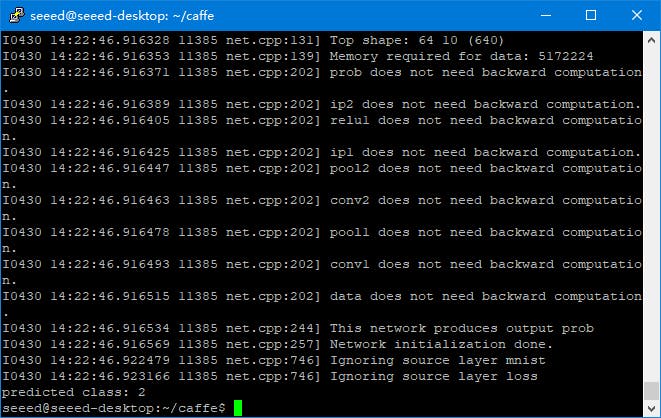
Now you can start train model, type./examples/mnist/train_lenet.sh in Putty or Nano's terminal, the train will start immediately.
When you see the output looks like this, the model is ready to use.

Create a Python script named number.py, type following code to it:
   import os
   import sys
   import numpy as np
   import matplotlib.pyplot as plt

   import caffe

   MODEL_FILE = '/examples/mnist/lenet.prototxt'
   PRETRAINED = '/examples/mnist/lenet_iter_10000.caffemodel'
   IMAGE_FILE = '/examples/mnist/number.bmp'

   input_image = caffe.io.load_image(IMAGE_FILE, color=False)
   net = caffe.Classifier(MODEL_FILE, PRETRAINED)
   prediction = net.predict([input_image], oversample = False)
   caffe.set_mode_gpu()
   print 'predicted class:', prediction[0].argmax()
And upload a 28 * 28 pixels binarized handwritten number to Jetson, and run this script. Such as, I upload this picture toexamples/mnist/number.bmp, and run the scritp.

I finally got this result: