

Introduction: Calamity Ganon Tapestry From Legend of Zelda: Breath of the Wild


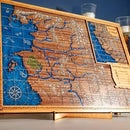

I made a Laser Engraved version of the Calamity Ganon Tapestry from Legend of Zelda: Breath of the Wild. I have played through Breath of the Wild three times and devoted easily 500 hours to finding Korok Seeds. This game has destroyed all other video games for me.
On my most recent playthrough, I got to the part where Impa started telling Link this history of Hyrule through the tapestry hanging behind her and I instantly thought, "I could make that"
So here it is! In all its laser engraved, hand-painted glory and today I'm going to teach you how to make it!
Supplies
Below are Amazon Affiliate Links to tools used in this build. Using these links don't cost you any extra, they just help us feed the cats and leave the lights on:
- Glowforge Laser Cutter - Referral link if you want one and want up to $500 off!
- Computer with Inkscape and GIMP (Illustrator and Photoshop)
- Board of your choice - I used a 1/8 inch Walnut Finished Plywood board purchased through Glowforge
- Vallejo Model Paints - https://amzn.to/2SYmVyC
- Paint Brush - https://amzn.to/2HOVRvh
- Soft Bristle Brush - https://amzn.to/2Pm4yRV
- Gorilla tape - https://amzn.to/2T0mSSC
- Scraping tools - https://amzn.to/2VnTojp
- Spray Polyurethane Varnish - https://amzn.to/2VnohnV
Step 1: Find Your Starting Point


In our previous Instructables, we always provided the laser files so readers could jump right in.
This time around, we wanted to explain how we create our Laser files, step by step, to teach something a little bit more difficult. We start every project by finding our source material.
- The image from the game is quite fuzzy (first image above) because, within the game, it is supposed to portray a tapestry made 10,000 years ago.
- After doing a quick google search, I had found someone had taken the time to remaster a clearer version of the Tapestry
- TIP: When taking a .jpeg and making it into an .SVG file, it is always good to start with a high contrast image.
Step 2: Photo Editing With Gimp / Photoshop


We need to get the image to a place where we have just the sections we need.
- Bring the found image into Gimp - (IMAGE 1)
- Using the 'Select by Color' tool, select the BACKGROUND of the image. - (IMAGE 2 and 3)
- While you have the background highlighted:
- Go to SELECT
- Click INVERT
- COPY the selection
- Head over to Inkscape with the selection saved to your clipboard
Step 3: Converting the Selection to a Vector File in Inkscape


Now that we have isolated the areas we want to engrave, we need to convert them to a format the laser cutter will understand, an .SVG File!
- Paste the Selection you have sitting in your clipboard into a new Inkscape window. (IMAGE 1)
- While highlighting the image - Go to the top bar (IMAGE 2 AND 3)
- Click Filters - Colors - Greyscale: Select live preview, drop the reds to nothing and hit APPLY.
- While highlighting the image - Go to the top bar and select: Path - Trace Bitmap... (IMAGE 4 AND 5)
- Live Preview - Checked
- Brightness Cutoff - Treshold: 0.800
- Hit 'OK'
- Delete the original image you brought in.
- Create a box the same size as your image - in my case 17.5" wide by 9.843" tall (IMAGE 6)
- Set up the box so it has no fill and a red stroke for the border.
- Line it up with the Image. (IMAGE 7)
- Save your work as an .SVG and a .PNG
- TIP: I use a Glowforge laser cutter, the .SVG file works, it's just large at around 150,000 vector nodes. Using a .PNG worked just a bit faster while saving my sizing.
Step 4: Send the File to Your Laser and Hit GO!


We imported the file to our Glowforge and waited the 1 hour and 45 minutes until it was all cooked!
Step 5: Clean Your Engraving

- Using a soft bristle brush (or a crafting toothbrush) Gently brush off the engravings just to get any dust off.
- With your hands, carefully make sure that the masking tape is still sticking well before you start painting.
- The amount of stick the masking tape has allows you to be less careful when painting.
- Glowforge's Proofgrade materials come with some really sticky masking tape. I had no issues painting right over it.
Step 6: Start Painting!


I cannot stress enough how long this is going to take you.
There are no short cuts and no loopholes so sit back, relax, and start painting.
- I used Vallejo Model paints to fill in the engraves.
- I typically like to clean off my engraves with pumice soap before painting them. Laser-cut pieces are really chard from being blasted with a laser beam. Chard wood usually causes the paint to change to a darker color, especially with light colors.
- For this project, I decided not to clean the wood because I wanted the masking tape to stay exactly where it was. I decided to use a high pigment model paint to offset the potential color changing from the burnt wood.
- Vallejo paints with a dab of water in them allow for super high pigment and runny enough consistency to fill the engraves while not causing the tape to lose its stickiness.
Step 7: Remove the Mask


After you let your paint COMPLETELY dry, its time to start removing the masking tape! Another step that is just going to take a good amount of time.
- Start removing the larger sections of masking tape.
- Go slow to try to pull off as much as you can in a given pass.
- When you feel you need more support, start using a scraping tool.
- Carefully run the tool across the surface with enough pressure only to remove the tape and not to scratch the surface.
- When you feel you have scraped away all you can, grab some Gorilla tape.
- Gorilla tape is INSANELY STICKY and will get all loose/scrap off bits off
- Be Careful - since it is very sticky you can damage your surface.
- When everything is cleaned and ready, Use some spray polyurethane to seal all the painting you did!
- Let dry per the cans instructions
Step 8: Stare at It in Awe


Congratulations!
- You're done painting.
- You have removed ALL the mask.
- Now you get to stare at it as long as your heart desires!
I hope you give this build a try. It's a great way to learn how to use Inkscape and Gimp to create laser friendly files. It's also a great way to make something INSANE to hang in your house!
Have fun and go make something awesome!
Instagram: @whengeekscraft
FYI because I have been asked a million times - Sold the first one but Selling a new one on etsy.

Participated in the
Games Contest


