

Introduction: Card Scanner for a Trading Card Machine


Card Scanner for a Trading Card Machine
The Change Log can be found in the last step.
The Background
I explained the main motivation of my project in the Card Feeder Intro. But in short, my children and I have amassed a large amount of Trading Cards by now. The handling, sorting, etc. is very difficult with these quantities. We have already tried it, but we gave up frustrated. For this reason, I want to build a Trading Card Machine, which should take on different tasks.
Trading Cards should automatically be
- managed (Which cards do I have?, Which ones are missing?)
- sorted (Block, Language, Set, Series, etc)
- rated (How valuable are my cards?, How much money do I have to spend for a full set?)
- traded (Buy and Sell)
Because of these ambitious goals, I decided to split the huge machine into 3 parts:
- Card Feeder - a machine which grabs and transport a single card out of a card stack
- Card Scanner - a part where the cards will be analyzed
- Card Sorter - a machine which will store the identified cards
This Instructable is about the 2nd part, the Card Scanner, which is the brain of the whole Trading Card Machine.
The Card Scanner:
- control the Card Feeder by turning it on or off
- capture, analyze and evaluate the Trading Cards
- move the Card Sorter to the right position
BUT, this is the functionality of the final Trading Card Machine.
This Instructable is reduced to the "internal" Card Scanner functions (capture, analyze and evaluate the Trading Cards)
In technical terms:
- I use a Raspberry PI and the PI Cam to capture the Trading Cards
- with the help of Google Cloud Platform API's (Vision and Translation) I analyze the Cards
- I evaluate the Cards with the Cardmarket API
So a lot of coding in this project, but there is still something to build.
The Card Scanner enclosure. Of course, I use 3mm Cardboard for this task.
Let's go!
In this Instructable I want to show you - How to create the Card Scanner.
Step 1: Tools, Materials and Software That I Used

Tools, Materials and Software that I used
Tools:
- Cutting mat
- Rulers
- Cutter
- Solvent-containing adhesives (UHU HART and tesa)
- Pencil, marker
- Center punch
- Hand drill
- Hot glue gun + glue sticks (not in the picture)
Materials:
- 3mm cardboard
- DIN A3 paper
- Raspberry PI 3 B+
- Raspberry PI Camera Module V2
- Adafruit IR Break Beam Sensor - 5mm LED
- Sparkfun super bright white 10mm LED 3VDC
- Adafruit SG92R Micro Servo
- 10k Resistor
- Breadboard Half-size
- Jumper wires female/female and male/male
- SD with Raspbian
- Some kind of computer, equipment, cables, etc. to connect and program the Raspberry PI (not on the picture)
Software:
Step 2: Design


Design
The design is very simple and not worth mentioning because it is just a rectangle box. The Card Scanner sits directly behind the Card Feeder. For this reason, I have adapted the Scanner to the contour of the Feeder.
The procedure with Autodesk Fusion360
-----


I have projected the contour of the Feeder into a new drawing. Based on this, I have created a sketch for the Scanner. It's the side view of one of the side walls.
-----

I extruded this side wall sketch to 3mm (thickness of the cardboard). After that, I copied it and moved it 83.5mm away. Thus I had two side walls.
-----

To create the top of the Scanner, I sketched a simple rectangle on top of the side walls. In the same way, I created the bottom.
-----


That's the main shape of the Card Scanner.
-----

In a further step, I added the positions of the components.
On the bottom:
- Servo Motor (Stops a card so that it can be photographed)
- IR Break Beam (Is not needed for the Scanner, only in the interaction with the whole Trading Card Machine)
-----

The same thing is necessary on top of the Card Scanner.
There it is:
- LED light (Creates the right light for the camera)
- PI Camera (Creates photos of the cards so that they can be analyzed)
- IR Break Beam (Is not needed for the scanner, only in the interaction of the whole Trading Card Machine)
-----
This is the draft shape of the Card Scanner
Step 3: Mounting - Step 1


Mounting - Step 1 (You can find the drawing as a PDF in the attachment!)
I printed the two side walls that were created in the Design Step on a DIN A3 sheet.
I roughly cut these out with a cutter. With TESA adhesive I glued these two shapes on 3mm cardboard. It is important and necessary to apply glue and paper on both sides as otherwise, the cardboard will bend during the drying phase. With that said, I glued some piece of paper to the backside.
While the glue was drying, I cut out an 83.5mm wide strip of cardboard. From this strip, I cut a 222mm and a 323mm wide piece. This is the top and bottom of the Scanner. To create the same look, I applied glue and some white paper to both sides.
After everything was dry, I cut out the final shapes.
-----

2x side walls, 1 top and 1x bottom
Step 4: Mounting - Step 2


Mounting - Step 2
After the basic elements of the Card Scanner were finished, I started assembling. Before that, all recesses in the bottom must be marked and cut out.
As announced in the Design Step, the following elements must be installed on the bottom:
- Servo Motor (Stops a card so that it can be photographed)
- IR Break Beam (Is not needed for the scanner, only in the interaction of the whole Trading Card Machine)
-----
I used rulers and a marker to transfer the information from the sketch to the cardboard bottom of the Card Scanner. I used a cutter, a small drill, a center punch and a gimlet (tool not the cocktail) to create the recesses and holes.
With UHU Hart and a wooden construction, I glued the two side panels to the bottom.
While drying, I moved on with the top of the Scanner. Here I had to create holes for:
- LED light (Creates the right light for the camera)
- PI Camera (Creates photos of the cards so that they can be analyzed)
- IR Break Beam (Is not needed for the scanner, only in the interaction of the whole Trading Card Machine)
-----
It is important, that the components are in the right position:
- If the light is too close to the PI Cam, there are reflections on the photo of the Card
- If the light is too far away, it is too dark inside the scanner
- The PI Cam has to be in the right position regarding the Card-Stop-Position. Otherwise, a photo from the whole Card is not possible
- IR's has to be vertically aligned that they are working correctly
-----
After everything was prepared, I started to mount the components.
On the bottom I used a Hot glue gun to mount the IR and the servo. It is not possible to use screws or nails, because they will protrude into the Card Scanner.
On the top of the Scanner I used very small screws and nuts to mount the IR, PI-Cam and the Raspberry PI. The LED light was only plugged into the cardboard.
-----

I don't want to glue the top piece to the rest of the Scanner. In case of problems (card jam), I want to be able to intervene.
To stabilize the whole Card Scanner, I glued three cardboard strips to the upper area of the side walls. With 3 nails I can fix the top temporarily to these strips.
Step 5: Electrical Part


Electrical Part
After all components had been assembled, I moved on with the wiring.
-----

- Adafruit IR Break Beam Sensor - 5mm LED is connected to Pin 3 (not the best choice) with a Pull-up 10k Resistor, 5VDC and GND
- Sparkfun super bright white 10mm LED 3VDC is connected directly to the 3,3V and GND
- Adafruit SG92R Micro Servo is connected to the PWM Pin 33, 5VDC and GND
For the moment this is ok but, you can see this in the video, the servo jitters quite a lot. So maybe a driver/ HAT is necessary to fix this issue.
Step 6: Coding - Step 1 - Intro
Intro
If you need some Raspberry PI basics => Raspberry PI Class
Attention!
I'm still a coding noob, so there are better/safer ways to write the code. It was good enough for my test, but I still have a lot to learn. If you're a pro, I would be very happy about tips and improvements.
Designing, building and mounting was one part of this project. Just straightforward. The coding part needs some more information to explain. Therefore, I split it into different parts.
- Step 1 - Intro
- Step 2 - Google Cloud Platform
- Step 3 - Cardmarket
- Step 4 - My Python Code
Step 7: Coding - Step 2 - Google Cloud Platform
Google Cloud Platform
I use the Google Cloud Platform API's to analyze the Trading Cards. Vision API for recognition of text on photos of the cards and the Translation API for recognizing language of the cards.
Here are two demos of the API's:
Attention!
Google Cloud Platform is within certain limits free of charge. Beyond these limits you have to pay. An overview of the pricing can be found here:
Google Cloud Translate Pricing
So make sure to use it within the limits. Irrespective of this you have to fill out your credit card information.
The process of setting up the API's is already very well documented on Google, but I want to give you a little guide. Here you can find Google's version:
Google Cloud Vision Quickstart
Google Cloud Translate Quickstart
-----

- Create a Google Cloud Account (I had already a Google Account, otherwise you need a Google Account too)
---

- Choose a country
- Accept Terms & Conditions (Sorry for the German screenshot, but I couldn't switch it to English)
-----

- A Popup appears asking for the same information. Why? I don't know, but choose a country, accept Terms & Conditions and move on
-----

- Choose account type "private"
- Type in your name, address and
- your credit card information
-----

- Skip this Popup
-----

- Home screen of Google Cloud Platform
-----

- Select => Menu => IAM & admin => Manage resources
-----

- Create a new project
-----

- Type in a "Project name"
- You don't need "Location"
-----

- Back in the Home screen select your project.
-----

- Select => Menu => Billing
-----

- Check if Billing is linked to your project
- If it's not linked => here you can find help
-----

- Select => Menu => APIs & Services => Library
-----

- Search for "Cloud Vision" and select the Cloud Vision API result
-----
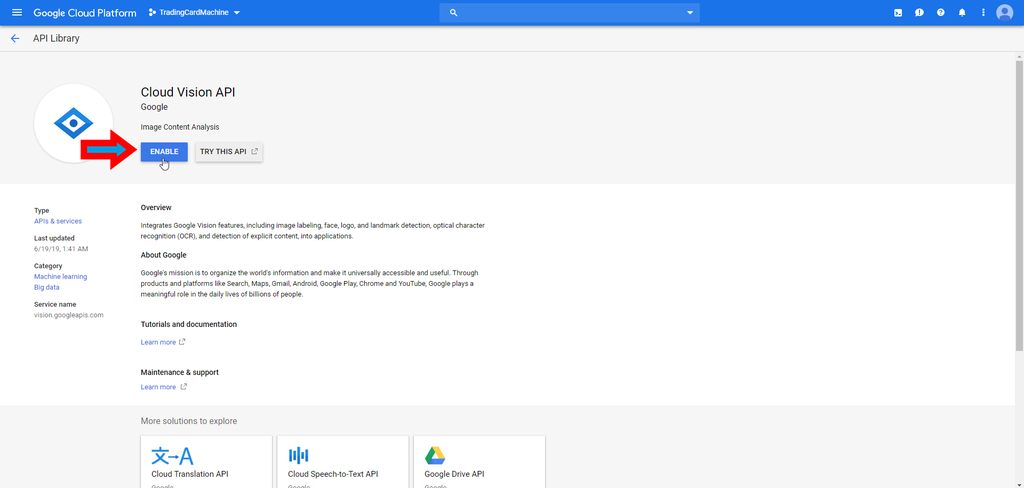
- Enable the Cloud Vision API
-----

- Overview of the Cloud Vision API
-----

- Select => Menu => APIs & Services => Library
-----

- Search for "Translate" and select the Cloud Translation API result
-----

- Enable the Cloud Translation API
-----

- Overview of the Cloud Translation API
-----

- Select => Menu => APIs & Services => Credentials
-----
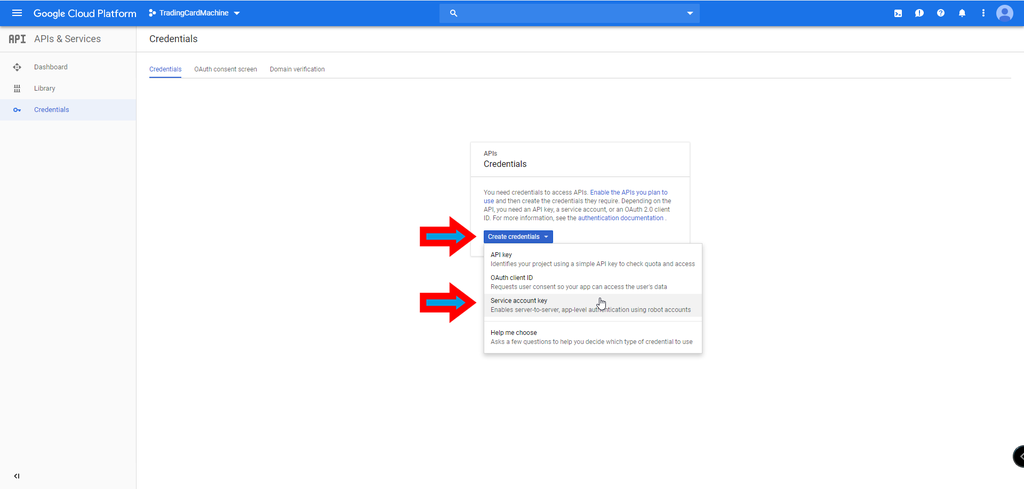
- Select "Create credentials"
- Choose "Service account key"
-----

- Create a "New service account"
-----

- Type in a "Service account name"
- "Service account ID" will be automatically generated
- Select => "Role" => "Project" => "Owner"
- Key type "JSON
-----
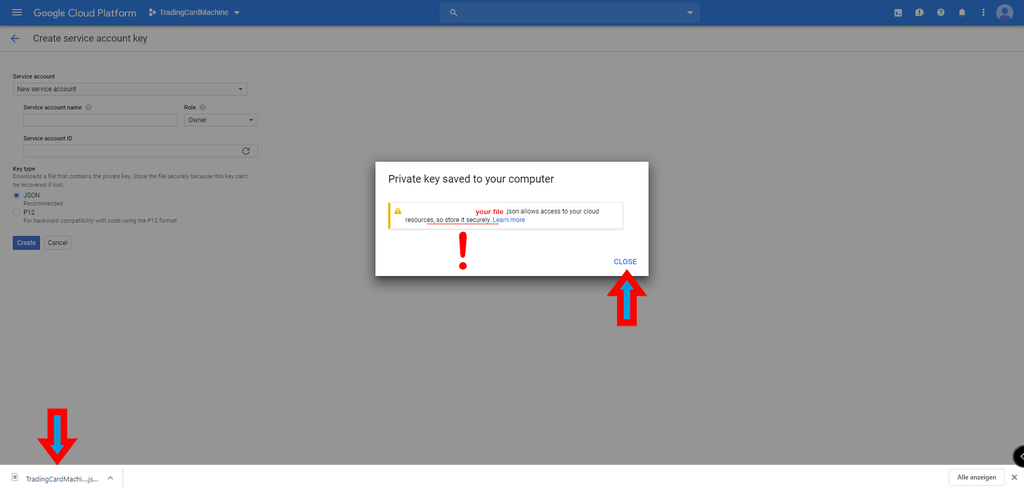
- A JSON-file is created and saved to your computer. HANDLE IT CAREFULLY.
- The JSON file is needed in the code for the Authentication
-----
Python
I used these API's on a Raspberry PI in Python. So the libraries have to be installed. There is also a very good guide from Google with a lot more information.
Python on Google Cloud Platform
pip3 install google-cloud-vision
pip3 install google-cloud-translate
That's it, let's move on.
Step 8: Coding - Step 3 - Cardmarket
Cardmarket
The data I get from the Google Cloud Platform can be passed to the Cardmarket API for many more functions. In this Instructables I use only one function to receive some information about the value of a card.
In general, Cardmarket has an API with a lot of functions. If you are interested, you can have a look at the documentation.
Here is a little guide on how to get access to the API:
-----

- Login with your account or create a new one
-----

- Select your User and open "My Account"
-----

- The guys at Cardmarket say:
- Attention: User accounts, created in January 2018 or later, don't have default API access. You first need to perform certain actions on Cardmarket, e.g. completely finishing a purchase, or registering as a seller. If you only wish to create an account for accessing an API, you should first contact us with as much details about your planned project as possible, so we can manually grant API access.
-----

- I have my account for more than 5 years, so I'm allowed to use the API.
- Choose "Dedicated App" this means If you want to develop an application, that provides services only to your user very own account at MKM, this app type is your solution. Your app is acting with the API like you are acting with your user account using the website.
- APP_TOKEN, APP_SECRET, ACCESS_TOKEN and ACCESS_TOKEN_SECRET is needed in the code for Authentication
-----
Python
I used the evonove/mkm-sdk for Python to interact with the Cardmarket API. On their Github you can find more information.
pip3 install mkmsdk
Let's move on to the code where I used all API's.
Step 9: Coding - Step 4 - My Python Code


My Python Code (You can find the code in the attachment!)
The basis to use the API's were done. So I created some code.
Attention!
I'm still a coding noob, so there are better/safer ways to write the code. It was good enough for my test, but I still have a lot to learn. If you're a pro, I would be very happy about tips and improvements.
-----
#System imports
import io
import sys
import time
import logging
import RPi.GPIO as GPIO
import picamera
import picamera.array
I imported some basic modules ...
-----
#3rd-party imports
#evonove/mkm-sdk
from mkmsdk.mkm import Mkm
from mkmsdk.api_map import _API_MAP

#Cloud Vision API
from google.cloud import vision
from google.cloud.vision import types

#Cloud Translation API
from google.cloud import translate
and the 3rd-party modules from evonove/mkm-sdk and Google
-----
#Local source imports
import settings
I have swapped global variables into a dictionary (settings.py). (To be found at the end of this step)
-----
#Environ
#evonove/mkm-sdk
os.environ['MKM_APP_TOKEN'] = ''
os.environ['MKM_APP_SECRET'] = ''
os.environ['MKM_ACCESS_TOKEN'] = ''
os.environ['MKM_ACCESS_TOKEN_SECRET'] = ''
#Google
os.environ["GOOGLE_APPLICATION_CREDENTIALS"]= 'your path.json'
I created the environment variables with the authentication information which I showed you one and two steps before.
-----
def _createlog():
    log = logging.getLogger() # 'root' Logger

    console = logging.StreamHandler()
    format_str = '%(asctime)s\t%(levelname)s -- %(processName)s %(filename)s:%(lineno)s -- %(message)s'
    console.setFormatter(logging.Formatter(format_str))
    log.addHandler(console) # prints to console.
    log.setLevel(logging.WARNING)

    return(log)
1st Function
Instead of using "print" to output information, I used logging. This makes me more flexible and provides more information while debugging
-----
def _initCSrv(_name, _pin, _position):
     log.info('Start _initCSrv')

     GPIO.setmode(GPIO.BOARD)
     GPIO.setup(_pin,GPIO.OUT)
     _srvCSrv = GPIO.PWM(_pin, 50)
     _srvCSrv.start(_position)

     return (_srvCSrv)
2nd Function
Setting a GPIO Pin as an OUT, PWM 50Hz to work with a servo and set it to a specific position
-----
def _init():
     log.info('Start _init')

     GPIO.setmode(GPIO.BOARD)
     GPIO.setup(mainProp["PIN_BBEAM"],GPIO.IN)
     _srvScan = _initCSrv("Scanner",mainProp["PIN_SRV_SCAN"], mainProp["DOWN"])

     return (_srvScan)
3rd Function
Setting a GPIO Pin as an IN for the IR Break Beam and call the initialization for the servo.
-----
def _changeDutyCycle(_srv, _position):
     log.info('Start _changeDutyCycle')

     _srv.ChangeDutyCycle(_position)

     return ()
4th Function
Changing the position of a servo.
-----
def _photoCards(_path):
     log.info('Start _photoCards')

     log.info('Picture saved @: ' + _path)
     with picamera.PiCamera() as camera:
       camera.resolution = (1024,768)
       camera.capture(_path)

     return ()
5th Function
Capturing a photo with the PI-Cam and saving it to a path
-----
def _detect_text(path):
    log.info('Start _detect_text')

    client = vision.ImageAnnotatorClient()

    with io.open(path, 'rb') as image_file:
        content = image_file.read()
        image = types.Image(content=content)

        response = client.text_detection(image=image)
        texts = response.text_annotations
        _strText = texts[0].description

    if _strText.find("\n",0) > 0:
        _intPosName = _strText.find("\n",0)
        _strCardName = _strText[:_intPosName]
    else:
        _strCardName = "Nothing found!"

    for _name in mainProp["LST_EXP_NAME"]:
        if _strText.find(_name) > 0:
            _intPosSetNameStart = _strText.find(_name)
            _intPosSetNameEnd = _strText.find("\n",_intPosSetNameStart)
            _strCardInfo = _strText[_intPosSetNameStart:_intPosSetNameEnd]
            break
        else:
            _strCardInfo = "Nothing found!"

    translate_client = translate.Client()
    result = translate_client.translate(_strText, target_language="en")
    _strCardLang = result['detectedSourceLanguage']

    return (_strCardName, _strCardInfo, _strCardLang)
6th Function
The image-file which is a photo taken by the PI-Cam is analyzed by the Google Vision API. The result is saved in the variable "texts".
-----

In the first description of the response, I searched from the beginning to the first "next line" command. This is always the name of the Card. It's saved in "_strCardName".
-----
In the same description, I searched for the expansion of the Card by comparing it with a list with possible expansion names. Saved in "_strCardInfo"
-----
And finally, I checked the language of the description. Saved in "_strCardLang"
More information about Cloud Vision
More information about Cloud Translation
-----
def _mkmSDK_products(_name, _game, _language, _match):
    log.info('Start _mkmSDK_products')

    # Using API v1.1
    mkm = Mkm(_API_MAP["1.1"]["api"], _API_MAP["1.1"]["api_root"])
    try:
        response = mkm.market_place.products(name=_name, game=_game, language=_language, match=_match)

    except exceptions.ConnectionError as e:
        log.error(e.response)

    return(response)
7th Function
I sent the Name, Game, Language and Match values to the Cardmarket API asking for "Product" information.
-----
#START MAIN

if __name__ == '__main__':
    log = _createlog()
    log.info(sys.version)
    mainProp = settings.main()
    srvScan = _init()
    mainProp["RUNS"] = 0
    try:
        while mainProp["START"] != 0 and mainProp["RUNS"] < 3:
            log.warning("Run number: " + str(mainProp["RUNS"]))
            mainProp["RUNS"] += 1
            _changeDutyCycle(srvScan,mainProp["UP"])
            time.sleep(10)
            file = mainProp["PATH"] + "image" +str(mainProp["RUNS"])+".jpg"
            _photoCards(file)
            time.sleep(5)
            strCardName, strCardInfo, strCardLang = _detect_text(file)
            log.warning(strCardName +" - "+ strCardInfo + " - "+ strCardLang)
            intLNG = int(mainProp["LST_LANG"].index(strCardLang)) + 1
            time.sleep(5)
            response = _mkmSDK_products(strCardName, 2, intLNG, 0)
            json_response = response.json()
            count = 0
            for cards in json_response['product']:
                log.warning(str(json_response['product'][count]["name"]["1"]["productName"]) +" - Price Trend "+ str(json_response['product'][count]["priceGuide"]["TREND"]) + " €")
                count = count +1
            time.sleep(5)
            _changeDutyCycle(srvScan,mainProp["DOWN"])
            time.sleep(1)


    except (KeyboardInterrupt, SystemExit):
        srvScan.stop()
        GPIO.cleanup()
MAIN program
In short:
- Set the servo to a UP Position to block a card
- Insert a Card in the Scanner, wait 10sec
- Take a picture of the Card, wait 5sec
- Request to Google and extract the information that I need (Name, Expansion and Language), wait 5sec
- Request to Cardmarket and receive the Price Trend information, wait 5sec
- Servo Down to release the Card.
In this example I repeated this process 2 more times. (RUNS >= 3)
-----
#!/usr/bin/python3.5
#settings.py
#Store settings in a dictionary and return it

def main():
    settings_dictionary = {}
    settings_dictionary['PATH'] = "/home/pi/Desktop/scans/"
    settings_dictionary['UP'] = 7.5
    settings_dictionary['DOWN'] = 2.5
    settings_dictionary['START'] = 1
    settings_dictionary['PIN_SRV_SCAN'] = 33
    settings_dictionary['PIN_BBEAM'] = 3
    settings_dictionary['RUNS'] = 0
    settings_dictionary['LST_EXP_NAME'] = ["AZEROTH", "DARK PORTAL", "OUTLAND", "LEGION", "BETRAYER", "ILLIDAN", "DRUMS", "GLADIATORS", "HONOR", "SCOURGEWAR", "WRATHGATE", "ICECROWN", "WORLDBREAKER", "ELEMENTS", "TWILIGHT", "THRONE", "CROWN", "TOMB", "ANCIENTS", "BETRAYAL"]
    settings_dictionary['LST_LANG'] = ["en", "de", "fr", "es"]
    return (settings_dictionary)
SETTINGS.py
I created global variables in a dictionary
-----
I hope you can follow my code.
If you have any questions, tips or improvements feel free to ask!
In the Video you can see how its working in practice.
Step 10: The Video
The Video
I've created a short video in which I show you how I built it and how it's working.
Step 11: The End


The End
Card Scanner for a Trading Card Machine => Finished!
I'm quite happy with the result, even with my low-level coding skills I could handle it. I've tested just a bunch of cards, but it worked on any time.
As always I would like to tell some open To-Do's/Things to work on/Findings:
- While writing this Instructables, I realized that the Vision API will also give me the language information of the Cards, so an own Translate API is not necessary. (Too late to adapt to whole documentation)
- In the Cardmarkt DB there are only English and German translations of the Card Name. I have a lot of Spanish Cards, so the API will not deliver any information, because the Card can not be found. The World of Warcraft Trading Card Game is outdated, so the Card Names in other Languages will not be updated.
Besides that, this is a huge step to accomplish the final goal to build the complete Trading Card Machine, which will be my next project. I want to combine Card Feeder, Card Scanner and the Card Sorter to a final machine. Some changes and updates will be necessary to achieve that. But I'm very confident, that it will work. Of course, I will update the Instructables with the modifications that I will do.
If you create it or a modification of it, I really would like to see your ideas and solutions.
I would appreciate any criticism, comments or improvements. Whether in relation to the Project, Photos, Skills, Writing or Language.
If you do not want to wait until the next update, you can see some news on Instagram.
Thank you for taking the time to read about my project!
Have a great time.
Servus and cu next time!
Step 12: Attachment
Attachment
Here you can find the files.
If you need anything else, feel free to ask!


Step 13: Change Log
Change Log
- V0.0 2019-07-17
- Project published

Second Prize in the
Sensors Contest


![Tim's Mechanical Spider Leg [LU9685-20CU]](https://content.instructables.com/FFB/5R4I/LVKZ6G6R/FFB5R4ILVKZ6G6R.png?auto=webp&crop=1.2%3A1&frame=1&width=306)


