

Introduction: LED Star Ornaments


More by the author:


About: I'm a teacher (physics, grades 7 to 10), Maker and product designer. (Check out www.slimme-handen.nl full of experiments, projects for Maker Education and kits for Bibberbeests!). Besides that, I write childre…
This instructable is about making stars shine brightly. A while ago, it was also about making Christmas trees without cutting down trees. These LED Christmas trees have an Instructable of their own now. They're still in the videoclip, though.
If you can solder a little, you can make LED stars. The stars can be made 6 to 10 cm wide and use a 9 Volt battery as a pedestal.
If you want to easily change batteries, take a look at step 5. The star can be mounted on a 9 Volt battery clip...
No video playing? Have a look at it here...
So get your soldering iron, grab your LEDs, find some batteries and kick off the christmas decorating season.
If you're uncertain about your soldering skills: Start with making the star. It's easy. You can do it. Really. Trust me.
Still in doubt whether you should make the star or not? Here's the one decisive reason you were waiting for:
--
The first three Makers who post a picture of their self-made star in the comments get a 3 months Pro Membership gift code from me.
An additional one year Pro Membership gift code goes to the maker of the funniest / loveliest / greatest picture that involves a LED star :-)
december 17th: lmijacevic gets the first of three 3 Months Pro Membership codes!
--
Step 1: Stuff and Tools


For a christmas LED star you need:
All parts for the star can easily be ordered at RadioShack, Mouser (if you live in he US), or Farnell or Conrad (Euro's, Aussies, rest of the world).
If you're new to electronics: buy a assortment of LEDs like this one.
Costs:
The star costs about €1,60 / US $2,- if you can get a carbon-zinc battery for under €1,-
A blinking star costs about €2,90
Tools and other stuff needed:
- 5 red leds, with a 5mm or 10 mm dome: up to you. The LEDs must be red to shine properly on a 9 Volt battery. I used LEDs with opaque domes as well as clear. Use what you think looks best.
- 9 Volt battery.
- 10 cm of sturdy solid copperwire.
- 1 blinking LED, 5 mm dome, red. I bought this one, it works on anything from 3 to 12 Volts.
- 4 "Low current" LEDs, 5 mm clear dome, red. These are LEDs that light up at very small currents. I bought these.
All parts for the star can easily be ordered at RadioShack, Mouser (if you live in he US), or Farnell or Conrad (Euro's, Aussies, rest of the world).
If you're new to electronics: buy a assortment of LEDs like this one.
Costs:
The star costs about €1,60 / US $2,- if you can get a carbon-zinc battery for under €1,-
A blinking star costs about €2,90
Tools and other stuff needed:
- For a template: 5mm plywood or something similar.
- Soldering iron and solder
- Pliers or pincers
- Polymer clay or a third hand to fix parts for soldering
- Multimeter for debugging
Step 2: The Layout

Christmas LED Star:
The circuit for the LED star is not very complicated. As a matter of fact, it is pretty easy: Five LEDs connected head to tail in one circuit.
The switch in the circuit is not a physical part of the star: The star lights up (the circuit is closed) by planting a wire into the plus-connector of the battery.
You say it's easy, so nothing can go wrong?
Uuuuhhhmmm... well, you could make a mistake with connecting the LEDs "head-to-tail". Have a look at this I'ble (step 2 is about LEDs) if you're not sure about LEDs having heads and tails...
Step 3: Make the LED Star


To make soldering the LEDs as easy as possible, I made a template out of plywood. It's a circle with marks for the five leds.
Now you have a closed star.
Test it:
Connect the ends of the star to the battery's poles. Mind the polarity of LEDs and battery! If the LEDs light up: Hooray. If not:
Solder a sturdy, solid copper wire (about 4 cm / 1.5") to the minus-side of the LED string. See picture 3 in this step.
- Place the LEDs on the template.
- Bend the LEDs leads in an angle so that adjacent leads cross each other.
- Fix the leads on the template with sticky tape.
- Solder the crossing leads (five times).
- Cut away protruding leads with small pliers.
Now you have a closed star.
- Cut away your least succesfull soldered joint.
- Now you have a star with a gap.
Test it:
Connect the ends of the star to the battery's poles. Mind the polarity of LEDs and battery! If the LEDs light up: Hooray. If not:
- Most likely, you connected at least one of the LEDs head-to-head instead of head to tail.
- If you lined up the LEDs correctly and it is STILL not working (this happened to me...): One of the LEDs might be broken. Check each led individually with a multimeter or a 3V coin cell or, if you have it, a 3V power supply.
Solder a sturdy, solid copper wire (about 4 cm / 1.5") to the minus-side of the LED string. See picture 3 in this step.
Attachments

Step 4: Finish Up


Almost done! The final step is to solder a piece of solid wire to the battery's minus-pole.
This is a little tricky to solder:
TIP:
Make sure wire and battery are fixed. Use tape, a third hand or small objects to make sure battery and wire are properly lined up and can't slide away.
Finally, solder the other end of the wire to the LED star's plus-side.
And you're done :-D
Liked it? Continue making a tree. It takes a bit more work / patience, but is well worth it! If you can make the star, you can make the tree!
This is a little tricky to solder:
- Take a piece of wire as long as the wire you just soldered to the star's minus-side.
- Lay down the battery and place the wire into the battery's biggest connector (noted with a minus-sign).
- To solder the wire onto the connector, make sure both wire and connector are well heated before adding solder.
TIP:
Make sure wire and battery are fixed. Use tape, a third hand or small objects to make sure battery and wire are properly lined up and can't slide away.
Finally, solder the other end of the wire to the LED star's plus-side.
And you're done :-D
Liked it? Continue making a tree. It takes a bit more work / patience, but is well worth it! If you can make the star, you can make the tree!
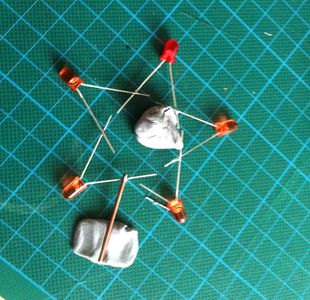
Step 5: Adding a Battery Clip...


To be able to change the battery a it more easily, I mounted the star on the innards of a 9 Volt battery clip. Instead of solid wire, I used two 60 Ohm resistors. The resistors limit the current through the LEDs, which increases battery life and lengthens the LEDs lives. The copper wires are more rigid than the resistors, so this version is a bit more fragile than the previous.
The pictures take you through the surgery of the clip, it's pretty straightforward I think:
Mount the battery-clip-with-star carefully on a battery. Now you're done. Again :-)
The pictures take you through the surgery of the clip, it's pretty straightforward I think:
- Cut away the soft plastic casing with a sharp knife.
- Desolder the wires from the connectors.
- Solder a 60 Ohm resistor to the small connector.
- Solder the other side of the resistor to the stars' minus-lead.
- Solder another 60 Ohm connector to the stars plus-lead.
Mount the battery-clip-with-star carefully on a battery. Now you're done. Again :-)

Second Prize in the
Make It Glow


