

Introduction: Constraints and Extruding


In this lesson, you'll learn how to create rule sets, or constraints, to control your sketches in a more specific way. Creating these parameters makes Fusion 360 into a powerful editing tool. For example, if you wanted one edge of a shape to be parallel to another edge, regardless of how large the shape is, you could create a parallel constraint. No matter what other changes you make, you can now be ensured that those edges will always be parallel.
Extruding is the way you will turn your sketch into a three-dimensional model. All the constraints inside the sketches will also apply to the model.
1) In the ribbon, under Sketch, choose Arc>3-Point Arc.
2) Approximately 1" from the far right corner of the triangle, click the hypotenuse, the bottom leg, and the middle of the arc, in that order. Use screenshots as a reference.
Step 1:


3) To exit any drawing mode, right click on the view window, and choose OK. This exits Arc mode.
4) Notice you can now drag and drop the nodes of the Arc to edit its shape.
Step 2:


Step 3: Add Tangent Constraint
It's important to constrain your drawings to keep them clean, organized, and easily editable. Sometimes this happens as you draw. For instance, you automatically created a perpendicular constraint when you drew the initial triangle because you snapped to the grid.
When you drew the arc, it is likely that Fusion 360 automatically created a coincident constraint--meaning that the arc is coincident to the triangle (they share a common point). Zoom into the arc and look at the small white icons that appear at its top and bottom. You can always match these icons to their names in the Sketch Palette.
Fusion 360 may have already created a tangent constraint for you. Look for the tangent icon near the top of the arc. If you do not see it, proceed to the instructions below. If you do see it, click on the tangent icon once. Then right click anywhere in the window, and choose Delete. This will give you a chance to practice adding constraints.
You want to ensure that the curve you just created is tangent to the hypotenuse of your triangle. In the first image, notice that there are two overlapping lines in the yellow box. This would cause modeling problems later.
5) In the Sketch palette on the right, choose Tangent.
6) Click the curve, and then the hypotenuse.
Notice the tangent icon now appears at the intersection of the line and arc.
Step 4:


Step 5:
7) Right click, and choose OK to exit Tangent mode.
8) Save.
Step 6:

9) Enter hotkey T to activate Trim tool.
10) Select the bottom edge of the hypotenuse that you want to trim.
11) Select the portion of the bottom leg that you want to trim.
Note that a pop-up will appear in the bottom right corner after steps 2 and 3, saying that a constraint was removed. The coincident constraint was indeed removed in this trim operation, but that's fine.
12) Right Click and select OK to deactivate Trim tool.
Step 7:


Step 8:
13) Inspect your sketch and ensure that the dimensions are correct.
14) In the ribbon, click Stop Sketch to exit the edit Sketch state.
The dimensions will no longer appear on the screen.
Step 9:


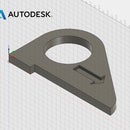
Step 10: Extrude
15) In the Create dropdown, choose Extrude.
16) Click the Home icon on the View Cube to see the extrude from an isometric perspective.
17) Click the area of the push stick that you want to extrude.
18) Enter 0.75 into the Distance box to specify the distance of the extrusion.
To extrude in the other direction, you can always enter a negative number for distance. Positive and negative values are determined by the Right Hand Rule.
19) Hit Enter to complete the extrusion and create a solid model.
Step 11:


