

Introduction: Cool Arduino Ultrasonic Transducer HC-SR04 Distance Measurement With Tinkercad


This project is about how to use the ultrasonic sensor HC-SR04 with Arduino Uno to make an ultrasonic distance sensor just like the ultrasonic sensor used in cars for parking assistance or Robotics.
If you like this project, please vote for it and subscribe to my newsletter on AeroArduino.com and my YouTube Channel.
Supplies

As we are using Tinkercad Simulation, we don’t need to buy any components or even software. Tinkercad is a free online environment. It comes with many Arduino Boards, power supplies, sensors and actuators.
So, the only thing you need to use is to go www.tinkercad.com and build our circuits.
You may also want to build your real circuit so here are the needed components:
Arduino UNO
Amazon UK , Amazon DE , Banggood
16×2 LCD
HC-SR04 Ultrasonic Transducer
Step 1: Circuit Connection

We start with Arduino Uno connected to 16 by two LCD.
Four pins of data and enable pin and register select pins connected to Arduino.
The VCC and ground connected to 5 volts and ground in Arduino Uno. Read Write and contrast pins connected to ground the backlight led positive pin connected to VCC.
The negative pin of the backlight led connected to negative through one kilo ohm resistor. Here is the HC-SR04 ultrasonic sensor it has two elements one element called trigger that’s the ultrasonic transmitter and hat’s the receive element called echo.
VCC connected to five volts and ground connected to the ground and here is the trigger or transmit pin connected to Arduino to pin number nine.
And the echo connected to pin number ten.
Step 2: Arduino Code

Here is the code that uses LCD library and uses the Ultrasonic Module HC-SR04.
Now, we need to program Arduino UNO board inside Tinkercad environment with this code to start executing it.
On the upper right Code tab, click the dropdown menu and select the text only. When you’re prompted to the caution that you are going to deleted all the Blocks , you click Continue.
Then you paste the above code in the software sheet.
Now, you’re ready to start the circuit execution.
Attachments

Step 3: Tinkercad Simulation
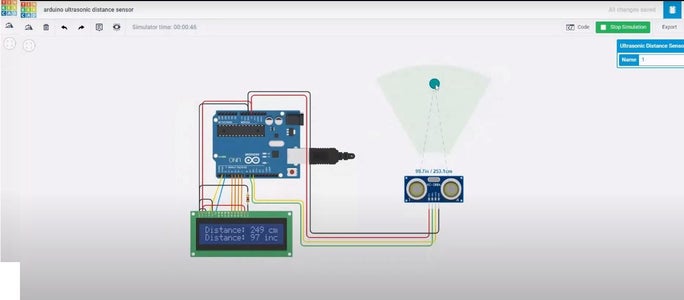
Here is the distance in centimeters and in inches as calculated by our ultrasonic distance device here we click on the ultrasonic sensor we find that the target is simulated on Tinkercad as a small object we can move it and we can see here the distance of that object from the ultrasonic sensor we can change that distance and we see the result on the LCD.
Here is the distance is about 175 centimeters it’s nearly as the same on the LCD. And we can change the distance and as we know the ultrasonic beam has a cone shape. Then we get that target out of this shape it’s no longer detected because of the way the ultrasonic waves move into the air.
When we get it back inside the detection area we find that it’s responding to the ultrasonic waves going from the transmitter and bouncing on the target and then coming back to the receiver. That’s the same way the ultrasonic sensor on the car parking assistance or in robotics.
Read this project on AeroArduino.com from here.
You can Find interactive Tinkercad Model and you can copy it here.
Step 4: Video
Thank you for reading my instructable.
Visit my website AeroArduino.com
and Subscribe to our news letter and our YouTube Channel.


