

Introduction: Cut Your Own Hair: Spend Zero-Dinero!


Most people are fearfull of cutting their own hair because they might "Mess it up." So they pay
Big Bucks every few weeks to have it cut for them. Why not build this SIMPLE device for a couple
bucks and you will be able to cut your OWN hair easily without making any "Mess-ups." I have
used this device for YEARS and it works perfectly and easily. You could even do it BLINDFOLDED
and it will come out perfect.
The tool connects to any vacuum cleaner hose (the "suction" end) and all you do is snip the scissors
a bunch of times all around making sure to keep clipping untill all hair is uniformly cut. The tool keeps the
scissors a uniform distance away from the scalp... so the outcome is predictably PERFECT.
This tool is probably better suited for men than for women... unless they want a very short haircut.
This tool is the 3rd or 4th one i have built and it is much improved over earlier ones I built. This features
easy construction with common items PLUS the CD protects your ears from any danger of being snipped.
This is because the scissors does not protrude anywhere! All the cutting is done between the CD's so it
would be difficult to cut yourself. This tool is NOT recommended to use on pets, because a dogs EARS could
be sucked into the scissors chamber and you don't want to hurt your pet using this. Now let's take a look at
the ITEMS NEEDED listing in the next step.
Step 1: Items Needed Listing:

The items needed to build this are very cheap and easily obtainable. Here's the list:
1--- roll of mostly used electrical tape. Keep the cardboard core, you will need it.
1 ---Epoxy quick setting glue or liquid nails glue.
7--- popsicle sticks. 6 of them should be rather flat.. not curved. 7th one is used for glue mixing/applying
2--- cd's or dvd's blank or junk ones.
1--- PVC fitting. I used a 1-inch with threaded end. Anything that can be electric taped to the hose will work
1--- rubber band or small piece of wire to hold the scissors in place
1--- discarded vacuum cleaner hose. A small lightweight one that is flexible is best, but any will work
1--- scissors of average quality. Not too long . They must NOT stick out the end of the CD for safety reasons.
1--- home vacuum cleaner.. the one you already own.
Thats about it! Once you get the parts together, it only takes about 30 minutes to build the hair-cut-attachment.
Step 2: Glue Your Popsicle Sticks.

It is important to glue your 2 stacks of popsicle sticks so they are SLIGHTLY thicker than your
scissors. Notice this scissors is rather THICK... so i had to use 3 popsicle sticks to stack up
higher than the thickness of my scissors. A thinner pair of scissors may only need 2 sticks.
If you place too few sticks in the stack, then the scissors will not move freely
if you place too MANY sticks in the stack, then the scissors will flop around too loosely.
Depending on the scissors you use... it will be a choice of stacks of 2 or stacks of 3.
Apply glue to the sticks and make 2 stacks as shown here.
Step 3: Lining Everything Up to Work Properly


Before gluing the sticks to the CD's... try lining up the scissors, the sticks, and the CD's
so you get a good idea how it should look. Once you are satisfied with the alignment and
placement then go ahead and glue the Stack-O-Sticks to the CD. Don't get any glue on
your scissors or you might ruin them. Notice the scissors is fully open and the CD hole
is fully exposed. Notice how the sticks line up with the edges of the scissors. This lining up
of the sticks to the scissors and to the CD hole will assure your hair-cutting-attachment
will work properly. It is very important to use a scissors that will NOT PROTRUDE out the
edge of the CD. This is so the scissors' blades are safely INSIDE the tool so no possibility of
accidental cuts can occur.
Step 4: Remove the Scissors!

Don't leave the scissors inside, because a stray spot of glue may touch
the scissors and lock them into the haircut tool. Let the glue dry before continuing.
Step 5: Attaching the PVC Fitting:


On one side of the CD-sandwich, you will attach the PVC connector. This connector is
selected so it fits into your SCRAP vacuum cleaner hose. When the glue dries here, we will
use electrical tape to tape the scrap-hose to this fitting. Use lots of glue and wait untill it is
fully cured before proceding.
Step 6: Attach the Scrap Vacuum Hose:


The PVC pipe is firmly attached now and the glue is cured. So attach your scrap vacuum
cleaner hose. Use lots of electrical tape to keep the hose on the fitting. Use all the tape on the
mostly-empty-roll. You will need the cardboard center on the OTHER SIDE of the CD sandwich.
Step 7: Rubber-Banding the Scissors

Place a sturdy rubber band to hold the scissors to the CD sandwich. This keeps
the scissors from falling out during haircutting. Alternatively you could use a piece of
wire or a tie-wrap to hold the scissors in place if you have those items available.
Step 8: Hair-Length-Spacer

On the other side of the CD sandwich, you will want a SPACER of some kind
unless you want a CREWCUT! This spacer will assure hair length of 1/2 inch or 3/4 inch
or whatever you prefer. I personally just want the hair CUT and done. So i placed the cardboard
electrical tape core on there and it works great for me. You may prefer something a little larger or
a little smaller. You will have to work this out yourself as it is personal preference.
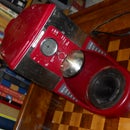
Step 9: Using the Haircut/vacuum Attachment:

Just attach the scrap vacuum hose to your vacuum cleaner. You may need to use
a scrap piece of plastic tube to get the 2 pipes to attach to each other. Turn on the
vacuum cleaner and start clipping away. Hold the tool close to the scalp and be sure to cut many many times in all areas
to assure uniform hair length. This way, you will not miss any spots. Don't use this on pets,
as it may get their EAR into the cutting section and I don't think that would be safe.
To give the haircut a finished look, you may need to SLIGHTLY trim above the ears with a
plain scissors a little... and a little behind the neck with a razor.
I hope you like my instructable and i hope it helps your family save money. Maybe for my
next instructable, we will explore "Doing our own Dental Fillings." Just kidding.


