

Introduction: Satellite Survey Tool for FTA Dishes & Others


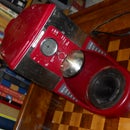
When installing a satellite dish, one of the most difficult problems is determining where to place the dish. If the dish is placed in the wrong spot, you will receive no signal due to trees or buildings blocking the signal. You could purchase a special SITE SURVEY tool but they cost about $200 dollars! I built my own site-survey tool, and am quite happy with it. I built several other site survey tools, but they were too large or required LEVELING. This one uses GRAVITY to hold a string vertical as a reference point... instead of a leveling bubble. So it is much easier to use and more compact than others i have built. It is also "all-in-one" rather than a separate COMPASS and INCLINOMETER. Once you get the parts ready, gluing it together only takes about an hour. Once completed, you can look right down the waterpipe to the "exact" spot in the sky where the satellite is located! So let's get started with the build.
Step 1: PARTS NEEDED.

Items you will need are very inexpensive. You probably already have some of them around the house.
1 compass that has degree markings zero to 360. and a sighting glass.
1 childs protractor. Mine was same size as a computer CD. Lucky me.
1 half-inch plastic PVC pipe. cut into 3 pieces. Length is not real critical. I used a piece
12 inches long, another one 6.5 inches, and a third one about 1.5 inches.
1 end-cap for pvc
1 plastic "tee" fitting
2 pvc "splice" fittings
Some string
1 cotter pin
5 or 6 inches of solder to wrap around the cotter pin.
a hot-glue gun and 3 or 4 glue sticks
a piece of sandpaper to sand off the lettering on the pvc pipes.
I assembled the unit using GLUE rather than screws because metal screws may be magnetic and would upset the accuracy of the compass. If you use any metal near the compass, be sure you use BRASS screws as they are not magnetic.
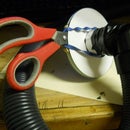
Step 2: Glue Your Pipes Together.


All of the pipes can be glued together in the shape shown in the picture. I used HOT GLUE because the pipes will not need to hold water pressure. Push them as far into the fittings as you can before the glue cools or hardens. Be carefull because Hot Glue is HOT! I placed a SPLICE adaptor on each end as a protection for my eye. Without the splice adaptor, the pipe may be rough and sharp so i didn't want to place anything like that near my eye. So be sure to place these on your pipe ends as an extra protection so you don't scratch your eye.
Step 3: Begin the Inclinometer Section

This section is called the INCLINOMETER. This tells us the ANGLE or INCLINE above the horizon for the satellite location.Draw a CENTERING line along the middle of the handle as shown in the picture. Then hot-glue the CD to the pipes being carefull to place the cd "centered" in the lines. It is important to place the CD on the RIGHT side of the sighting-pipe. (as shown in the picture). The reason for this is because of the NUMBERING on the protractor. ZERO degrees must be at the BOTTOM of the CD. If you place it on the wrong side, then your protractor will read 180 degrees off. This makes sense because when the string points straight down, that is ZERO degrees. As the scope is rotated UP.... the string always stays pointing STRAIGHT DOWN due to gravity. So no bubble level is needed for this INCLINOMETER.
Step 4: Add the Inclinometers Angle-gauge

glue down the protractor to the CD. Line up the reference lines to the lines on the pipe-centers. This step determines the accuracy of your inclinometer.
Step 5: Pendulum for the Inclinometer.


Now add the STRING to the protractor. You may need to drill a small hole in the crosshairs of the protractor to pass the string through. I made my string and pendulum out of thick thread and a COTTER PIN. I wrapped a little bit of solder around the cotter pin to give it a little more weight. You COULD use some other weight such as a PENNY or other item, just be sure it does not interfere with the compass readings. Metal objects can be magnetic and will throw off your compass readings.
Step 6: Inclinometer Glue-the-string

The string is attached to the rear of the inclinometer by just gluing it down.
Step 7: Compass Glued-down & Using the Site Survey Tool

Using websites such as lyngsat.com, you can determine where any particular satellite is in the sky that you want to know whether or not you can "see" it. Aim the compass to the azmuth (horizontal) angle you have found for your satellite. For example, I like to receive FTA free-to-air channels on galaxy 19. In the st louis area, this satellite is located at 190 degrees (magnetic) or 97 degrees on the satellite arc. the ELEVATION for this satellite is 44.7 degrees. Your numbers will be different unless you live near St. Louis. So I aim the compass at 190 degrees. I then tilt the inclinometer UP untill the gauge reads about 45 degrees. This gives me a very close aproximation of where the satellite is in the sky. If tree-limbs are in my viewscope (waterpipe), then i know that is a bad place to put the dish. Using this site-survey tool could greatly help those who would like to install a FTA dish, but don't have the equipment to do their own site survey. Now for only a few dollars and a little bit of work, you can make your own site survey tool. As a final note i will describe a little about FTA satellite service for those who haven't heard of it.
Step 8: What Is FTA Satellite??


FTA satellite stands for "Free-To-Air". In the USA there is one satellite that has about 200 channels that are NOT scrambled and it is OK... NOT illegal to receive. Also, you will receive NO MONTHLY BILL !!! FTA isn't for everyone though. Most of the channels are foreign language... or english subtitled. There is almost NO SPORTS. The channels that are in English are mostly religious channels. There are about 25 or 30 english channels... including Aljazeera, RN russian news, and Amazing Discoveries (christian) channels. Personally, I really like the programming, but it is not for everyone. If you are addicted to HBO and pay-per-view... and lifetime... etc etc then it is not for you. If you like the idea of NO monthly bill... far-fewer commercials.... christian programming.... weird foreign stuff...then you may want to look into FTA satellite. Check out sadoun.com or ebay for FTA dishes and satboxes. This instructable is purposed to give you a site survey tool, not explain all the details of FTA installation. I only want to give a few tips here to get you started if you are interested. Fta dishes must be 30 inches minimum but 33 or 36 inches is best to assure good signal. You can NOT re-use your old 18 inch dish for FTA channels. There is no guarantee that any of the channels will stay or go. The channel line-up changes occasionally, but the price is right. That about wraps it up. Have a nice day.


