

Introduction: Dagger Props (Darker Than Black)


I was recently commissioned to make two daggers for a friend. These daggers are from the anime Darker than Black and are used by the character Hei. I had a lot of fun making them and even though I'm far from the first person to make these I thought I would share my build anyway.
Step 1: Designing Your Prop

I started by researching two things: reference pictures and other people's props. The reference pictures helped me figure out what they should look like of course but finding other people that had built them gave me an idea of what would work well, and what wouldn't in the actual build process. Thankfully Harrison Krix over at Volpin Props has a very nice pattern of these daggers for sale in his shop so that allowed me to jump ahead in the design process for only $3. If you're planning on building a pair I highly recommend you pick up the pattern here.
I decided to build this in layers like I had seen others do so I printed out the pattern a couple times so I could cut different detail out for different layers.
Step 2: Supplies
The main body of this project was made up of 1/4" MDF, 1/16" styrene plastic, super glue, bondo, and paint. The paint I used was all Rustoleum brand. I used a grey primer, metalic silver, gloss black, and clear gloss coat.
I used pretty basic tools: a coping saw, a retractable knife, files, a dremel, and sand paper. You can definitely speed up the process if you have a scroll saw and a belt sander. In fact if I had to redo this project I would go out of my way to find someone with a scroll saw I could borrow, or better yet a laser cutter. If I had a laser cutter I could have cut things out with precision and bypassed hours of sawing and cutting, as well as hours of sanding and filing to fix my imperfect cuts and get each piece flush with the others, but I digress.
Step 3: Cutting Everything Out


I started by cutting out multiples of all the layers. I'm using a method some prop makers like to call "sandwiching" which is just building up the prop out of different thicknesses of material. This is where having printed out a few copies of the pattern comes in handy. I started with a center layer of styrene that has the full dagger shape. Then I cut MDF layers without the bevel of the blade or the little handle cutouts. Then I cut a final layer out of styrene for some raised detail on the handle. You can see each different layer in the above pictures. The MDF all got cut out with a coping saw. The plastic I just cut out with a retractable knife. In the last two pictures in this step you can see how all the layers stack together.
Step 4: Clean Up

At this point some of the MDF parts were a little rough since I had to use a coping saw to cut them out. I took some time with some files to clean them up a little. I basically just took all of the MDF layers and held them together so I could make sure they were all the same shape. This way the different sides of the daggers wouldn't look lopsided or anything.
Step 5: Gluing


I sanded things a bit to get any smooth finish off so it would adhere well and then glued the layers together with Gorilla super glue. The dry time was fast so it didn't actually require any extended clamping (60 seconds I think?) but I let it cure overnight before doing any more work, just to be safe.
Step 6: Bondo and Sanding


Once everything was cured I used my dremel to fine tune the handle. I had already worked on the MDF layers but they we a little thicker than the plastic layers so I used files and sanding blocks to make everything flush. The handle was the only part I had to do this on since the bevel on the blade would be filled in with Bondo.
I started to apply Bondo to the bevel of the blade when I realized I had a problem. You can see in the first two pictures in this step that the wide parts of the handle look very flat and uninteresting. When cutting out the MDF layers I had forgotten to cut those parts in so that I could bevel them along with the blade. Rather than starting all over again I just took my dremel and a grinding drum and beveled it that way.
With that problem out of the way I could get back to the Bondo process. Mixing small amounts at a time I began applying Bondo to the bevel area of the blade. It was actually a pretty easy process to apply it in the beginning because I could use the edges of the plastic and the wood as a guide for smoothing it into the groove. Once I had the majority of it filled in it became the more difficult, but usual, process of filling little dips and gaps, and sanding down bumps and ridges. I tried to use a scrap piece of MDF as a divider between the blades that I could push the Bondo up against but I just ended up globbing it on the tips and sanding it down to the shape I wanted. Once I thought it was in a good place I sprayed some primer on it to see what areas still needed work. Then I added more Bondo and resanded everything.
Step 7: Painting


Once I was satisfied with the Bondo I went on to painting.
I started by giving it about 3 coats of primer. After waiting the required 24 hours of curing time I sprayed it with metallic paint. In the pictures you can see that I didn't bother spraying the handles with the metallic paint. For these daggers all you really need coverage on is the bevels of the blades. I gave the metallic paint a good long while to cure (over 24 hours) because for the next layer I had to mask them off and I didn't want the tape to pull up any of the paint. I carefully masked off the areas I wanted to remain silver with painter's tape and then painted everything gloss black.
Don't forget to take duck face bathroom mirror selfies with them while they hang from your shower rod drying. All the prop makers are doing it.
Once I was satisfied with how they looked I peeled off the tape and checked out my work
Pro Tip: You'll notice that for some of this I was spray painting in my attic. I want to note here that fumes from spray paint are extremely bad for you and you should always spray outside or in a well ventilated area. I had to spray in my attic because it was too damp outside for the paint to cure well so to offset the fact that my conditions weren't ideal I hung a fan in front of the window to draw the fumes out of the room and I also wore a respirator.
Step 8: Final Details and Touch Ups


There was some clean up that needed to be done around the edges of the tape; a small area that pulled up towards the base of the blade as well as a little seepage under the edge of the tape in one or two places. Rather than attempting to paint over it, which could make the metalic finish look blotchy, I decided to dry brush some black paint on to give it some weathering and make it more realistic looking. After that had dried I gave it a couple coats of gloss clear coat and let them dry.
All finished!
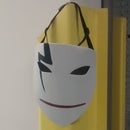
As you can see from the pictures I also made a mask to go along with it which will be documented in a separate instructable.
Thanks for reading and don't forget to vote for me in the Halloween Props contest!

Participated in the
Epilog Contest VII

Participated in the
Halloween Props Contest 2015


