

Introduction: Drafting Table / Craft Desk


My custom built Drafting Table / Craft desk.
This desk is my first furniture build and first time working with anything besides construction grade lumber. Right now it has a white board, cutting guide, lift top, floating shelf with sliding tool board and more features to come (no project is ever truly complete).
Background:
My girlfriend is very crafty and has never had a dedicated area to work on her projects. Our new house had an extra bedroom that would be perfect for all of her drawing, painting, sewing, cross stitch, scrap booking, quilting, framing etc, so we turned it into a craft room. The room is rather small and has a flue running through it creating several small awkward spaces. I decided to make a custom desk to fit in one of the spots as a surprise for her while she was away over a weekend. I started the project in a friend's workshop because you have to hide a surprise for it to work. A year later... it is in the room, in use and we are determining the final touches. In all fairness; I did complete the carcass in 2 days. However the finishing took forever and the lift mechanism was difficult to design.
I am writing this now because the shop is froze and I will not be using any water based finishes for at least 3 months, I have a little time to kill ...and I wouldn't complain about a big box of drill bits (shameless reminder to vote on contests). This is my second Instructable and a brief overview of the project highlighting things I found important. I plan on turning this build into a series of write ups and going into greater detail for each piece.
Step 1: Tools
I have a limited workshop at the moment filled with cheap or 2nd hand tools so the design had to work around what I had or was able to borrow. My biggest aggravation with most Instructables is "first go buy this $500 tool." Most of us do not have the luxury to just buy any specialty tool and the lack of these tools automatically prevent us from doing many of the projects. I do not have a functional router, hand saw, miter saw, jointer, planer, jig saw (saber saw), air compressor, lathe, 3d printer, laser cutter or any other $4,000 whirligig.
That being said, I was lucky enough to use someone else's shop for a day and borrow some tools that really sped up the process. I have no idea how I would've glued the top together.
Had:
Palm Sander
Framing Square
Carpenter Square
Fancy Paint Brush
Ratchets and Wrenches
Cordless Drill and Bits
Drill Press (optional)
Circular Saw
Level
Phone camera
Owned but not accurate/precise enough:
Table saw with wobbly fence
Radial Arm Saw aka whirling death machine
I love this machine and it probably just needs a tune up to take out the extra play
Router with flimsy table (the fixed collet is worn out and will not hold a bit safely)
Bought:
Chisels
Pocket Hole Jig (to speed up the process)
Foam Brushes
Borrowed: (seriously, thank you again)
Good table saw
Miter Saw
Biscuit Joiner
Belt Sander
Pipe Clamps
Brand Nailer
Air Compressor
Step 2: Design


The design will always change, you will find something that didn't work exactly as expected. The trick is to be able to get as many of these changes out of the way before you ever make the first cut and to adjust on the fly.
Tips:
- Draft it - this will show any early issues. I use engineering grid paper most of the time but use cad or 3d modeling for more complete things.
- Mock it up - stack up boxes, scrap wood, anything with volume to get approximate sizes and heights and see how it fits you and the space. Throw a sheet over it if you have trouble seeing anything besides a pile of crap.
- Look it up - there have been billions of people that came before us, chances are that somebody else had the same idea first. See what they did for inspiration
I used Revit and Sketchup to model this one.
The design changed several times.but it always included lots of storage, 38" high, tilting drafting section, siccor guide and to perfectly fit in the alcove. I avoided curves because they would have to be done free hand with my palm sander.
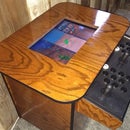
Step 3: Desk Top


I started with 3 edged Quarter Sawn American Sycamore. It is a light colored wood that has a beautiful "ray" detail.
I built the top in 1 morning at a friend's shop, so every tool during step this was borrowed.
I first laid out all the pieces to figure out the book matching. Then figured out the maximum width I could get from each piece.
I cut to length on the miter saw, then ripped with the table saw, then cleaned up the opposite side with the table saw. The saw cut so well we used those cuts for the glue joints.
The biscuit joiner and pipe clamps made glue up much easier than expected. I couldn't contain my excitement to use such fancy tools. I was originally going to find a nice flat floor to do the glue up on.
American Sycamore has tear out issues with planers so I was forced to sand at least 3/32" off of the top with my palm sander. I spent 2 days with a palm sander until someone lent me their belt sander (seriously thanks again).
After it was sanded to final thickness and flatness it was cut into the 2 final top pieces and ready for finishing.
Step 4: Cabinets


I did this a little backwards from tradition. Face frames are typically used to hide the construction of the cabinet. I used the face frames as the support for the entire cabinet. The face frames are built with glue, butt joints and a pocket hole jig. The jig wasn't necessary but it made everything go much faster. I glued and brad nailed the panels to the frame from the inside of the cabinet. This hid almost all of the pocket holes.
Step 5: Apron / Lift Mechanism


This is by far the most complex part of the build and would have saved a lot of time if I had just abandoned the drafting table style lift. The entire purpose of the apron is to provide support for the table top. I modified it so it included a basic linkage and crank to raise the top.
How it works:
- Crank the thread rod and the block with the captive nut moves towards the front of the desk
- The block forces the linkage into the top.
- The top is forced to pivot at the hinges
- The top raises
The linkage must be at a slight upward angle to work. Basic statics shows that the lower the angle, the more force required to get a lift. I made a couple different size links to see what gave me the easiest lift.
Since I used quatersawn wood for the top, it is less likely to warp. I felt comfortable making the top lift support with the wood oriented in the weaker direction.
Step 6: Floating Shelf W/ Sliding Tool Board


This shelf was my first Instructable you can see it here: Floating Shelf with Sliding Hanging Organizer. I'll probably update it with more photos showing the finishing and light installation.
It has led lights built into it, finished with water based poly. The sliding mechanism is just a hanger for a bypass closet door.
The tool organizer had to slide, otherwise it would interfere with the tilting drafting table portion of the desk.
Step 7: Whiteboard


It is a $12 4'x8' "White Panel Board" cut to size with a white pine frame.
It is attached to the wall with large "Command Picture Hanger" strips, basically velcro on steroids. These hold flatter and stronger than anything else I have tried with the added bonus of no drywall damage.
I use white panel board because of the cost. The downside is that is not magnetic and as the surface becomes scuffed it will not clean up as well. However, I can replace the board 10 times for the cost of a single commercial grade board.
The frame was rabbeted with the 0 clearance table saw fence shown. To the safe conscious: the bolt is recessed and the blade can not hit it unless the blade bends 3/8" and if that happens a bolt is the least of my worries.
Step 8: Finishing


This step was infuriating to me so I apologize in advance.
I used water based polyurethane (poly) as the finish because it is the clearest non-yellowing finish available and this was the source of all my frustration. I own a very nice nylon paint brush that will put down any finish I have tried like a pro (if I do my part) except this one. I was constantly getting dry spots, brush strokes, runs, wet edge issues, and bubbles in the finish. I tried everything and sanded off the finish to bare wood at least 3 times. I kept reading and trying different things until I found the one that worked, but not before inventing some knew 4 letter words.
For the stencils I used basic black spray paint and a week of curing between changing finish types. Be sure to use extremely thin coats to avoid bleed through.
Top: 3 layers of poly, Stencils, 2 more layers of poly
White Board and Floating Shelf: 2 layers of poly
Cabinets: 3 layers of poly.
If you are using water based poly you need to break multiple rules of good finishing technique. Find the biggest, fattest, cheapest black foam brush you can find that will cover in the least amount of passes and buy 4+. Treat them as disposable.
1st Coat:
Thin the poly with distilled water about 10% (any more causes curing issues)
Put a thin layer down and allow it to completely dry. It will absorb and raise the grain.
Go over every thing with 220 grit or finer sand paper to knock down the grain but not remover the poly. If it is smooth it is done.
2nd Coat:
Start by heavily over loading the brush (2 inches up or more) and let it drip off. Do not strike off. It causes air bubbles in the foam
Start just off the edge because it will cause a puddle when first touched to the surface.
As you brush it on, lay the brush flatter until all the poly from one side is on the surface. Do not lift off the surface until you reach the edge. Lifting will cause bubbles.
Now go back the other direction using the opposite side of the brush. The goal is to have the brush almost dried out when it hits that puddle
1 strike off with just a wet tip should even everything out
Do not go over the same sport more than 3 times. There is only about a 1.5 minute working time.
Water based poly shows sanding scuffs between layers in glossy finishes. I had decent results with 400 grit paper, no pressure and going with the grain.
Step 9: Finished! ...Sorta


We are still organizing and adding everything to the desk.The only way to tell what you really need is to use it.
Future Items to add and why I'm waiting:
- Sewing Machine Lift (we don't own the machine yet so I can not determine the final height, but I have the lift and it will work great)
- Light table (no safe way to create accurate rabbets on short stock)
- Drawer and Shelves (pieces are cut but can't use water based finishes)
- Lift Crank Knob (unsafe router)

Participated in the
Tables and Desks Contest 2016


