

Introduction: Drilling Registration Holes


You're almost finished with this side, but you need to drill three registration holes in your part that will go through the material and then down into your spoiler board. This way, when you flip your part, you can insert dowels through the holes and into the spoiler board that will align your part perfectly with Setup 1. This will prevent you from having to change the X and Y values of your WCS after the flip.
If you didn't have a registration system, you'd have to reset the WCS after the flip in X, Y, and Z. Remember that the DMS does not have a Renishaw probe to locate your part: you have to do this "by eye" by jogging an endmill or tool as close to Work Home as possible. Even if your stock were exactly square and positioned perfectly square to the machine, it would still be nearly impossible to set the WCS "by eye" and get the two sides to align perfectly with one another.
1) In the ribbon, click Drilling.

2) Next to Tool, click Select.
3) In the Sample-Aluminum library, choose the 1/2" drill. Click OK.

4) Change the Spindle Speedto 1000 rpm.
You must manually set feeds & speeds because this tool is not in the Pier 9 CNC Tool Library. By default, drill rpm is not correct. Use the following schedule for Sample Library drills in wood:
1/8" Drill: 4000 rpm
1/4" Drill: 3000 rpm
3/8" Drill: 2000 rpm
1/2" Drill: 1000 rpm

5) Click the Geometry tab.
6) Select the bodies of the three holes.
Step 1: Registration Holes Continued

1) Click the Heights tab.
2) Under Bottom Height, check Drill Tip Through Bottom.
Remember that a standard drill bit has a 118 degree angle at the end. By default, the toolpath will end exactly at the tip of the drill. In this case, this means the drill would not go all the way through the stock.
3) Add a Break-Through Depth of 0.35.
The break-through depth specifies how much further the tool drills past the bottom of the hole, after it has broken through. The tool will drill 0.35" past the break-through, into the spoiler board. You want this so the dowels will have a place to be seated after the flip. However, you have to be very careful that you don't drill through your spoiler board into the acrylic on the machine bed of the DMS. The tip of this drill bit will go 0.5" into the spoiler board, so your spoiler board MUST be at least 3/4" in depth.
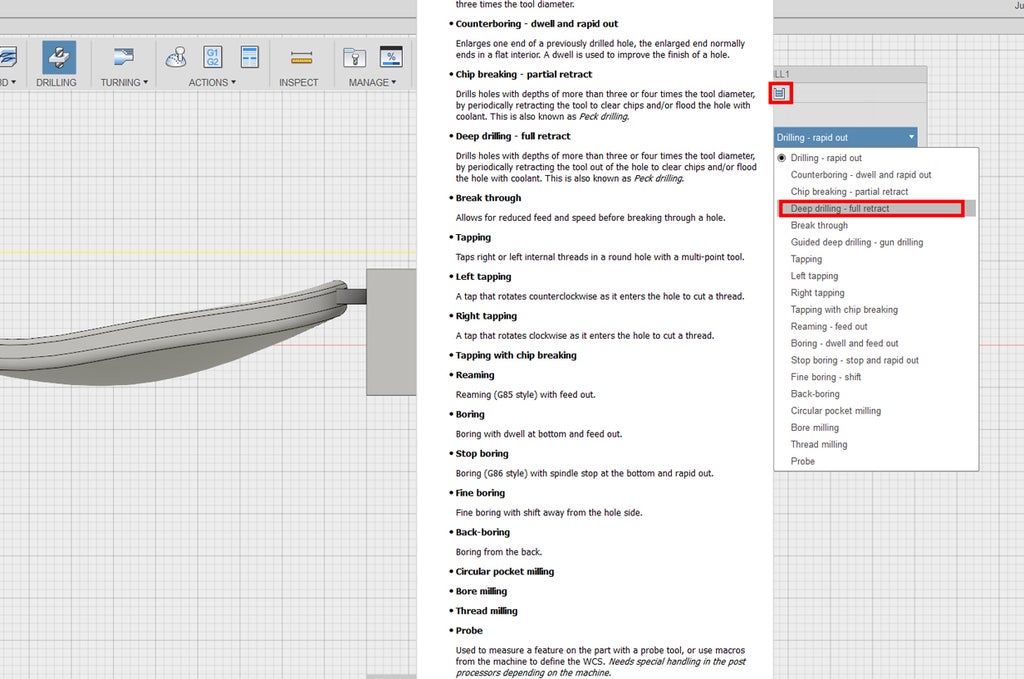
10) Click the Cycle tab (far right).
11) Change the Cycle type to Deep Drilling-Full Retract. Though new fields will appear, leave those at the default settings.
The default drilling cycle is Drilling-rapid out. This brings the tool into the hole once and then rapid retracts. This is fine for shallow holes, but could break drills in deeper holes.
Deep Drilling is the best cycle for drilling holes with depths of more than three or four times the tool diameter, by periodically retracting the tool out of the hole to allow chips to escape. Your drill depth is 1.5" (depth of stock) plus 0.5" (depth into spoiler board). 2/0.5 is 4, so you should use Deep Drilling, as this ratio is greater than 3. If you're ever not sure what drilling cycle to use, just use Deep Drilling--it's conservative and will help drill bits last longer.
12) Click OK to generate toolpath.
13) Click Setup 1.

14) Click Simulate.
Turn off the visibility of the model and make the stock transparent so you can watch the deep drilling.
You've finished all the toolpaths for Setup 1! The next lesson will address flipping the part and creating a new setup for the new orientation.


