

Introduction: Enameling Metal Jewelry


This Instructable is designed to show you how to do some great basic jewelry techniques, like doming and torch enameling. This is one that is fairly introductory in skill level, so if you've never worked with metal jewelry, you will be able to do a lot of this with ease. I actually teach these basic skills in the jewelry class that I teach at the high school that I work at. I hope you enjoy! Here's a list of supplies and links to where you can find each of these items! I hope you enjoy! If you're trying to do this as cheaply as possible, research before you buy! Sometimes, certain items will be on sale through different websites.
1. Copper sheet (20 gauge is ideal for enameling, but don't go any thinner than 22 gauge, the enamel will warp the metal itself!) 6x6" Sheet
- You can also buy circle blanks as well, which would save you from having to cut the metal--tends to be more expensive by bulk, but if you plan on doing a lot of metalsmithing, you'll save much more by purchasing big sheets, generally, the larger sheet you purchase, the less per square inch.
- *If you didn't know, metal gauges work as the lower the number, the thicker the metal, the higher the number, the thinner the metal
2. Cutting Tools
3. Enamel Powder *Pay attention to your opaque and translucent powders! Opaque will not show metal through, as opposed to translucent need a base color to make it really show the color. Usually a white base works well.
- Rings-Things--they sell small sample packs for really cheap, but limited selection.
- Rio-Grande--great selection, but tends to be a little more pricy.
- Fire Mountain Gems--Be careful you get the vitrearc type enamels, not their resin-based materials.
4. Beads--I used pearl and glass seed beads for this instructable, but you can always substitute!
- Michaels, Fire Mountain Gems, Hobby Lobby, etc.
5. 20 or 22 Gauge Silver Wire-- I like to use Argentium Silver wire and Rio sells them in customized segments. For this instructable, you would only need about 4 inches for earring wires. You can use sterling silver as well. I like to use silver for earring wires, primarily because I have sensitive ears and I rash when using anything plated.
6. Head Pins- this link is to Argentium head pins, but you can substitute for sterling silver.
7. 1.25 mm Metal Hole Punch
9. Brass Hammer
10. Bail Pliers
11. Nylon Ring Pliers--optional, you can also use a steel block to pinch the dome
13. Metal File
14. Steel Block
15. Chasing Hammer
17. MAPP gas (yellow canisters) and torch (propane torch nozzles work on MAPP gas tanks!) --NOTE: Propane gas will fire enamel, but it WILL take longer to heat, so if you're impatient like me, you'll want the MAPP gas.
18. Tri Pod and Metal Mesh Screen OR Screen and Clamp
20. Rubber Earring Backs *Some prefer to use them, some don't. That is your preference.
SAFETY:
1. Safety Goggles
2. Ventilation
3. Nonflammable surface to torch on--large ceramic tiles work great on top of another surface to protect your table tops!
4. Particle Mask
Step 1: Cut Your Metal


There's two approaches that I like to use that are relatively quick. The first is using a steel disc cutter. If you plan on cutting a bunch of round pieces, these do a good job at being consistent. You'll need the brass hammer and steel disc cutters. I used 1" diameter discs. When using steel tools (for example, the cutter die), you'll want to use the softer brass hammer. It's ok for the surface to be rough on the hammer, it's more to keep from your cutters from mushrooming at the top while using a steel hammer. Some important things to know when using your steel disc cutter. Make sure you're hammering it square, like a nail. If you hammer it crooked, it will shave the inside of your cutter and you will wear out the inside of it, causing for lopsided/stretched cuts. So, instead of a crisp edge, you get irregular lumps.
The second way to cut your metal is using the french shears. You won't get as smooth and perfect of a circle, but nonetheless it is a much cheaper solution, if you're looking to keep this pretty cheap.
If you would rather just purchase the discs, they're more expensive in the long run, but for a set or two, they are significantly cheaper than buying the disc cutter.
Step 2: File Your Metal Edges

If you cut your metal using the french shears, you may consider filing now to get the nice elliptical form you were looking for. I love filing to get the 'beveled' edge that makes it feel more of a finished edge. It also removes any burrs that may be left behind from cutting them out. My go-to is a 10 inch single mill file. There's many other options, but the one suggested at the beginning is a pretty good staple. Sandpaper also works really well, but I usually use 400 grit or higher if I go that route. The higher the grit on sandpaper, the more smooth/finer the finish will be.
Step 3: Doming and Forming Your Metal


Once your edges of your circles are filed, you will want to start doming them. I like to use my dapping block, which has a range of different sizes and depths for this particular one. You can also use a chasing hammer to do this doming process, but it gets more challenging. When you use steel tools, like the daps, you'll want to use a soft metal hammer, like brass. If you strike steel against steel, you will 'mushroom' your tools, which will end up in damaged tools in the long run. Here's a great video that goes into the ins and outs of dapping and doming. The important thing to remember is that you should do it gradually, by going from largest to the intended size, step by step. When you hammer, there will be a change in the pitch of sound when hammering, and you'll notice the difference if you listen for it.
Step 4: Punch Holes


Using the handy Eurotool Metal Hole Punch, create two holes in each domed piece of copper. These are where your headpin will run through to hold your pearl in the middle later. If you also noticed, the dome is not exactly perfectly domed, because I pinched it laterally using nylon ring pliers. If you don't have any of those handy, you can also use a chasing hammer to hold it sideways and collapse the dome just slightly, so they're not exactly perfect domes.
Step 5: Clean Your Metal

Any surface oxidization you may have on your piece will need to be cleaned off. If you start with bright copper, I find the yellow Sunshine Polishing Cloths are super quick to get back that high shine if you have a few spots here and there after handling it. Be sure to wash both your hands and your piece with soap and water after you get done polishing it because the compound will be a contaminant in your enamel later and you REALLY don't want that. Any contaminants can potentially cause your enamel to crack later. You can see the difference between unpolished versus polished in the image above.
Step 6: Apply Klyr-Fire
Using a small brush, apply the clear liquid called Klyr-Fire. There are several other brands of solvents that you can use, but a small amount GOES A LONG WAY. I like to keep from cross contaminating my big stash by using small film canisters (provided by my fellow Photo teacher). Be sure to always label the container. Let it dry. This will help keep your enamel fused to your metal.
Step 7: Sift the Enamel: White Base


When you're sifting enamels, be sure not to contaminate the powder. I like to use little scraps of matboard as a base to capture the lost enamel. With translucent/transparent enamels, like our cascade blue that we will be using later in this instructable, generally, you will want to use a base color, like white.
While using the sifter, gently vibrate the enamel powder onto the domed discs. I've got mine inverted to act like a cup to hold the enamel. The sifter handle has a series of ridges where you can run your thumbnail across it to vibrate it enough to sift it like powdered sugar. Give it a generous coat, but you don't want to make it too thick. You shouldn't be able to see any of the underlying metal and it shouldn't be more than an 1/8" thick. Any thicker than that, you run the risk of cracking your enamel. Be sure to also remove any contaminants that may fall onto the surface. Occasionally, a fleck of dirt will fall in, so you want to do a double check before torching, because once it's heated, it's very difficult to remove any blemishes/dirt.
Step 8: Firing First Round


When firing enamel on copper, you will want a couple things handy. First off, a MAPP gas torch. As mentioned at the beginning, a propane torch nozzle will work with MAPP gas. Propane can work as well for firing, but it will take considerably longer to hit the firing temperature to melt the enamel, which is 1300°F to 1600°F, depending on the glass color, thickness, and chemical composition. You'll want a well-ventilated space, safety goggles, a nonflammable surface, and a dust mask (because of the powder). If you don't have a metal surface handy, ceramic tiles work as a great substitute! I would suggest using independent tiles placed on top of your surface, as opposed to using a ceramic tiled surface, if you go that route.
When you heat enamel, it should be fired FROM BELOW. Any fire that comes directly in contact with the enamel itself will become smoky and not as vibrant of a color. Hold the torch so the blue cone of the flame is touching the metal. Make small circles continually to heat the metal evenly.
As you torch the enamel, it will change to three textures. The first, it will look like 'burnt sugar', so it will still be in powdered form, but typically it darkens, like burnt sugar, hence, the burnt sugar stage.
The second stage is the orange peel stage, when it's half melted and looks like the bumpy skin of an orange peel.
The third and final stage is the glossy stage. As soon as you see it hit that stage, pull the torch away. Let it cool. I usually like to move it after it's no longer glowing and place it on a metal surface out of the way for at least 5-10 minutes. The larger the piece, the longer it will take to cool. If you rapidly cool glass, it will crack and fracture off, so let it take its time and cool.
Step 9: Sifting Transparent Enamel (2nd Layer)

Once the enamel is cooled, you will sift on the second layer, similar to the white layer we just did, but using the transparent enamel. In this case, I used Cascade Blue. If you want more vibrant of a color, layer more and do multiple layerings and firings of the same color. You can do this several times, especially if there's a thin spot. The process is the same as the base coat, just a different color.
Step 10: Round 2 Firing of the Transparent Layer Enamel


Here in the second round of firing the Cascade Blue enamel, I included pictures of the enamel as its firing and cooling to show that colors can change during the heating process. DON'T WORRY! Most enamels will cool to the color as sampled! Some colors, like reds and oranges that if they are fired too long, may result in duller colors, so make sure you pull the fire away after you've hit the glossy stage. I also included images of the stages of how it goes from powdered to the melted gloss.
Step 11: Creating Earring Wires Pt. 1


Now that we've created the enameled part, we will now need to create earring wires. There's all sorts of designs and styles, but my go to is creating the fish hook style. This is done with a small loop using round nose pliers (in the first picture) and then a bigger loop with the bail pliers (in the second picture). Bail pliers can always be substituted with dowel rods and other items slightly smaller than a pencil diameter. Once I do the big loop, then I will typically do a little kink parallel to the little loop.
Step 12: Creating Earring Wires Pt. 2


Using the french shears, I typically cut at anywhere from 1/8" to 3/8" from the kink, depending how comfortable of length you want. Be sure they are the same length for both earring wires. I cut these a little longer (the ones demonstrated are at 3/8") Once they're cut, they will need to be filed and rounded down. French shears do a nice job being pretty flush, but can still leave a pretty sharp cut. Filing prevents ear punctures later down the road.
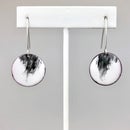
Step 13: Assembling!


Now that we have our components all made, next we will use the headpins and string the few little glass beads at the base, then through the first hole. After it's through the first hole, then string on the pearl and feed the headpin end through the second hole. Make a 90° kink flush to the enameled piece. Use the french shears to cut the length of the headpin, which is typically 3/8" to 1/2" in length from the kink. Use that length on the headpin that is weaved through the holes and create little loops using the round nose pliers. Finally, once you have the loops, open them back up, using the round nose pliers, and insert the earring wire and join the pieces together! Keep in mind, you can always substitute different beads and different enamels to create different effects. Because of the weight of these earrings, you may consider rubber earring backs. I typically put them on majority of the earrings I make, simply as a preventative to keep them from falling out. Hope you enjoyed learning about enameling! This just scratches the surface of what this medium can do!

First Prize in the
Hand Tools Only Contest 2017

Participated in the
Metal Contest 2017


