

Introduction: From Papers to Pixels: a Raspberry Pi Document Scanner


Welcome to my project where i build a Raspberry Pi Document Scanner! Utilizing the Raspberry Pi 4b, the Pi Camera V2, and custom 3D-printed components, this guide will guide you through creating a functional document scanner. This device is equipped to capture high-resolution images and process documents for perspective correction and cropping, making it an ideal tool for a variety of digitizing tasks.
The ability to digitize documents efficiently holds vast importance in today's digital-first environment, serving purposes ranging from personal archiving to reducing paper clutter and facilitating educational activities. Assembling this scanner yourself not only provides a cost-effective alternative to commercial scanners but also enriches your understanding of hardware integration, software development, and advanced image processing.
By the end of this instructable, you will have put together a fully functional document scanner. The final product will excel in producing clean, corrected images of your documents. The introduction video and the images of scan results showcased in the pictures above provide a glimpse into how the assembled components work seamlessly to fulfill the project's objectives.
Supplies
Requirements:
- Raspberry Pi 4b
- Pi Camera V2
- 1 x Push Button
- 3 x 220 ohm resistors
- 1 x Green 3mm LED
- 1 x Orange 3mm LED
- Soldering equipment
- USB stick
- Jumper wires
- Breadboard (optional, but helpful)
Tools:
- Micro SD card with at least 16GB
- Micro SD card reader
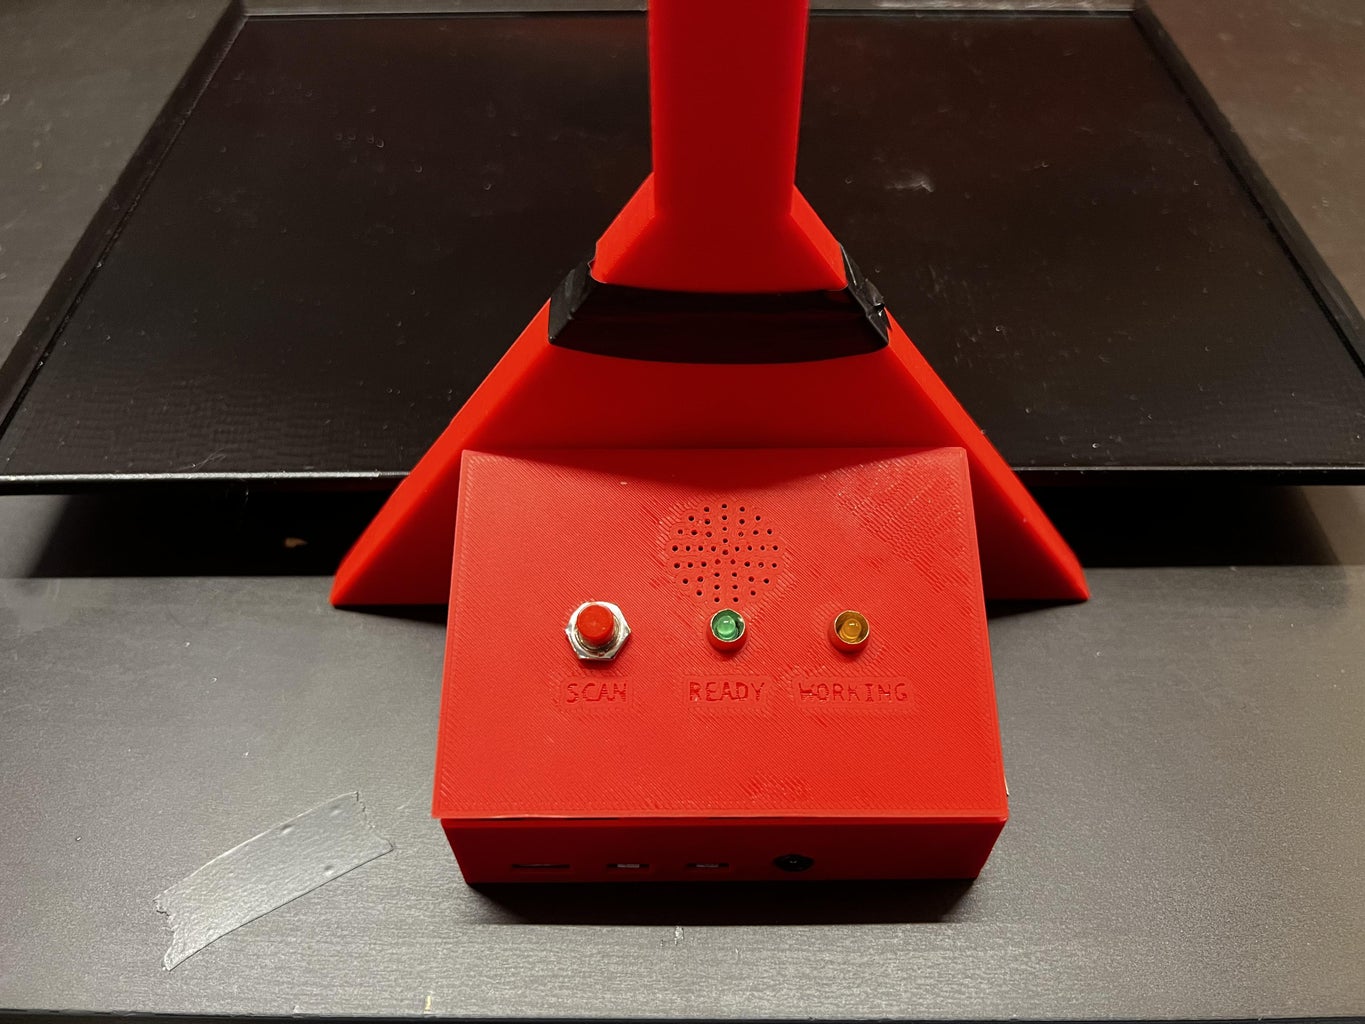
Step 1: Printing the Frame

Kick off the document scanning project by 3D printing the frame that will house all the electronic components. This step is positioned first to allow the frame to print while you proceed with the coding and wiring aspects of the setup. I printed it using a 0.6mm nozzle and at 0.2mm layer hieght. Please keep in mind that i have never designed anything for printing before myself and this is not a great design by any means. Any changes or edits are very welcome!
Attachments

Step 2: Preparing the Micro SD Card

Install Raspberry Pi Imager:
- Download and install the Raspberry Pi Imager from the Raspberry Pi website. It's available for Windows, macOS, and Ubuntu.
Choose the OS and Write it to the SD Card:
- Insert the SD card into your computer.
- Open Raspberry Pi Imager.
- Click on "CHOOSE OS" and select "Raspberry Pi OS Lite (64-bit)" from the list under Raspberry Pi OS (other).
- Click on "CHOOSE SD CARD" and select your SD card from the list.
- Click on "WRITE" to begin writing the OS to the SD card. Confirm any prompts to erase the SD card if necessary.
Enable SSH for Headless Setup:
- After the OS is written to the SD card, the Imager will automatically mount the boot partition.
- Before ejecting the SD card, navigate to the boot directory in your file explorer.
- Create an empty file named ssh (without any extension) inside this directory to enable SSH access on boot.
Add WiFi Configuration (Optional):
- Still in the boot partition, create a file named wpa_supplicant.conf and add the following configuration for your WiFi network:
country=US  # Use your 2-letter country code
ctrl_interface=DIR=/var/run/wpa_supplicant GROUP=netdev
update_config=1
network={
    ssid="YOUR_NETWORK_NAME"
    psk="YOUR_PASSWORD"
    key_mgmt=WPA-PSK
}
- Replace "YOUR_NETWORK_NAME" and "YOUR_PASSWORD" with your WiFi details.
Step 3: Hardware Assembly


Connecting the Pi Camera:
- Connect the Pi Camera V2 to the CSI port on the Raspberry Pi using the camera ribbon cable. Ensure the Pi is powered off while doing this.
Wiring LEDs and Button:
LEDs:
- Connect the anode (longer leg) of each LED to a GPIO pin through a 220-ohm resistor (GPIO 22 for green, GPIO 27 for orange).
- Connect the cathode (shorter leg) directly to any ground (GND) pin on the Raspberry Pi.
Button:
- Connect one side of the button to GPIO 17.
- Connect the other side to a ground pin. You can add a 10K ohm pull-down resistor to ensure the input state is stable.
Testing the Connections:
- Power on the Raspberry Pi.
- Use simple Python scripts to test each component (LED blink, button press detection).
The next parts will cover setting up the software environment, programming the Pi for the scanning task, and creating a system service to manage the application.
Step 4: Software Installation and Configuration
SSH into the Raspberry Pi:
- Find your Raspberry Pi's IP address from your router's device list, or connect a monitor and keyboard to get it directly from the Pi using hostname -I.
- SSH into your Raspberry Pi using a terminal or an SSH client like PuTTY:
ssh pi@pi_ip_address
- The default password is raspberry, but you'll be prompted to change it on first login.
Installing Dependencies
Update and Upgrade:
- Ensure your Raspberry Pi is up to date with the latest packages:
sudo apt update
sudo apt upgrade -y
- Install Python3 and Pip if they are not already installed:
sudo apt install python3 python3-pip -y
- Install necessary tools and libraries for image processing and camera control:
sudo apt install libatlas-base-dev libjasper-dev libqtgui4 python3-pyqt5 libqt4-test libilmbase-dev libopenexr-dev libgstreamer1.0-dev -y
sudo apt install -y python3-opencv python3-numpy
Setting Up the Virtual Environment
- Install the package for creating virtual environments:
sudo pip3 install virtualenv
- Create a virtual environment in your project directory:
mkdir ~/document_scanner
cd ~/document_scanner
virtualenv venv --system-site-packages
- Activate the virtual environment:
source venv/bin/activate
- Install dependency:
pip install imutils
This completes the basic software setup. In the next part, we will cover writing the scanning script, creating a service to run the script at boot, and testing the entire setup.
Step 5: Part 3: Making the Document Scanning Script and Setting Up a System Service
In this part of the guide, we cover scripting the document scanning functionality, testing it, and creating a systemd service to automatically run the script at boot.
Create the Document Scanner Script:
- Use the sudo nano document_scanner.py to make the scanning script. Make sure it's placed in your ~/document_scanner directory. Copy the code below and paste it into the script, then press ctrl+x and y to save.
import sys
import cv2
import numpy as np
import os
from picamera2 import Picamera2
import time
import imutils


def find_usb_drive():
    # Directly return the path to the 'scans' directory on the USB drive
    path = "/media/usb/scans"
    if os.path.isdir(path):
        return path
    else:
        print(f"Directory {path} not found.")
        return None


def next_filename(path="/media/usb/scans", prefix="scan_", suffix=".jpg"):
    """Generates the next available filename in the path with a given prefix and suffix."""
    i = 1
    while os.path.exists(os.path.join(path, f"{prefix}{i}{suffix}")):
        i += 1
    return os.path.join(path, f"{prefix}{i}{suffix}")


def capture_image():
    picam2 = Picamera2()
    picam2.start_preview()
    time.sleep(2)
    config = picam2.create_still_configuration()
    picam2.configure(config)
    picam2.start()
    image = picam2.capture_array()
    picam2.stop()
    return image


def preprocess_image(image):
    gray = cv2.cvtColor(image, cv2.COLOR_BGR2GRAY)
    blurred = cv2.GaussianBlur(gray, (9, 9), 0)
    edges = cv2.Canny(blurred, 50, 150)
    kernel = np.ones((7, 7), np.uint8)
    closed = cv2.morphologyEx(edges, cv2.MORPH_CLOSE, kernel)
    return closed


def find_document_contour(edges):
    contours, _ = cv2.findContours(edges, cv2.RETR_EXTERNAL, cv2.CHAIN_APPROX_SIMPLE)
    document_contour = None
    max_area = 0
    for contour in contours:
        peri = cv2.arcLength(contour, True)
        approx = cv2.approxPolyDP(contour, 0.05 * peri, True)
        area = cv2.contourArea(approx)
        if len(approx) == 4 and area > max_area and area > 5000:
            document_contour = approx
            max_area = area
    return document_contour


def four_point_transform(image, pts):
    rect = order_points(pts.reshape(4, 2))
    (tl, tr, br, bl) = rect
    width = int(max(np.linalg.norm(br-bl), np.linalg.norm(tr-tl)))
    height = int(max(np.linalg.norm(tr-br), np.linalg.norm(tl-bl)))
    dst = np.array([
        [0, 0],
        [width-1, 0],
        [width-1, height-1],
        [0, height-1]
    ], dtype="float32")
    M = cv2.getPerspectiveTransform(rect, dst)
    warped = cv2.warpPerspective(image, M, (width, height))
    return warped


def order_points(pts):
    rect = np.zeros((4, 2), dtype="float32")
    s = pts.sum(axis=1)
    diff = np.diff(pts, axis=1)
    rect[0] = pts[np.argmin(s)]
    rect[2] = pts[np.argmax(s)]
    rect[1] = pts[np.argmin(diff)]
    rect[3] = pts[np.argmax(diff)]
    return rect


def binarize_image(image):
    gray = cv2.cvtColor(image, cv2.COLOR_BGR2GRAY)
    blurred = cv2.GaussianBlur(gray, (9, 9), 0)
    binary = cv2.adaptiveThreshold(gray, 255, cv2.ADAPTIVE_THRESH_GAUSSIAN_C, cv2.THRESH_BINARY, 29, 7)
    return binary


def main():
    usb_path = find_usb_drive()
    if not usb_path:
        print("No USB drive found. Exiting.")
        return

    image = capture_image()
    edges = preprocess_image(image)
    document_contour = find_document_contour(edges)


    if document_contour is not None:
        warped_image = four_point_transform(image, document_contour)
        binary_image = binarize_image(warped_image)

        rotated_image = imutils.rotate_bound(binary_image, -90)

        processed_image_filename = next_filename(usb_path, "scan_", ".jpg")

        cv2.imwrite(processed_image_filename, rotated_image)
        print(f"Binary document image saved to {processed_image_filename}")
    else:
        print("No document found in the image. Please check the camera setup and document placement.")


if __name__ == "__main__":
    main()
- Ensure all paths and dependencies are correctly set within the virtual environment and the script is executable:
chmod +x document_scanner.py
Testing the Script:
- Run the script within your virtual environment to make sure it operates as expected:
python document_scanner.py
- Check the output to ensure images are captured, processed, and saved correctly.
Creating the Controller Script
- Now in the same document_scanner directory do the command:
sudo nano controller_script.py
- This script is designed to react to button presses, manage system LEDs for status indication, and call the document scanning script. Copy the script below and paste it before saving.
from gpiozero import Button, LED, Buzzer
from signal import pause
import time
import subprocess
import logging


logging.basicConfig(level=logging.INFO, format='%(asctime)s - %(levelname)s - %(message)s')


button = Button(17)  # Adjust the GPIO pin number according to your setup
led_green = LED(22)  # Adjust for your green LED GPIO pin number
led_orange = LED(27)  # Adjust for your orange LED GPIO pin number
buzzer = Buzzer(24)  # Buzzer connected to GPIO 24


is_scanning = False


def beep():
    """Short beep to indicate button press."""
    buzzer.on()
    time.sleep(0.1)  # beep for 100 ms
    buzzer.off()


def play_melody():
    """Play a simple melody after scanning."""
    melody = [0.1, 0.1]
    for duration in melody:
        buzzer.on()
        time.sleep(duration)
        buzzer.off()
        time.sleep(0.1)


def scan_documents():
    global is_scanning

    if button.is_pressed and not is_scanning:
        logging.info("Button pressed. Starting scan...")
        led_orange.on()  # Turn on orange LED to indicate scanning
        led_green.off()  # Ensure green LED is off
        beep()  # Beep to indicate scan start

        is_scanning = True

        subprocess.call(["python", "document_scanner.py"])

        is_scanning = False
        led_orange.off()  # Turn off orange LED
        led_green.on()  # Turn on green LED to indicate ready for next scan
        play_melody()  # Play melody after scanning

        logging.info("Scan complete. Ready for next scan.")

    time.sleep(1)  # Adjust this value based on actual debounce needs


led_green.on()  # Initially, the system is ready for a scan


button.when_pressed = scan_documents


pause()
Testing the Controller Script:
- Run the controller script to ensure it interacts correctly with the hardware (button presses, LED signals) and triggers the scanning process:
python controller_script.py
- Verify that the LEDs and buzzer behave as intended during the operations.
Step 9: Setting Up a System Service for Autostart
- Create a Systemd Service File:
- Navigate to the systemd directory and create a new service file:
sudo nano /etc/systemd/system/document_scanner.service
- Add the following configuration to the file:
[Unit]
Description=Document Scanner Service
After=multi-user.target


[Service]
Type=simple
User=pi
WorkingDirectory=/home/pi/document_scanner
ExecStart=/home/pi/document_scanner/venv/bin/python /home/pi/document_scanner/controller_script.py
Restart=on-failure


[Install]
WantedBy=multi-user.target
Enable and Start the Service:
- Reload the systemd manager configuration:
sudo systemctl daemon-reload
- Enable the service so it starts on boot:
sudo systemctl enable document_scanner.service
- Start the service immediately to test:
sudo systemctl start document_scanner.service
- Check the status to ensure it's running without errors:
sudo systemctl status document_scanner.service
Final Testing and Validation
- Reboot the Raspberry Pi and observe if the service starts automatically and behaves as expected:
sudo reboot
- After rebooting, check the system logs to confirm that the service started correctly and is running as expected:
journalctl -u document_scanner.service
- Test the button, LED responses, and ensure the images are being processed and saved correctly after system boots and during normal operation.
Step 6: Final Assembly


- Putting Everything Together: Instructions on assembling all components into the final product.
- Testing: Guidelines on testing the scanner to ensure everything works as expected.
Step 7: Final Thoughts
Congratulations on completing the setup of your Raspberry Pi document scanner! You've successfully assembled the hardware, installed the necessary software, and configured everything to work seamlessly together. This project not only enhances your understanding of hardware interfacing and software development on the Raspberry Pi but also provides a practical tool for digitizing documents. Continue to explore and expand your system, and share your results with the community!

This is an entry in the
All Things Pi Contest


