

Introduction: Fusion and CAMplete Workflow for Using the Matsuura MX-330 at Pier 9


This Instructable is for workshop users at Pier 9 who are interested in machining parts on the 5-axis Matsuura MX-330 Vertical Machining Center. Following these steps is a prerequisite for the machine operation course. It is expected that users have intermediate to advanced level CNC experience, and have completed at least two personal projects already on the Haas VF2 Vertical Mill. Click here to learn more about the steps involved in the CNC Learning Path at Pier 9.
You will learn how to follow a streamlined workflow in Fusion 360 and CAMplete all the way through post processing the final G-code for the machine to run. You'll bring your part into a workholding template file in Fusion 360 and learn how to use joints and the history timeline to control the behavior of the part, stock, and fixture. You'll also learn how to plan out your CAM setups to take advantage of the modularity of the workholding system--for most applications, you won't need to probe your stock at all! This saves time, and makes for a much more efficient way to juggle multiple projects without losing the Work Coordinate System.
You'll then use CAMplete--software that takes toolpath and geometry data from CAM packages like Inventor HSM or Fusion--to run a simulation on a virtual Matsuura MX-330. This simulation provides a full representation of toolpath motion, tool changes, approaches, retracts, and all other aspects of machine movement for more accurate collision detection. This is a critical step for five-axis machines, especially ones with a small cutting envelope, because there are many more ways that the machine can collide with itself as compared to a standard 3-axis mill (like the Haas VF2). CAMplete will show you a simulation of everything that will happen during machining, from start to finish, and give you warnings or errors if any parts get dangerously close to one another. Of course, CAMplete is only as accurate as the data that it is provided with, so it's critical that all aspects of the CAM program are correct, including the stock, tool library, and workholding model.
Step 1: What You'll Need to Start

To follow these steps, you'll need:
A laptop with Fusion 360 installed
A PC to download CAMplete--CAMplete is Windows only
A USB drive
All the files you'll need are available in the Pier 9 Tool Library Instructable link. You can download these all at once or as you go--the files will be linked for you throughout this Instructable.
1) The CAMplete installation link (emailed to you)
2) The network license key (emailed to you)
4) Lang workholding vise models
6) HSM to Matsuura tool library
7) HSM to CAMplete post processor: http://cam.autodesk.com/posts/
(Search for CAMplete APT)
8) The Pier 9 CAMplete guide
After finishing this Instructable, you should read through this guide to gain a deeper understanding of CAMplete functionality.
Step 2: Download CAMplete


1) Click the CAMplete download link you received from the CNC staff.
2) Save the executable file and open it.
3) If you get a security warning, allow your computer to run the software.
4) When prompted for a security key or network security license, enter the network security license that CNC staff gave you with the link.
Step 3: Finish Downloading CAMplete


5) If you want to share the application data with all users of your computer, click Yes.
6) Choose I Agree for the license agreement.
7) Choose both components to install.
8) Choose Install Location and Start Menu Folder. Click Install.
9) Click Close.
Step 4: Open CAMplete Trupath and Exit

1) Open CAMplete.
2) When prompted to create databases, exit application.
These steps ensure that the CAMplete data will appear in the next step.
Note: if you get an error that you need to install a security key, go to the next step for troubleshooting.
Step 5: CAMplete Install Troubleshooting


In some cases, CAMplete will not open after downloading and instead you'll be prompted to attach a security key. Here are some steps to help you troubleshoot this issue:
1) Go to the Windows Start Menu, and in the search bar type regedit .
2) Open the registry editor.
3) Navigate to HKEY_CURRENT_USER/Software/CAMplete/CAMplete TruPath v4/Security Alert Options .
4) Look for Network Key Location in that folder. If you do see it, make sure you see the network key. If you don't see it, right click on the field and choose New>String Value.
5) Name the new string value Network Key Location, and hit Enter.
6) Right click the string, and choose Modify.
7) Enter the network key, and click OK.
8) Try restarting CAMplete.
Step 6: Delete Default CAMplete Program Data


Now, you are going to delete the default CAMplete program data. Later on you'll install new data that's specific to the machine at Pier 9.
1) You might have hidden folders on your PC. Check if you can see a folder called 'Program Data' in your C: drive.
'Program Data' is not the same as 'Program Files'!
2) If you can't see 'Program Data', navigate to your Control Panel and choose Appearance and Personalization.
3) Choose Folder Options.
4) Click on Show hidden files and folders.
5) Under Folder Options, click the View tab, then click the button next to Show hidden files, folders, and drives, and then click OK.
6) Go back to your C: drive and click on Program Data.
Note: Alternatively, you can enter '%programdata%' in the file explorer path field to go directly to the folder.
7) Navigate to the' CAMplete' folder, and click Delete.
NOTE: DO NOT CONFUSE PROGRAM DATA WITH PROGRAM FILES. Otherwise you'll delete your installation of CAMplete!
You are going to replace this data with data specific to Pier 9 and our Matsuura MX-330 in the next step.
Step 7: Add in Pier 9 CAMplete Program Data


1) Open the 'CAMplete data' folder in Dropbox.
2) Download the 'CAMplete.zip' file to a convenient location.
3) Right click and Extract All.
4) Leave the default destination and click Extract.
5) Navigate to the new CAMplete folder and drag it into 'C:/Program Data'.
Note: Do not drag the folder within the CAMplete folder, CSI-FWIV, into Program Data, or the file browser tree structure will be incorrect. The full explorer path field should look like this: C:\ProgramData\CAMplete\CSI FWIV . Check this against the last screenshot in this step.
You have now added all the data that CAMplete needs for Pier 9, including the correct post processor and machine definition.
Step 8: Verify That CAMPlete Is Running


1) Open CAMplete again.
2) Click Create Blank Databases.
3) When the Paths have been populated with databases (red text turns black), click Close.
4) CAMplete should open automatically. If prompted, run updates.
You have now verified that you have CAMplete up and running on your machine.
Step 9: Set Up Matsuura Projects Folder in Fusion 360


You're going to set CAMplete aside for now to focus on the Fusion 360 workflow, assuming that you've finished modeling your part and are now ready for CAM toolpathing.
For five-axis machining, it's critical that you have an accurate model of your fixture to ensure the accuracy of the CAMplete simulation. At Pier 9, we use the Lang 5-axis Makro-Grip vise, which features toothed jaws that grip a mere 3 mm of the bottom of the stock. Lang uses a modular workholding system in which every vise contains pull studs that fit in a specific pattern inside a receiver plate, which is permanently installed inside the machine. This means that the vise is always placed in exactly the same location inside the machine. This will come into play later when we consider the Work Coordinate System.
For this workflow, you will start with an assembly file of the Lang workholding system, which is made up of multiple components. Then you will drag your part into this assembly file.
1) Download 'P9 Lang 1471555 Jaws Normal.f3d' from Dropbox.
2) Open Fusion 360, go to New Design from File, and choose the file.
3) Click the Save button and then click New Project.
4) Create a new Project called called 'Matsuura Projects'.
5) Name the file 'P9 Lang 147155 Template', and save it inside 'Matsuura Projects'.
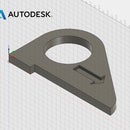
6) Next, download 'MX-330 CAMplate part.f3d' from 'Pier 9 CNC Data_2_10/Matsuura part models'.
Step 10: Bring Part Into Assembly


7) In the data panel on the left side of the screen, navigate to 'Matsuura Projects' and click Upload.
8) Click Select Files.
9) Choose the 'MX-330 CAMplate part.f3d' file and click Open.
10) Drag the part file from the data panel into the open template file window.
Step 11: Place Part and Save New File


11) Move part up using the arrows so you can see the whole part and the whole Lang vise assembly, then click OK.
12) Save as 'First Matsuura Project' in the 'Matsuura Projects' project folder.
Step 12: Import Matsuura Tool Library


Now, you are going to import the HSM to Matsuura Tool Library.
1) Download P9_Matsuura_May2017.tools and save it wherever you keep your other tool libraries.
2) In the ribbon at the top, change the workspace to CAM.
3) In the ribbon, under Manage, choose Tool Library.
4) Right click Local, and choose New Tool Library.
5) Rename the new library P9_Matsuura_Jan2017.
6) Right click again and choose Import Library.
7) Navigate to the file and click Open.
The tool library should populate with the Matsuura tools.
9) Exit out of the window.
Step 13: Create Joint


Assemblies in Fusion 360 are made up of components whose motion is controlled with joints and joint parameters. Joints, such as Rigid, Revolute, or Slider, define movement between two components. The workholding system, stock, and part are components in this assembly file.
The joints that have already been created within this template file make your process much simpler. For instance, if you edit the stock model in this file, the jaws of the Lang vise will open or close accordingly. You'll see this happen later.
You are about to build a joint between the part you just brought in and the stock inside the Lang vise. If the stock changes in any way, the part's behavior (in this case, its location) will update as well.
1) In the ribbon at the top, return the Workspace to Model.
2) Under Assemble, choose Joint.
3) For Component One, choose the center top of the part, as shown in the screenshot.
4) For Component Two, choose the center top of the stock, as shown in the screenshot.
5) Click the flip icon to flip the part.
Note that the part is sticking out above the top of the stock. This is due to the nature of this particular part--you chose a location for Component One that's a bit lower than the top of the actual part.
6) For Offset Z, enter -0.35.
Because your first operation will be to face the part, you want to leave some stock above the part model. In this case, 0.025" of stock will be faced off in the first operation.
7) Click OK.
Your part is not yet in the correct position because the stock has not been extruded to the correct amount. You'll address this in two steps.
Step 14: Editing Stock Sketch to Open and Close Lang Jaws


For this part you don't actually need to modify the stock model sketch to open or close the Lang vise jaws, but here's the process for future projects:
1) Turn off the visibility of the part and all the models of the fixture with the lightbulb icons in the browser tree.
2) In the timeline at the bottom of the screen, double click on Sketch1/Stock.
Alternatively, in the browser tree you can expand Stock, expand Sketches, and right click Sketch 1 to edit it.
3) Use the hotkey D to dimension the stock--try changing the width from 2" to 4".
4) Click on Stop Sketch.
5) Observe how the jaws have opened around the re-dimensioned stock.
This is a great showcase of parametric modeling and the power of using joints in assemblies.
6) Edit the sketch again and return the width to 2".
Step 15: Editing Stock Extrusion


You can also edit the stock extrusion in the Lang template file. In this case, your stock is a 2" x 4" bar of aluminum, cut on the horizontal bandsaw to a height of 6".
1) In the timeline, double click the Extrude1/Stock button.
2) Change Distance from 2" to 6", and then click OK.
3) Verify that the part, which moved with the stock due to the joint, is now sitting flat on the gripping part of the Lang vise, and that the jaws are touching the sides of the part.
Step 16: CAM Workspace Considerations


You have successfully brought your part into the template file, built a joint, and made the necessary adjustments to the stock.
Now it's time to move into CAM. The Lang template file also has a Setup 1 that has already been created for you--you just need to make a few adjustments.
1) Re-enter the CAM workspace.
2) Right click Setup 1, and choose Edit.
3) Notice that the origin of the Work Coordinate System, or G54 Work Home, is placed on the center top of the Lang receiver plate.
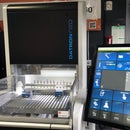
Don't move Work Home--we have a system in place that allows you to skip probing with the Renishaw probe altogether. This is because we have already set G54 inside the Matsuura to the center top of the Lang receiver plate. These coordinates are stored inside the machine under G54, and we don't ever change them. When you go to operate the machine, you will verify that this is set to the correct location by comparing the G54 coordinates on the sticker outside the machine to the current G54 X, Y, Z, A, C numbers in the controller (see photo). Because your fixture model and stock model are correct, all you'll need to ensure is that your stock is centered inside the Lang vise, and you're ready to machine your first setup.
One beauty of this system is that projects can be swapped out on the machine much more quickly, with perfect repeatability. If you haven't finished your part, you can remove it while it's still inside the Lang vise, and then later put the vise back in the receiver plate and continue machining. As long as you never changed the part's location in the vise, you'll know that everything is perfectly registered. We have extra Lang vises for this purpose.
4) Turn off the visibility of the stock, so that you don't accidentally select it when choosing your model body.
5) In the window click Nothing, next to Model, and select the model.
If you hover your mouse over the model, you should see the word "model" appear. This will help prevent you from choosing the stock.
The model will turn blue.
6) In the window click on 6 Bodies next to Fixture to verify that the Fixture has been selected.
The fixture will turn blue.
Step 17: Verify Stock

7) Click on the Stock tab in the Setup window.
8) Verify that the Stock Mode is From Solid.
9) Click on Stock Solid Body to confirm that the stock is selected.
The stock will turn blue.
10) Click OK to generate Setup 1.
Step 18: CAM Toolpathing

Following this workflow, at this point you would continue with your CAM toolpathing. The simulation will now give you collision data if you machine into your fixture--a compelling reason to perform CAM with a model of your workholding system.
Because this Instructable is not intended to teach you CAM, you are going to work with this same file, except with completed toolpaths, from this point forward.
1) Save the current file.
2) Download this file with toolpaths from Dropbox: MX-330_CAMplete_part_with_toolpaths.f3d.
3) Open the file in Fusion 360.
4) Watch the simulation so you understand what the toolpaths are doing.
Step 19: Create Folders and Download Post Processor

Once you've verified that your toolpaths are correct and your simulation has no collisions, you're ready to post process. You are going to use a post processor that outputs six different files (three .stls of your stock, model, and fixture, as well as a project file, database file, and .apt file to transfer information to CAMplete). When you open CAMplete later, it will take this data to create the final G-code for the machine.
1) Go to cam.autodesk.com/posts/ and search for CAMplete.
2) Download the latest CAMplete post, CAMplete APT.
Note: this post is updated regularly, so always check that you have the latest version.
3) If you're on a PC, save this post to a folder on your Desktop called Custom Post Processors.
4) If you're on a Mac, open a Finder window and navigate to the filepath Macintosh HD> Users> USERNAME> Autodesk> Fusion 360CAM> Posts. Save the CAMplete APT post here.
Step 20: Post Process


4) Right click Setup and choose Post Process.
5) If you're on a PC, click the three dots on the right side of Configuration Folder. Find and select the Custom Post Processors folder you just made. You won't see anything inside this folder, but don't worry: you're just mapping its location. Click Open.
On a Mac, next to Source, choose Personal Posts.
6) In the dropdown under Post Configuration, choose camplete.apt.
On a Mac, this is next to Posts.
7) Create a folder on your Desktop called Matsuura posts, with a subfolder with today's date.
The six post files will be mapped to this location. You'll want to create a new folder for each new setup, or else CAMplete will attempt to import more than six files at once and cause errors in the simulation.
8) On a PC, click the three dots next to Output folder, navigate to the folder with today's date, and click Open.
9) Name your program a four-digit number that starts with "1", like 1001.
10) Click Post.
11) Navigate to the folder with today's date and verify that the six files are now in this location.
Step 21: Open CAMplete


Now you're ready to bring these files into CAMplete to simulate your toolpaths.
1) Open CAMplete.
2) In the New Project window, click Browse.
3) Navigate to the folder with today's date and click Select Folder.
4) Verify that you have one .apt file, one .tdb file, and three .stl files inside the New Project window.
5) Under Loader, click Generic apt.
5) Under Select File Handler, choose Autodesk CAM APT.
Autodesk CAM APT is the file handler you should use every time, so verify this every time you open CAMplete. Otherwise, data could be imported incorrectly.
6) Click Import.
Step 22: Milling Machine Options


1) Click OK three times to select inches as units.
2) Under Your Milling Machine, click the button for Use Predefined Machining Setup Selected Below.
3) Place a checkmark under Default, next to Pier 9 MX-330 Machine Definition.
The Machine Definition is the model of the Matsuura MX-330 that CAMplete needs to run an accurate simulation.
Step 23: Verify NC Format

4) On the left side of the window, click NC Format.
5) Verify that the NC Format is Pier 9 MX-330 Format for every toolpath.
Note: If this format is not showing up, please see next step for troubleshooting.
Step 24: CAMplete Troubleshooting: NC Format Not Appearing


If you were able to see the machining definition, but not the correct NC Format (Pier 9 MX-330 Format), try following these steps.
1) You will see 'Default Format Not Found' in the NC Format dropdown. Click the dropdown to make sure there are no other formats that appear.
2) Navigate to C/Program Data/CAMplete/CSI FWIV/Databases.
3) See if there are duplicate databases--for example, CSI_Machines(1).DB. If these duplicate databases appear, delete them.
4) Open a New Project in CAMplete (File--New Project), browse back to the folder with today's date, and see if the NC Format now appears. If not, proceed to the next step.
5) Cancel out of the New Project window.
6) In the CAMplete Tools dropdown, choose Options.
7) Click Databases on the left side.
8) The duplicate databases might still be there. In this case, double click each one, and re-map to the original database.
9) Open another New Project, and see if the NC Format appears now. If not, try closing and re-opening CAMplete.
10) If the Pier 9 MX-330 Format appears, continue with the next step. If it does not appear, email Pier 9 CNC shop staff.
Step 25: Verify Tool Information


1) While still in the NC Format tab on the left, verify that the Input Tool Reference is Tool Tip.
2) On the left side of the window, click Cutting Tool.
3) On the right side of the window, click 3D Preview.
4) Click each tool to view the 3D model and verify that it looks correct.
5) Click Finish.
You will see multiple windows surrounding the viewing area for the simulation. It's helpful to use CAMplete on a larger monitor to leverage screen space. Now this CAMplete file can be saved as a ".cs4" project file with no link back to the original information from HSM. Generally it's not necessary to save .cs4 project files, because you'll be generating G-code in a few minutes and that's the data that you really need.
Step 26: Use Machine Positioning Mode


1) In the simulation window, click on the sixth button from the left, Use Machine Positioning Mode.
2) Click on Hide the Machine Enclosure, the button on the far right.
3) Notice that the part is currently embedded inside the machining platter.
This is because CAMplete automatically snaps the G54 position to the center of the machine platter. You will need to transform the coordinate system to address this issue in the next step.
Step 27: Coordinate System Transformation


If you look at the screenshot from Fusion, you'll see that the G54 (center top of the Lang receiver plate) is exactly 52 mm above the part of the fixture that will sit flush against the machine platter. Because we always use the same receiver plate and adaptor plate, this value--52 mm--is what you'll use for all your Matsuura projects, unless you're working with a custom fixture or you've placed G54 in another location.
1) On the left side of the screen, click on CAM Wizard.
2) In the CAM Wizard window, click Coord Sys.
3) Next to G-Code CS, double click the Z-value and enter 52 mm.
Be careful here--make sure you're modifying G-Code CS and not G54.
4) Click Finish.
Verify that the Lang receiver and adaptor plate are now sitting on top of the machine platter.
Step 28: Simulation Options


1) On the right side of the screen, under Simulation Options, click the buttons next to Machine and Collision.
Though real-time simulation can be helpful to visualize what is going to happen, it does not perform collision detection, which is what you really want CAMplete to be doing. Feel free to toggle between these two modes as you become accustomed to CAMplete, but be aware that Collision mode is your final safety check.
2) Check the box for Stop next to Collisions.
3) Click on Check next to Proximity All, and enter a Tolerance of 0.25".
If any objects come within 0.25" of the machine components, CAMplete will create a red error message. Always heed these warnings--this is too close to be safe.
4) Click on Check next to Proximity Tool/Fixture, and enter a Tolerance of 0.25".
If the tool and fixture come within 0.25" of each other, CAMplete will create a red error message. In this case, consider moving the part further from the fixture in the Fusion 360 setup.
5) Click on Check next to Overcuts, and enter a Tolerance of 0.005".
Overcast are tool gouges in the part. If you used negative stock to leave in Fusion, you may need to adjust this tolerance.
6) Uncheck the Stop boxes next to Optional Stops and Program Stops.
7) On the left side of the screen, click the eyeball icon next to each toolpath to remove its visibility in the simulation window. This will make the simulation easier to see.
Step 29: Start Simulation


1) On the bottom left side of the screen, click Clear under Status.
This will empty the log so that only the latest errors, warnings, and events will appear.
2) Under Simulation, Click Play.
Unlike Fusion 360, CAMplete runs its simulations directly from G-code code rather than intermediary information from the software. Because this G-code is exactly what you will run inside the machine, CAMplete is a trustworthy safety check.
As the program plays, pay attention to the Status panel and make sure you don't see errors in red. Any red error in CAMplete means that it is unsafe to run the program on the machine. ALWAYS HEED THESE ERRORS AND MAKE ADJUSTMENTS ACCORDINGLY.
If you pause the simulation or make adjustments to tolerances, click the rewind button twice--once to go to the beginning of the toolpath, and once to go to the beginning of the program.
You'll notice that the CAMplete settings don't provide a very visually continuous simulation--the image will only refresh every few seconds. The visuals are much smoother when you run real-time simulation, but again, this does not provide collision detection and is therefore only useful for understanding what will be happening physically inside the machine. You can adjust the simulation settings under Tools/Options/Simulation/Update Based On Time, but this will slow down the simulation processing time.
Once you've simulated the entire program, scroll through the Status window to ensure that there are no red errors. If you see any, you will need to go back to Fusion 360, make adjustments, and repeat the CAMplete process.
Step 30: Re-setting CAMplete Dock Views

It's a common problem for users to lose dock views when using CAMplete. If a window disappears while using CAMplete, follow these steps.
1) Save your file.
2) Close CAMplete.
3) While holding down the Shift key, re-start CAMplete.
Step 31: Export G-code


Because the G-code has already been created, all you need to do now is export it.
1) In the Program Editor towards the bottom of the screen, click the disk icon for Export G-Code.
2) Insert a USB into your laptop, navigate to the USB, and click Select Folder.
3) Give your program a descriptive name. YOU CAN USE BOTH NUMBERS AND LETTERS.
Unlike the DMS and Haas Mill, the program comment will not appear under your program name, so be as
specific as possible. Also unlike the DMS and Haas Mill, you can use letters. Do not use spaces. For example, use: Certification_part_oct_2017.nc
4) Click Export G-Code.
It should just take a few seconds for the program to transfer to your USB.
Congratulations--you are now ready to take the Matsuura MX-330 course! Bring your laptop and USB drive to class, and be prepared to show this CAMplete simulation to your Matsuura instructor when class begins.
When you have transferred your program via USB, confirm that the file name and file size are correct.
Step 32: Faster Way to Transfer Files: Filezilla

If you're planning to run 3D parts or parts with complex toolpath geometry, you'll save yourself a lot of time by avoiding the use of USB to transfer files onto the machine, which can take upwards of an hour.
Instead, follow these steps to use File Transfer Protocol software.
1) Download the free FTP Client software, Filezilla.
2) Fill in the Host, Username, Password, and Port from the information emailed to you by CNC shop staff.
3) Make sure the Matsuura is turned on.
4) Click Quickconnect. In the future, you can use the dropdown by Quickconnect to navigate back to this Host with all your saved information.
5) Drag your file into the correct location. Frequent users should create a folder with their name for their NC files.
Unlike the DMS and Haas Mill, the program comment will not appear under your program name, so be as specific with your program name as possible. Also unlike the DMS and Haas Mill, you can use letters. Do not use spaces. For example, use: Certification_part_oct_2017.nc
6) Within 20-30 seconds, this file will appear in the Matsuura's Data Server.
Verify that the file has the correct name and file size.


