

Introduction: Giant Chocolate Coin


Today we will be making a chocolate coin that is 10 times bigger and 100 times heavier than a standard one 😀
Supplies
To make this you will need:
- At least 1kg of chocolate, of which about 750g is used in the coin
- A piping kit (nozzle and bag or nozzled concertina bottle)
- The lid of a large tin (mine is 20cm diameter)
- A spatula
- A bowl and pan that fit together to make a bain-marie
Optionally:
- A chocolate thermometer (or other accurate thermometer) is very useful
- Mycryo tempered cocoa butter powder to help with tempering.
Step 1: Melting and Tempering the Chocolate


Chocolate is easy to melt, but if you want it to solidify correctly, you need to temper it too. This isn’t about getting it angry; tempering is ensuring the correct crystal structure forms to give the nice hard melt-in-the-mouth chocolate we all love. To do this we will use a process called seeding.
Weights are for casting in a generously filled 20cm lid. Excess can be re-used so err on the side of way too much 😋
Take 250g of chocolate, break it into chunks. Take 5 of these chunks and chip them into small, roughly 1cm or smaller pieces, and set all this to one side. The full chunks will be used to cool the chocolate quickly and the chips will be used to seed our crystal structure.
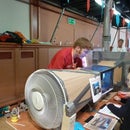
Take another 500g of chocolate and break it into chunks. Place in a bowl and heat this bowl over a pan with water (bain-marie) until the chocolate completely melts. If you are wondering why some of the chocolate I'm melting is rainbowy, it is left over from chocolate I made for my instructable on holographic chocolate. The aim is to get the chocolate to about 45°C and fully melted, so you can remove it from the heat as the last bits of solid chocolate are still melting. Ensure it reaches at least 45°C. If you undershoot, just put back on the heat a little while longer. If you overshoot, don’t worry, just let it cool to 45°C before continuing.
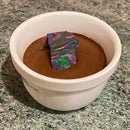
Once cooled back close to 45°C (and off the pan so the water isn’t still adding heat), stir in the chunks you set aside before. As this melts it should quickly bring the chocolate down to about 33°C, ideal for making the crystals we want, without too long making unwanted crystals at higher temperatures. Confirm the chocolate is at 33°C, and stir in the chips to seed crystal growth. If you have Mycryo, sprinkle in a teaspoon as you stir to try to get an even mix. From this point keep stirring for a good 5 minutes while the crystals grow. It can be tempting to start using the chocolate too quickly, resist this temptation!
After the 5 minutes of stirring your chocolate should be well tempered and ready for casting.
Step 2: Casting the Coin Body


For the disc body of the coin, I decided to cast it in a large tin lid. This one is from a large (20cm diameter) tin of chocolates, but any circular tin lid could do. Make sure the lid is clean and dry before use, and preferably slightly above room temperature (25-30°C).
Pour the tempered chocolate into the lid and spread it out with a spatula. The chocolate is too viscous to level itself completely so you have to do this carefully with the spatula.
Once fully cool, the disc should shrink slightly so should come out relatively easily. Unfortunately my lid had been a bit cold when I filled it so a couple of areas had flash frozen to the wrong crystal structure and had stuck on. These broke away as I removed the disc. I was frustrated enough by this that I forgot to photograph the blank disc, sorry! Fortunately the imperfections from this are less visible once the detail is piped on, as I didn't have time to remake it.
Step 3: Piping on Details for Decoration


Repeat the tempering process using any excess chocolate from the first stage, and fresh chocolate for the rest (especially the cooling and seed chocolate). Ideally you need about 400g otherwise it is difficult to temper the chocolate, but you can make do with less if you are very careful. We need much less than this for piping, so have a plan for what you want to do with the rest (such as piping onto other things (cakes, cookies, etc)... or just eating it!).
Get a picture of the coin you want to recreate (or a real coin to copy).
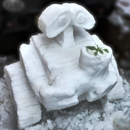
There are multiple sources to instruct you how to pipe chocolate, so I'll be brief. You can use either a piping bag or squeezy bottle with a plane small hole nozzle. Fill the bag or bottle, then shake the chocolate carefully down to the nozzle. First practicing on a plate, slowly squeeze chocolate while moving the nozzle to draw. Once happy, draw the details on your coin. I found as well as adding the writing and the portcullis motif, adding a series of dots around the perimeter really made a difference to how coin-like the design looked.
For my purposes I only needed the design on one side, but once cool you could pipe details on to the other side too, if you want.
Step 4: Enjoying Your Giant Chocolate Coin


This doesn't take much instruction, it is a giant slab of chocolate after all!
I've entered this in the super-size contest, so as soon as it lets you (this does take a bit of time) please vote for me if you have enjoyed this, and remember to post photos below if you make one!

Participated in the
Super-Size Speed Challenge


