

Introduction: Cardboard Cowboy Costume


This instructable is to show how to make a quick and easy cardboard cowboy costume.
I intentionally didn't paint anything to leave a plain cardboard aesthetic, but card is easy to paint if you want to change the look.
The cardboard elements I made were:
- Cowboy hat
- Revolvers (x2)
- Gun belt with holsters and bullet loops
- Boot tops with spurs
Some context for my build... Most years I take part in a Hockey festival where, aside from the tournament itself, there is always a themed fancy dress party in the evening; this year the theme was the wild west. Also due to other commitments leading up to it, I could only spend one evening on my costume, so I kept the design simpler than previous costumes I've made. I decided on being a generic cowboy (rather than a specific character), and designed my costume around the plain cardboard look, as it both suggests leather, but also has a style of its own.
Supplies
To make it, you will need:
- A few decent sized corrugated cardboard boxes
- Some small cardboard tubes (mine were sold as bee nesting tubes)
- Some cardboard-brown coloured paper sticky tape
- PVA glue
- Stapler
- Garden wire
- Ideally some single sided corrugated card, although thin card could also work.
To save time, and because I had access to one, I used a laser cutter, but everything could have been made using just a knife. I even modified the laser cut gun handles as it is easier to get the shape right by hand with a knife than on a computer screen.
If you do laser cut the cardboard, watch it like a hawk as it can catch fire and damage the cutter very quickly if you aren't there to blow it out! I find if the laser cutter is clean it cuts nicely with no fire, but any wood or plastic residue under it can flash, igniting the cardboard.
Step 1: The Hat


I made the hat slightly larger than life to add to the slightly cartoon look of my costume, but you can make it to whatever shape and size you prefer.
Brim
Start with a large piece of single-corrugated cardboard that is not printed on either side. This will form the brim. Cut a large rounded oblong that is as big or bigger than you want the hat brim... remember you can always trim it down, but making it bigger is much harder!
Cut an egg shaped hole slightly smaller than your head in the centre. Try it on the top of your head and identify which bits stop it from fitting on. Shave a little off and try again.
Open this hole out to the shape of your head by repeatedly trying it on your head and cutting a sliver off wherever it is too tight.
Stop once the brim sits comfortably on your head at the height and angle you want it to.
Now roll the brim sideways over a table edge to curve the cardboard. Be firm but careful; you need to provide enough force to partially collapse the structure inside, without fully creasing any one ridge, or tearing the surface. The main curvature should be strong curve upwards either side of the ears. A secondary much gentler curve should be added to curve the front and back of the hat downwards. Be aware that the card doesn't really stretch so the curves don't really overlap, but a sufficient effect can be created as seen in the pictures.
Crown
Next roll a new piece of card, plain side outwards, into a slightly tapered tube such that the smaller end fits through the head hole but the larger end doesn't. Cut off the excess overlap and tape the edge thoroughly inside and out with cardboard-brown paper sticky tape. Cut the bottom of the tube off at a slight angle at a height that matches the circumference of the head hole to form the crown of the hat. This should angle backwards a little, but probably not as much as mine did in hindsight.
Stick a few pieces of sticky tape as tabs on the brim sticking out into the head hole. Carefully align the tube, then press the join together and firmly stick on the tabs to hold the tube in place. Add more tabs to fill in the gaps, ensuring that you close any gaps before applying the tape.
Next we need to cut the top of the tube off. This should angle back relative to the brim. I was too cautious and should really have cut off slightly more, but I definitely didn't want my head to poke through the top. Once satisfied, neatly cut the top, and then cut an oval of card to fill the hole. Tape this on either side and then neatly close the join with tape. Putting folds in the tape allows it to follow the curve more neatly.
Try the hat on and make any adjustments to the brim (curving or trimming) you need now you have the finished shape.
Step 2: Revolver Part 1: Rotor and Barrel Core


As the cowboy's guns are a key prop, I didn't want them to be either flimsy or too simple. I settled on the idea of structuring the 6-shooter with a fixed 'rotor' that supported the barrel, mounted in a body/handle made of three layers of double corrugated card board glued together. The chambers and barrel are made of cardboard tubes sold for making nesting boxes for solitary bees to live in.
Again I made these 'larger-than-life' for effect, but you don't have to... just don't cut the cardboard too thin where it needs strength!
I cut each tube into 3 pieces to make each of the 5 short chambers. The top chamber and barrel are kept as one piece for robustness, as the barrel wouldn't be well attached otherwise. Sadly this means the rotor doesn't spin.
Neaten the cut ends as best you can.
I laser cut the chamber spacers, but there is nothing stopping you making these with a kraft knife. I'd recommend measuring and marking the spacing though, to make sure everything looks right when assembled. A matching piece without holes is also needed when the gun is assembled. This is the plate that keeps the bullets in place in the side chambers. All 3 plates have a slot cut for a tab from the central piece of the body to locate them.
The holes for tubes were cut such that the tubes were a tight fit in the spacers. I test fit the longer barrel part in the photo, although this needed removing before assembling into the body of the gun. Fit the 5 shorter pieces with the neatest end facing forwards as these will be seen.
Step 3: Revolver Part 2: Body, Handle and Finishing Assembly


I laser cut the gun bodies both to make the two guns the same and to save time as there were multiple layers. I also needed to manually trim the handle, as the larger-than-life look meant it didn't fit in my hand as originally made.
I drew a cut out big enough for the rotor, around this cut out the frame needs a decent bit of thickness for strength. I put the trigger and hammer only on the central piece to give some 3
dimensionality to the piece. The central piece also has the tabs to hold the rotor.
Mounting the rotor
Fit the backing plate over the back tab in the centre piece cut out. Sliding the front rotor chamber spacer backwards gives just enough space to slot the rotor between the tabs. Align the empty hole for the barrel at the top and then slot the back spacer onto the back tab and then slide the front spacer along the chambers to secure the rotor in place.
Fitting the barrel
The longer tube of the barrel needs to burrow through the central body piece into the top holes of the rotor chamber spacers. To allow this, carefully cut away the central sheet and double-corrugation from the central body piece locally in front of the holes on the rotor. Poking a pen in allows this hole to be widened to the point that the tube can be twisted into position. The central piece will bow-out around the tube... that is fine.
Note these next sub-steps are interchangeable and I made one each way, leading to unhelpfully inconsistent photos.
Glueing the body pieces together
Test fit everything, then apply a decent covering of PVA glue to the central piece, especially on the 'frame' around the rotor. apply the side piece, keeping it carefully lined up while squeezing it onto the central piece. Extra pressure is required to glue around where it bows around the barrel. Hold the pressure on for 3-5 minutes until the PVA has fully set.
Repeat for the other side.
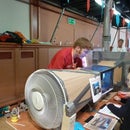
Broadening the barrel
By now the barrel of the gun is quite structural, but it looks a bit pathetic. To broaden it, take some one-sided corrugated card, tape one edge along the barrel and then wrap it around until you are satisfied by the girth. Tape it to stop it unrolling, and then if yours is a similarly poor colour match as mine was, wrap some paper tape over the whole length of the barrel to cover it.
You now have a six-shooter to be proud of. Repeat these steps and you'll have two!Step 4: Gun Belt With Holsters and Bullet Loops


The gun belt is a shaped strip of single layer corrugated cardboard with two folded cardboard holsters stapled on, and a row of bee-nest tube bullet loops attached with the paper tape. The buckle was made with a hook formed in 2.5mm thick galvanised steel garden wire wrapped around a reinforcing and decorative rectangle of double corrugated card at the front before hooking through a tape-reinforced hole in the other end of the belt.
Holsters
Fold a piece of cardboard around a gun, form and bend the card to shape and then staple several times along the edge to force the shape to hold. Then trim the edge back to follow the line of staples. Finally trim the front edge lower than the back. Repeat with the other side (make sure you make this one mirrored).
Bullet loops
Cut few bee-nest tubes into quarters (or whatever length matches the width of the tape you have). Starting from one side, apply the paper tape to the belt for ~3cm, then add a tube. Wrap the tape 3/4 of the way around the tube, then stick it back to the belt. Run the tape 2-3cm along the belt then add another tube. Repeat this as evenly as you can, until all the bullet loops are on and the row of loops is symmetrical. Finish by applying ~3cm of tape before cutting it to ensure the end is secure.
Buckle
By this point it was getting late so I didn't get any photos other than me wearing it the next day, sorry.
The main attachment is a wide loop of gardening wire that hooked through a slit in the other end of the belt. The loop was attached to the belt by piercing through it and wrapping around a rectangle of card to reinforce the piercing holes. The slot was also reinforced, here by adding a few layers of paper tape to stop the slot from running into a tear.
Step 5: Boot Tops With Spurs


I don't own any cowboy boots, and I didn't think making full boots out of cardboard would work, so I decided that making tops to fit my tan boots would give a good enough effect. These were quite simple.
Wrap some card around your shin, and staple it in a tapered shape to for the boot top. Trim the tops to follow the boot top shape, and trim most of the way down the back. At the bottom, leave a strut sticking out. Cut a 6-point star and staple it to the strut. The bottom of this tube needs shaping short over the foot and longer over the sides to allow your ankle to move.
Try them on and adjust as required.
And now your costume is complete.
Step 6: Wear It and Enjoy!


I combined the outfit with jeans and a chequered shirt with the tan boots under the boot tops.
We had a great party, and the costume survived much dancing and revelry.
I hope this has been useful inspiration for a costume of your own.
I'll be entering this instructable into the cardboard contest, so do please vote if you like it!*
*It takes some time to be accepted into the contest so you might need to come back!

Participated in the
Cardboard Speed Challenge


