

Introduction: Holographic Rainbow Chocolate


Chocolate is great, it smells good, it tastes great... but wouldn't it be nice if it was a little more colourful?
Well now it can be!
I'm not talking about coating or painting it or adding icing, I'm talking about colourful pure chocolate; that's what we get with this instructable.
To make the surface colourful with holographic rainbow shine, we are creating a microscopic structure in the surface of the chocolate itself, and it is this structure that makes light diffract into colourful rainbows, just like the rainbows you see on CDs or DVDs.
Supplies
To make this instructable you will need:
- Chocolate: at least 600g to make tempering easier (dark chocolate works best)
- Diffraction Grating Film: This is a plastic film that has the special rainbowy surface structure we will cast into the chocolate. You can buy a suitable film here
- An accurate foodgrade thermometer or other method of tempering chocolate
- Basic kitchen equipment and supplies (pans, bowls, spoons, parchment)
Step 1: Melt Some Chocolate


Melt 2/3 of your chocolate (we'll use the other 1/3 later so don't eat it!).
Melting can be done a number of ways, but I prefer to bain marie, which involves heating a bowl of chocolate over a pan of simmering water. This allows good control of temperature and you can keep stirring it to keep everything evenly heated and mixed. Others microwave it and that seems to work too.
Break two thirds of your chocolate into squares and place them in a Pyrex bowl. Sit the bowl in a pan with a shallow level of water so the bowl isn't touching or submerged in the water. Heat the lower pan to a simmer, and stir the chocolate as it melts. Measure the temperature and remove the bowl from the bain marie when all the chocolate has melted and reached 45°C.
While you are waiting for it to melt, get going on the next step.
Step 2: Temper the Chocolate


Chocolate is a very strange material. Unlike many things it can freeze into 6 different solid forms or crystal phases as they are known. Each of these crystal phases has different properties, and only one (phase 5) has the sheen, snap and melt in the mouth yumminess that all think of when we think of chocolate.
To ensure we get quality chocolate that takes on the rainbow structure and looks and tastes great, we need to temper the chocolate to ensure it grows entirely 'phase 5' crystal structure.
There are many ways to do this, but the easiest is to seed the chocolate with crystals from the 1/3 we saved from before. All we need to do is chop the chocolate into small pieces (each ~1/3 square), and drop all these pieces into the 45°C molten chocolate. Drop them all in at once and stir them in quickly. This both cools the chocolate quickly to prevent undesirable 'phase 6' crystals from forming, and adds lots of the desirable 'phase 5' crystals to help nucleate and grow more of these. The added chocolate should just about melt but if there are any lumps left after stirring for a couple of minutes, you can fish these out and eat them.
Work quickly with the chocolate as it will gradually solidify, but if needed and you are feeling brave you can reheat it to lengthen working time; just be sure not to exceed 33°C anywhere in the mix as this will melt your precious 'phase 5' crystals!
Step 3: Cast Onto the Diffraction Grating Film


Now the chocolate is tempered it is time to cast it on the diffraction grating film.
Unroll as much film as you need, and identify the structured side (this feels slightly grippy to your fingers and gives a squeak if you slide your finger across it). Lay the film down with the structured side up and weigh it down in the corners as it will try to roll itself up again.
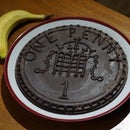
You can add the chocolate onto the film any way you like: pour it, spoon it, pipe it, drizzle it, just remember that if you want the visible side to be rainbowy in use, you will have to write and draw in mirror now. In the photo I just spooned on some letters, numbers and stars to celebrate a friend's birthday.
Step 4: Carefully Peel to Reveal


Once the chocolate has solidified for half an hour at room temperature (possibly longer if really thick), it should be firm enough to peel off the diffraction film.
The key thing to remember is the film bends and the chocolate doesn't so peel the film back from the chocolate. Surprisingly thin and spindly pieces will peel off if you are careful. Also try to avoid touching the rainbow surface that is revealed from under the film. Not only is the microscopic structure fragile, but also the warmth of your fingers will almost instantly melt the structure, destroying the rainbow where touched.
The film can be reused numerous times, so be careful not to crease it and don't throw it away.
Step 5: What to Do With It?


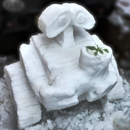
You can make pretty shapes and letters, as above. Alternatively, I find the smaller parts look the prettiest so I often cast thin plaques to decorate my favourite chocolate mousse recipe, and I also make various random drizzles to decorate cheesecakes and other desserts.
Have a play and see what you can do, then share a photo of your uses with the 'I made it' button.
Step 6: What to Do With the Left-overs


600g is quite a lot of chocolate to use in one go. The good news is you can remelt it as much as you like as the tempering process will freshen it to as good as new. Unless confident in your temper, you might still want to use new chocolate for the seed chocolate, but the rest can always be reused, even if the temper turned out poor.
Alternatively you can cast a big 500g rainbowy block and eat it to avoid a surplus (yum!).
I hope you enjoyed this instructable; it will be entered into the desserts contest as soon as the moderators have accepted it (this can take a day or so). Please vote for me if given the option to!

Participated in the
Dessert Speed Challenge


