

Introduction: HALF LAP JOINTS ON THE TABLE SAW


A half lap joint like anything else can be as simple or as complicated as you want it to be. Personally I'm all about the simple, so let me break this joint down and share a simple approach to half lap joints using the table saw.
Step 1:


For this article I'm using a couple of boards from the scrap bin, but what ever your project is just make sure that your pieces are the same in width and thickness in order to create this joint the way I am showing.
The first thing I do is line up the ends of the boards so that they are flush as shown in the picture.
Step 2:


Then using a pencil I mark the width of this joint using the edge where the two boards meet as my guide.
Step 3:


Now using my square I can transfer this line on to the side of my board.
Step 4:


Then using a small ruler I draw an x by connected the corners with in this area, like shown in the picture below. A half lap is created by removing half of the material from each board and in order to do that I need to find the center of the board, it's now located at the center of the x I just drew.
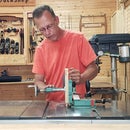
Step 5:


At my table saw I will adjust the blade height to level out with the center of this x, and then using my miter gauge I remove the waste material to create the half lap. I do like to use a stop block when creating these joints because it makes for easy repeatability once you have it set up, and even if your building something like a picture frame that's eight times you will have to repeat this process leaving a lot of room for mistakes that can be easily avoided with a stop block.
Step 6:


Now it's just matter of making multiple passes, removing a little material each time until all the waste has been removed.
Step 7:


With my last pass complete I'm left with a cut surface that is less then desirable, and this is the only down side of creating the joint this way. The problem is that a normal blade leaves behind cross cut marks through the matting surfaces of the joint, now you can avoid this by spending a little cash on a flat tooth blade or even a dado stack. But I've never found this to be a big deal, I just give the surface a couple of light passes with my block plane, or you could use a solid sanding block it really doesn't take much effort to clean up. How ever you decide to approach this you do want to take the extra couple of minutes to ensure the joint will close up nice and tight.
Step 8:

And there it is, a simple half lap joint using the table saw. I hope this helps you and your able to get out in your shop and use this joint to build something awesome.


