

Introduction: High Power Vortex Cannon


The Vortex Cannon is a strange, diverse device. They have been marketed in the thousands as a child's toy, yet versions were built as anti-aircraft guns. The same can be said of air guns and gunpowder-fired weapons, but the Vortex Cannon is unique in all that it fires is air--swirling donuts of air.
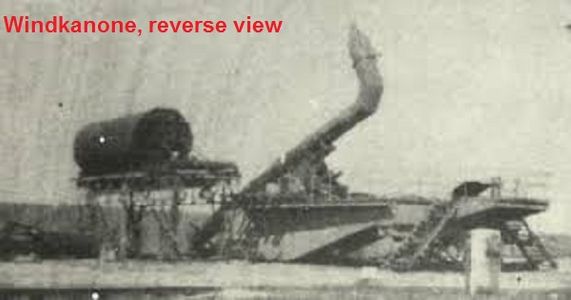
The biggest and baddest member of the vortex cannon family was the World War II Windkanone. I remember first reading about the mysterious windkanone in Brian J. Ford's 1969 book German Secret Weapons: Blueprint for Mars. In addition to such classic secret weapons as the V-1 and V-2, Ford's book revealed a whole panoply of bizarre devices ranging from vicious poison gases to miniature exploding tanks. The windkanone interested me particularly because it had actually been built, tested, and installed by a bridge over the river Elbe. According to author Rudolf Lusar, tests of the windkanone at the Hillersheim gun range resulted in the breaking of 25 mm (1 inch) wooden planks at a range of 200 meters. The windkanone was powered by an explosive mixture of hydrogen and oxygen. Some writers describe the device as firing "plugs of air," but in fact something much more complicated (and interesting) was happening. The windkanone expelled a torus of air at high velocity.
Torus: Shape
In geometry, a torus is a surface of revolution generated by revolving a circle
in three-dimensional space about an axis coplanar with the circle.
Volume: 2 × π² × R × r²
Surface area: 4 × π² × R × r
Common objects with this shape: ring, donut, tire inner tube, life ring [from Wikipedia]
Shooting rings of air is nothing new. Smokers have done this for centuries, blowing carefree rings of carcinogenic fog. When I was a kid in the 1960s, the American toy company Wham-O marketed a hand-pumped vortex gun called the Air Blaster. I never had one, but some lucky friends of mine did. With a few pumps you could knock down houses of cards, toy soldiers, or unsuspecting Barbies. Experimentally minded kids discovered you could shoot objects shoved into the muzzle, and from that moment the Air Blaster was doomed. The Air Blaster was declared a no-no and taken off the market.
Curiously, one branch of the vortex cannon family predates the windkanone and yet survives today, even flourishing after a fashion. These are the so-called Hail Cannons. Hail cannons are large devices, standing about 20 feet tall. Aimed to fire straight up, they are fed a mixture of air and acetylene, which when detonated, generates a powerful, high speed vortex of air. Operators claim the discharges disrupt storm clouds and prevent hail from damaging valuable fruit crops. Meteorologists dispute this claim, pointing out that the vortex ring from even a very large hail cannon dissipates after 650 feet or so--hardly range enough to reach even low thunderheads. Even so, users swear by their hail cannons. They've been used by grape growers in Europe since before World War I. A search for "hail cannon" on YouTube will turn up a number of strange and amusing videos.
Pondering a new building project, I decided to tackle the vortex cannon. There are several how-tos out there (including good ones on Instructables), but in line my design philosophy of adapting existing components to new purposes, I decided to build a vortex cannon using ready-made parts as much as possible. I also decided to make as powerful a device as I could. Why? It would be too easy make a simple diaphragm-powered smoke ring blower. In tribute to the long ago windkanone, and retro-tech hail cannon, I opted for an explosion-powered ring generator, a true vortex cannon, fueled by propane and ignited by a high voltage transformer.
After all, bigger bangs=more fun.
Step 1: Toroidal Vortex: How It Works


As a writer (and not a trained scientist), I will try to explain how a vortex cannon works. Basically, a sudden movement of air, from a released diaphragm in the Wham-O Air Blaster, or by the detonation of explosive gases in a hail cannon, seeks to escape the vessel in which it is confined. When this takes place in a chamber with a narrow opening at one end, the driven air rushes through the small aperture into a larger cone-shaped barrel. Along the way, stationery air lining the barrel is dragged along, but surface friction between it and the walls of the barrel cause to rotate along the way.
Think of a log rolling down hill. As the log rolls, contact between it and the hillside induce it to turn. In the vortex cannon this happens very quickly. By the time the fast-moving air reaches the muzzle, it is surrounded by a slightly slower torus of rotating air. Spin gives the air cohesion, keeping it together as it flies downrange. The result is a stable, invisible projectile. The same effect works in fluids too.
As the distance increases, friction with the surrounding air slows the torus. As it spins more slowly, the torus begins to expand in size. The spinning of the vortex slows too, and eventually the ring falls apart, dissipating completely.
At lower velocities it is possible to make the torus visible by filling the cannon barrel with smoke or visible vapor, like from a fog machine. Fired in still air, the resulting smoke ring dramatically demonstrates the flight characteristics of a toroidal vortex.
At higher velocities, such as occur following a major propellant blast, smoke tends to be torn apart, and the vortex remains unseen. It's still there, it's just moving too fast to carry the fog with it.
At very high velocities (hail cannon strength), unusual effects can be seen and heard. In a famous BBC TV show about vortex cannons, the low pressure induced by a strong acetylene detonation cause a cloud ring to form briefly. This is akin to the contrail from a high flying jet. Hail cannon are sometimes so strong their toroids make shrieking sounds in flight, like artillery shells.
Step 2: Making the Cannon


The cannon I built owes inspiration to spud gun designs, as it uses PVC pipe for its combustion chamber.
PVC starts to decompose when the temperature reaches 140 °C (284 °F),
with melting temperature starting around 160 °C (320 °F). The linear
expansion coefficient of rigid PVC is small and has good flame
retardancy, the Limiting oxygen index (LOI) being up to
45 or more. [from Wikipedia]
Because the combustion within the pipe lasts only an instant, there's little chance of melting the PVC. Repeated firing can cause the pipe to get warm.
Take a 12 inch long, 3 inch diameter piece of PVC pipe. It is not necessary the pipe be pressure rated. I used pipe labeled PVC-DWV U.P. Code ASTM F 891-10. The pipe is not called upon to sustain much pressure, as it is open on one end.
You will need to attach a 3-into-2 inch reducer coupling to one end of the 3 inch pipe. Use standard PVC primer and glue and securely attach the coupling. On the other end of the 3 inch pipe glue a 3-into-1 1/2 inch reducer coupling. The 3 into 2 inch coupling will be the breech end. Glue onto it a 2-into-3/4 inch femalethreaded adapter. With an appropriate wrench, screw a 3/4 inch brass male coupling into the threaded PVC adapter; the brass piece should have a 5/8 inch hose barb on the other end.
On the 3-into-1 1/2 inch adapter glue a short length of straight 1 1/12 inch PVC tubing; a 3 inch long piece will do. Set the assembled PVC combustion chamber aside and let the glue set.
Parts List:
(1) 12 inch length of 3 inch diameter PVC pipe (pressure rated or not)
(1) 3 into 2 inch PVC coupling
(1) 3 into 1 1/2 inch PVC coupling
(1) 2 into 3/4 inch adapter. The 3/4" opening should be threaded.
(1) 3 inch long piece of 1 1/2 inch PVC tubing
(1) male brass 3/4 inch to 5/8 inch male hose barb adapter
Step 3: The Vortex Cannon Barrel


The hardest part of making a vortex cannon is the funnel shaped barrel. It needs to be fairly long, smooth, and of the proper geometry to create good vortices. It also needs to be strong enough to stand up to moderate heat, gas detonation, and support its own weight.
Hail cannons barrels seem to be made of light sheet metal joined together in conical sections. (I've never examined one in person, but all the videos I've seen show similar construction). Problem is, you can't just buy four or five foot lengths of metal cone off the shelf. I know; I tried. I contacted some folks who make hail cannon, but they said their cones were proprietary, so they couldn't help me.
Undaunted, I looked at all sorts of pre-made cones: megaphones, flower buckets, exhaust pipes.
The cheerleader megaphone I discarded because it was plastic (albeit heavy duty). I also thought the conical shape was too extreme; the mouthpiece measured 1 1/2 inches, but the bell mouth was a whopping 13 inches. Even a propane blast could get lost in there.
Flower buckets show promise for building a larger cone by stacking a series of buckets atop each other, but to start with I wanted a single piece, so I went with the 30 inch long steel exhaust megaphone.
The cone had an inlet sized at 1 5/8 inches, and a 4 inch mouth. It's made of 18 gauge steel, so it's quite sturdy. The four inch mouth also matches the diameter of PVC reducer's OD. When I put the combustion chamber and exhaust megaphone together, they would ride nicely on the wooden frame I was planning for them.
The outside diameter of the 1 1/2 inch outlet tube was slightly more than 1 5/8 inches, so I had to sand the outside of the tube a bit to get it to fit the exhaust pipe. All I had to do was wrap a strip of medium grit sandpaper around the PVC tube and sand away, periodically testing how it fit into the megaphone. When I got a snug friction fit, that was enough. I did not use glue or sealer on this joint. It was tight, and I wanted to be able to dismantle the cannon if I chose.
Join together, the combustion chamber and megaphone now measured 49 inches long, from megaphone mouth to the end of the brass hose barb.
Parts list:
(1) 1 5/8 x 4 x 30 inch megaphone steel exhaust pipe
medium grit sandpaper
Step 4: The Cradle of Boom


I decided to go utilitarian with the cannon mount. It's made of yellow pine, and draws liberally on available scraps from my supply of wood left over from other projects.Recoil is negligible, so I didn't need a heavy frame.
The basic stock of the cannon consists to two yellow pine 1 x 4 planks, 44.5 inches long. To cradle the round combustion chamber and megaphone barrel, I had the planks beveled along one edge at a local carpentry shop. The shop guy ran the planks through a massive table saw and voila! A 22.5 degree bevel flawlessly cut in both planks. This angle was perfect to nestle the 4 inch diameter cannon.
The planks are separated by short lengths of pine 1 x 2 blocks. I used four blocks, spaced along the length of the 44.5 inch planks: two 6-inch blocks sited six inches from the ends of the planks and centered in the width. Then I put in two 2-inch blocks 7.5 inches inside the first pair of blocks. These locations are arbitrary; any rational spacing is OK. Leave a gap 12 inches long in the center of the planks for the pedestal. The 1 x 2 blocks are attached to the left plank with 1.5 inch deck screws. Center and clamp on the right plank, and drill four evenly spaced 1/4 inch holes through the planks and blocks. Install a 3 inch 1/4-20 hex head bolt in each hole, after first placing a flat washer under each bolt head. Add another washer to the open end, a 1/4-20 nut, and tighten.
Give the wood some sort of protective coating--varnish, polyurethane, etc. I slapped on a coat of Thompson's Water Seal and left it at that.
The pedestal on my cannon is a single 1 x 4 pine plank 42.5 inches long. (Most of these measurements are seredipitous, and are based on what wood I had on hand. Your pedestal can be whatever height you like.) Knock off the rear corner of the pedestal plank to allow the cannon to elevate without binding. Drill a 1/2 inch hole through the pedestal, centered and about 2 inches down from the top.
For the base I made a simple X frame out of 2 x 4s, each 40 inches long. I half-lapped the 2 x 4s and put a short deck screw through the center joint. I butted the end of the pedestal at the intersection of the 2 x 4s and placed filler blocks on either side, then used short lengths of oak 1 x 3 and 2 inch deck screws to bind everything together. I made four 45 degree angle braces out of available scraps, screwing everything together with 1.5 inch deck screws.
Drill a 1/2 hole through both sides of the stock at the center point (21.25 inches). Slip in a 1/2 inch hex head bolt (3.5 inches long) with the usual washers on both sides of the stock. Add a 1/2 inch hex nut and tighten just enough to make a firm friction grip on the pedestal. I covered everything with Water Seal, and that finished the base, pedestal, and cannon stock.
Parts list:
(2) 1 x 4 x 44.5 inch yellow pine planks
(1) 1 x 4 x 42.5 inch yellow pine plank
(2) 1 x 2 x 6 inch poplar or pine
(2) 1 x 2 x 2 inch poplar or pine
(16) 1.5 inch deck screws
(2) 2 x 4 x 40 inch white pine studs
(4) 1/4-20 hex head bolts, 3 inches long
(8) flat washers to fit 1/4-20 bolts
(4) 1/4-20 hex head nuts
(1) 1/2 inch hex head bolt, 3.5 inches long
(2) flat washers to fit 1/2 inch bolt
(1) 1/2 inch hex head nut
(4) pieces of wood, 8-14 inches long, for bracing
Thompson's Water Seal or other finish for wood
miter saw, drill, Philips screwdriver, square, rule, pencil, brush
Step 5: Seating the Barrel


With the stock level, lay the vortex cannon in place. Depending on the variables of parts lengths, the cannon may match the stock length or be slightly longer. The muzzle should be flush with the end of the stock, or it can protrude a little.
To fasten the cannon to the stock I used steel pipe hanging strap. Three pieces will do, each16 inches long or so. Put one strap near the muzzle, dividing the strap evenly on either side of the stock. Put short (1/2 inch) round head wood screw through the holes at the extreme ends of the strap, then another pair of screws just below where the stock and barrel meet. Screwing the upper screws in will draw the strap tight, conforming to the shape of the conical barrel.
Back at the PVC combustion chamber, put a similar length of strap at the reducer couplings. Attach in the same way as the barrel. This is a pretty secure method of mounting the cannon, but I also added two poplar blocks at the junction of the forward coupling and steel barrel. This steadies the cannon and also helps center it. Just use two 6 inch lengths of 1 x 1 poplar (or pine, whatever), screwed to the stock with appropriate length screws. See the photos to clarify where these supports go.
The cannon is now complete except for fueling and ignition.
Parts list:
(3) lengths of steel pipe strap, 16 inches long each
(12) 1/2 inch round head wood screws
(2) pieces of 1 x 1 poplar or pine, 6 inches long
(2) wood screws, 1 1/4 inches long, narrow gauge
Step 6: Gasssss!


Propane (/ˈproʊpeɪn/) is a three-carbon alkane with the molecular formula C3H8,
a gas, at standard temperature and pressure, but compressible to a
transportable liquid. A by-product of natural gas processing and petroleum
refining, it is commonly used as a fuel for engines, oxy-gas torches,
portable stoves, and residential central heating. Propane is one of
a group of liquefied petroleum gases (LP gases). The others include
butane, propylene, butadiene, butylene, isobutylene, and mixtures thereof.
[from Wikipedia]
Here's where you have to show restraint and not be foolish. Working with explosive gases is inherently risky. Years ago, in the process of lighting a propane furnace on a cold morning, I got a delayed ignition explosion that burned my chest and singed all the hair off my right arm. The burn was first degree (like a bad sunburn) but it could have been worse. Don't screw around with flammable gases. Making and using a vortex cannon is fun. Going to the ER with burns is not.
To power the vortex cannon you'll need a common 14 ounce tank of propane. Remove the torch head and set aside; you won't need it for the cannon. What you will need is a Bernzomatic TS4000 trigger operated torch head. This head will fit most any common portable propane tanks like the 14 ounce model. Screw the TS4000 onto a tank, making sure it's seated squarely, with no leaks.
To test the burner, point the torch head away from you. Rotate the red plastic trigger button to the Unlock position. Squeeze the trigger. Gas will hiss out and ignite, making the usual short, blue flame. Let off the button, and the flame goes out.
Find a short length (6-8 inches) of clear vinyl tubing, 5/8 inch inside diameter. The tubing I bought is marked:
7008 5/8 I.D. x 3/4 O.D. 092503270080.
Do buy clear tubing; I'll explain why later.
Fit an 8 inch piece of tubing to the brass hose barb at the breech end of the vortex cannon. Secure with a hose clamp.
Move the cannon to a suitable testing place--outside, in a garage, or a large room. Insert the nozzle of the TS4000 into the open end of the 5/8 tubing. It should be a good slip fit. Work the torch head 3-4 inches in.
Unlock the trigger. Depress the trigger just enough to release a puff of gas, but not enough to ignite the burner. Let off the trigger. Wait 2 or 3 seconds, then give the trigger a quick push. DON'T HOLD THE TRIGGER DOWN! You should see a flash of fire in the tubing and hear a slight pop as the gas in the chamber ignites. This is a small scale example of what the cannon will be doing soon!
For more info on how to use the TS4000 is this very non-standard way, see this video on YouTube.
Parts list:
(1) 14 ounce propane tank
(1) Bernzomatic TS4000 triggered torch head
about 8 inches of 5/8 ID clear vinyl tubing
(1) stainless steel 1 inch hose clamp
Step 7: Spark of Life: High Voltage Ignition


I wanted to be able to load the cannon with gas and ignite it without using the Bernzomatic's trigger. You don't want to ignite the torch for real inside the vinyl tubing, for obvious reasons. (The whole point of using clear tubing was to watch the flash of flame in the cannon, a visual safety measure.) My first idea was to follow spud gun practice by using a piezo-electric push button igniter, such as are used with gas barbecue grills.
I bought a Weber 7510 spark unit new from a home center. Removing the grounding shield (the little metal box around the wires) I separated the leads and crimped on a couple of U connectors. I decided to mount the ignition system on the left side of the stock, so I drilled two 1/16 holes in the lower left quadrant of the 3-into-2 inch reducer coupling--at the breech end of the cannon--about an inch apart. I screwed in two 1-inch long sheet metal screws with washers. Because of the curvature of the coupling, the tips of the screws would end up about 1/3 inch apart when fully in. I connected the leads of the Weber sparker to the screw heads. I slipped the push button switch into a 4 inch length of 3/4 inch PVC tubing to serve as a neater, insulating grip. Now I was ready to make vortices! (See the next page for loading and firing info).
I made lots of ring vortexes in my driveway, and sometimes alarmed my neighbors with loud bangs. Fortunately I was able to do most of my experiments when the neighbors were at work. On rainy days I discovered I could fire the cannon safely indoors, too, being more moderate with the propane charge, of course.
The piezo-electric sparker was never very satisfactory. It requires a brisk thumb on the push button, and people not used to operating it often failed to get a spark. At the best of times the sparks were pretty feeble. When I took the vortex cannon to science demos at local elementary and middle schools, I experienced several delayed ignitions. That is, having primed the chamber with puffs of gas, I could not ignite it. Either the igniter was 'tired,' or there were too many combustion byproduct gases (and not enough oxygen) in the combustion chamber for quick ignition. Continued sparking usually led to an alarmingly loud ka-boom and puffs of fire from the muzzle--exciting, but alarming to my hosts. The grill sparker was not efficient enough. What I needed for the vortex cannon was a stronger, more reliable ignition source. In other words, more voltage!
In the past I have experimented quite a lot with high voltage electricity, as a perusal of my other Instructables will attest.
A 7,500 volt neon sign transformer (NST) or 10,000 volt oil burner ignition transformer (OBIT) would certainly do the job, but such devices are heavy, bulky, and represent safe handling problems around crowds of onlookers who include children. I also wanted portability, which meant battery power instead of being tied to a wall socket. By the way, modern safety regulations are slowly killing off the "iron brick" style transformer. Modern NSTs and OBITs have ground fault interrupt features designed to prevent them from generating high voltages sparks--and high voltage sparks are exactly what was needed.
Quite soon I found the answer: a high voltage transformer that claimed to output 400,000 volts on as little as 3.6 volts input. These small voltage transformers are available online, mainly from Chinese suppliers. A search for "DC 3.6V-6V To 400KV Boost Step Up Power Module High Voltage Generator" will yield a number of likely devices. I ordered three of them. They were cheap, and if you're ordering from far away, you might as well get more than one to insure you get a working example. (In fact, all three worked perfectly).
The transformers are small, about 3 inches long, cylindrical, and about an inch in diameter. They're sealed, so you can't examine the components inside without a damaging dissection. There are two polarized input wires and two heavier gauge output leads. On the workbench, the Chinese HV modules emit pulses of high voltage DC, not a steady spark.The polarized input and intermittent output indicate the little modules are probably a type of Marx generator, a compact transformer that steps up low voltage DC into high voltage DC. That's just what the vortex cannon needed.
It was easy enough to rig up a battery pack of two AA alkaline batteries and a normally open, push button switch. See the simple circuit drawing above.
Since the widespread closing of many local Radio Shack stores, I found a good, sturdy push button switch in the electrical aisle of my local home center. I used an ex- model train transformer box to house the components. The Marx generator is attached to the lid of the box with two black plastic zip ties. Because of a bolthead in the stock it's necessary to use a mounting block to mount the igniter box; in this case, a 4 inch long strip of lathe about 1.5 inches wide. Drive two screws through the box bottom and lathe into the stock. Replace the battery pack. I wrapped mine in a square of bubble wrap to keep it from rattling. Fit the lid in place and install the four screws to secure it.
Run the two output wires from the box and connect them to the metal screw electrodes. Press the push button to test. You should get a rather loud crackle of high voltage sparks. If not, open the box and check your connections.
Update 8/28/2017: more info on the high voltage module: https://www.youtube.com/watch?v=iDJp2tHmEQo
Step 8: Fire in the Hole!


Firing the vortex cannon is straightforward, but since we're dealing with flammable gas, pay close attention to the method, both for best results and greatest safety.
The Bernzomatic TS4000 is design to burn a steady stream of propane when used as a proper torch, so it is engineered against back-blast. With a little practice the trigger is easy to depress without igniting the released gas too. I regulate the gas charge by counting how long I hold the trigger down. This isn't an exact method, but it helps to get some idea of the amount of gas is being injected into the cannon.
The torch head of the TS4000 is a good slip-fit in the 5/8 vinyl hose. Push the torch head in a good 3-4 inches before squeezing the gas release trigger. I've fired the vortex cannon more than a hundred times this way and never experienced any blowback on my hand while gripping the TS4000.
Once you have the desired charge of propane, let off the trigger and wait 1-2 seconds for the gas to mix with the air inside the PVC combustion chamber. Then hit the high voltage igniter button. You should get an immediate pop, bang, or boom, depending on how large a charge you loaded.
The detonation can be surprising. You may get a poof when you're expecting a bang, or set off a window-rattler when you think you've loaded a gentle ka-pow. The gas-to-air ratio can be quite sensitive, especially if you've set off a series of shots and exhaust gases have collected in the chamber. On some occasions I have used an old hair dryer (set on "Air" only) to blow fresh air through the cannon. I put the dryer at the muzzle and blow down the barrel for a few seconds until the burnt gases were driven out.
For outdoor use only, large gas charges--say, ten seconds or more of the trigger--will truly wake up the neighborhood. In cool weather I have even seen a faint ring leave the barrel, without use of a fog machine. This is a contrail effect, where warm swirling air meets the cooler atmosphere, and the water vapor in the torus condenses briefly.
Step 9: Fog of War . . .


The neatest way to show your toroidal vortices to the world is by using artificial fog. There are several brands of fog machine on the marker, ranging from mega-disco fogbank generators to little home units. (A good time to buy a fog machine is in the weeks following Halloween--lots of surplus units come up for sale then!)
I found a second hand device that way. It's called The Fog Machine, and it's small, about 9 x 5 x 4 inches. It plugs into a standard three prong 120 volt AC outlet and has a hand control separate from but wired to the fog generator itself. You fill the reservoir on the machine with "fog juice," plug it in, and wait for it to get hot enough to generate fog. A green ready light glows on the control when it's hot enough. Push the switch, and a built-in fan blows a stream of gray vapor from the device's nozzle.
You can buy pricey fog juice, or make your own (thanks, Instructables!) I've always used a homemade mix of distilled water and glycerin, and I've had no problems with it.
With the fog machine spitting fog, hold the nozzle to the muzzle of the vortex cannon and hit the switch. When you see a healthy stream of vapor coming out the breech hose, you've filled the cannon. Put aside the fog machine, insert the torch head of the TS4000, squirt in some propane, and ignite.
If you charge the cannon too strongly, it will simply blow the vapor away. Pop out a fairly gentle puff, and you'll see a nice ring-shaped vortex shoot from the muzzle. Depending on weather conditions, you toroidal vortex will last scant seconds, or drift away majestically for as long as 20-30 seconds. On a clear, cold, and still day I watched a vortex hover in one spot a full 22 seconds. It faded away like the Cheshire Cat, still rotating as it disappeared. The effect is quite magical.
On the other end of the power spectrum, a great blast of propane can send an invisible torus of air forty or fifty yards. Because the barrel of the vortex cannon is small (4 inches), the vortex it makes is quite tight and surprisingly accurate. As a demonstration, I set up a dozen empty 16 oz styrofoam cups, stacked vertically like bowling pins. From 20 feet away, I can pick off the topmost cups without disturbing the others, or blast the base of the pyramid and topple them all. Kids love this invisible shooting gallery effect.
There's a really funny Japanese TV show featuring a giant vortex generator filled with fog: here.
Step 10: Next Year's Model


I've had the vortex cannon about eight months now (as of May 2017). I am gathering parts for a larger device:
4 French flower buckets, made of galvanized steel. Piled end to end, they make a cone 51 inches high, with a bell 10 inches in diameter. I cut the bottoms out of each bucket with a can opener and joined the resulting cones together with aluminum HVAC tape. The result is a quite serviceable metal cone.
The combustion chamber I first planned to make out of a standard 20 pound propane tank. Since I need to make holes in the tank, I studied up on methods to empty a propane tank and safely bore holes in it. It can be done, but it takes some care. Fortunately an alternative unexpectedly came my way--a steel DOT 39 helium tank, such as are used to inflate party balloons. It's much the same size as a 20 pound propane tank, and being filled with an inert gas, much safer to work with.
Once I have the tank and barrel joined, I'll assemble a stock and pedestal similar to the first model. I have more high voltage modules, but I'll have to install insulated electrodes in the steel walls of the tank so the spark gap works properly.
Stay tuned, and stay safe!


