

Introduction: Hiving a Package of Bees


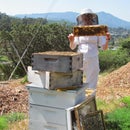

You've gotten the bug and decided to start keeping bees. You do a little research and learn that every spring, local bee supply companies and permaculture stores are carrying what are knowns as "packages" of bees. Excited, you sign up for a package and eagerly await the arrival of your first hive.
Now what? This tutorial will show you the simple and easy methods to package a hive, with extras in italics for those who want a little bit more to fill their heads.
At the end I'll include some links for resources and a few extras for those deep learners.
Step 1: Assembling Your Wooden Ware and Supplies

Before your package arrives, have your new hive pre-assembled and set up in its new location.
For installing the package, your new hive should have the following:
bottom board (base)
one hive box (super)
four or five frames for now, a total of ten for the first super
either a telescoping lid with inner cover, or a migratory cover
entrance reducer set to the smallest opening size
feeder for syrup (or a spacer for Drivert sugar*)
You'll also need to make up a spray bottle with sugar syrup for the journey home. To make the syrup, you mix a 1:1 ration of hot water to table sugar, being sure to let the syrup cool to room temperature before using it.
Optional but recommended
follower boards**
hive stand with ant-proof feet (optional- but highly recommended)
* Drivert sugar is a dry form of feeding. See Step 5 for more about drivert and feeder types
** Follower boards are basically blank frames that reach the bottom of the box and act as moveable walls. They're great for keeping the hive small and cozy so the bees don't have to work so hard to keep the interior in equilibrium. Follower boards are good for insulation too, and many beekeepers use them year-round for different reasons. They're becoming more popular in California where I keep bees, but still ca be hard to find online. Try Dadant or Mann Lake, as they have carried them in the past. Or make your own with online instructions, its easy and less expensive.
I've never used a veil or gloves for this part, as the bees are pretty calm and never seem to feel the need to defend their territory. Its easier to see without a veil, and using your bare hands is a treat. Plus, you're more aware of the bees as you work when you have your sense of touch. However, its always the case that to go bare with bees means you're taking a risk of getting stung, so keep that in mind.
Step 2: Caring for a Package

A package of bees is an exciting concept. Knowing a bit about how it works will be helpful for you to know what to do, so in this section I'll briefly explain what a package is and what it needs to while it travels to its new hive.
A package is named after the little wooden and screen box that your new bees are being housed in while they travel. The worker bees are in the main section of the box and the queen is kept in an even smaller little cage, (called a queen cage) that is secured in the main box. In the center of the box is a can that contains sugar syrup to feed the bees in their journey.
Your new bees will be a bit stressed out- who wouldn't be in a cage? Your first job is to minimize their stress. You can do this by misting them lightly with sugar spray. Just enough to coat the side of the cage and wings, but not soaking. The helps calm the bees, believe it or not, because the bees will clean the sugar spray off one another, and this close physical contact is soothing to them. It's very similar to the sweetness that happens when cats groom one another.
Your bees should be kept in a warm- but not hot- place while they travel to their new home. Think of them as you would a baby. They need to be kept out of the wind, the damp, and at a temperature that you and I would find comfortable. This is where the cardboard box comes in. Put the package in the box, making sure there are gaps on all four sides so the bees can get a little air. Place that box in your vehicle to ride with you. The box will ensure the bees don't coat your car's interior with sugar as their wings beat, and being in your car ensures the bees are comfortable.
The sooner you can get your package to their new hive, the better your success rate. Now let's get on with it!
If you've jumped in with both feet and bought many packages, then you should plan ahead and bring any tarp, boxes, and accessories you need to strap those babies down in the back of your truck all nice and cozy-like.
Step 3: Hiving the Package

Your package of bees has arrived safely home and is ready to be put in place. Your hive body should be assembled as described in step 1.
Place the package inside the hive box, to one side next to the frames. Its important to remember that the bees will need to be warm and dry in their new hive, which means we start out with a small space so the small colony doesn't have to work so hard to keep equilibrium. This means you begin with one box (called a super) and four or five frames, depending on how many you can fit next to the package while still allowing air flow through the screen. If you're using follower boards, then you can start out with four frames to one side and a follower board on each side to the very outside. The frames should be all pushed together on one side, so when the bees move out of their package they can cluster together to keep warm.
Once the package is in the hive, pry the can from the center, up and out of the package. Do this slowly, as many bees will be hanging from the can, and bees are very delicate despite their tough reputations. Set the can aside for use later, being sure to keep it in the same inverted orientation, holes down, so that you don't break the vacuum that keeps the syrup from running too quickly out of the holes in the can.
Step 4: Now for the Queen


Now, look into the hole where you pulled out the can and there will be a slot where the queen cage is hanging.
You'll see in the queen cage there is usually a metal clip attached on the side. Reach in and pull out the queen cage. Take some time to admire your new queen. Some queen breeders mark their queens, and if your queen isn't marked then get a good look at her, because later you'll need to spot her among her worker bees.
The queen cage should have a candy plug in one end of the cage. The worker bees will chew through the candy and release her, but only after enough time has lapsed that they are used to her scent. Some companies will have you insert the plug or may have a step here to release the queen, so check with them when you pick up your package.
Place the queen in her cage between frames in the center of the group, hanging from the top bar of a frame from the clip. If there's no clip then just wedge the queen cage with the candy side down between two frames scooched together tightly. Make sure the mesh side of her cage has plenty of air.
When you finish this step, your assembly should look similar to the photo, with the package on one side and the frames on the other.
Why is the queen in a cage of her own? It turns out that she has never met the worker bees around her, and because they are strangers, the worker bees need time to get used to her pheromones before they will accept her as their new queen mother. Beekeepers call this step "introduction" or "introducing the queen". Introduction usually takes a couple of days, so in the meantime the queen hangs out safely in her own little cage until the workers eat through the candy to free her. I'll get back to the queen several more times, but for now just remember that having a happy healthy queen is the most important part of the process.
Step 5: Feeding


When you first install a package and for the first couple of months after they arrive, you must feed your bees. Even if you're going organic, live or let die, survival of the fittest with your new hive. Bees consume upwards of 8 or more pounds of honey to make one pound of wax. You've given your bees the raw bones of a hive, but now they need enough food to make wax, to raise babies, and to get more adult foragers out there to bring in more food.
Your bees will need a source of sugar, which is how they get the carbohydrates in their diet. This sugar can be syrup or dry form. If you use syrup, it will be the same formula as you had in the spray bottle, so save some extra. Syrup is easy for bees to use, and this formula stimulates them to make wax. You can feed syrup using several feeder devices; from an entrance feeder which sits in front, frame feeder which goes inside the hive like a frame, and top feeders that sit above the super under the lid. Be forewarned with syrup: ants love it, and will invade when you use it, so make sure your hive is on a stand that is ant-proof!
Another method of feeding sugar is to use a product called invert sugar, Drivert being one trade name. Its a different type of sugar than table sugar, used in baking, and the bees can use it dry. The only downsides are that it has no anti-caking agent so gets chunky, and that it's rather hard to find. Many bee sources carry invert or bee sugar, and if you're lucky enough to live near to one of the Mann Lake retail stores you can pick up a few bags in person. If its warm out, you can also use baker's sugar.* Using dry sugar is easy, your bees can't drown in it the way they can and do with syrup, and you can use frame feeders, top feeders, and you can even pile it inside the inner cover using a spacer to give more room between the inner cover and telescoping lid. You can see from the image how I've feed my hives with Drivert sugar.
In addition to sugar, the bees need pollen. Bee supply stores sell pre-made patties, and you can make your own with powdered commercial pollen supplement or by mixing your own with raw ingredients. The pollen patties should be added as close to brood as possible, and in this case I'd put them right on top of your frames where they can get to them easily. Remember to place the patties to that bees can still get around them. Go sparing on the pollen patties at first, feeding no more than a 1/4 to 1/2 pound at first.**
Feed your bees until all the frames are completely built up with wax comb.
And one last thing the bees need is water. They seem to love pool water and dirty water, like where faucets drip onto the soil. If you are feeding dry sugar in place of syrup, they will especially need it to liquefy the sugar.
Bees gather nectar, the raw ingredient used in making honey, from plant flowers, and this nectar can consist of 16+ different types of sugars. When we feed, we usually can only provide one or two different types of sugar, but this is enough to get them started. If you want to go super granola, you can feed your bees honey, but you run the risk of infecting them with all sorts of diseases. Its a general conception that feeding bees with corn syrup can harmful, as most corn is heavily treated with pesticides.
Pollen is how bees get their protein, and they need this to feed their brood and use it to keep themselves fat and happy, which extends their lives. When bees begin to lose their body fat, they begin to age, which triggers them to leave the hive in search of more food. Pollen supplement is just that, not a substitute. If you go super-granola you can buy real pollen to feed your bees, but again it's risky and very expensive.
In the image of Drivert you can see a pollen patty sitting there too. In this case the bees ignored the patty because it was too far from the brood. Better to put it inside the hive body. I mix my own pollen patties using Ultrabee, a product sold by Mann Lake. I make it with the powdered suppliment, sugar syrup, and a little olive oil. The olive oil keep the patties moist and adds extra to the diet of the bees. I make the consistency moist enough to dribble it on the top bars where there are brood.
*Baker's sugar contains a bit of corn starch, which can make bees poop extra, so make sure to use this only in places where the climate and season allows them to exit the hive for bathroom breaks.
**Small Hive beetles are these small bugs that infest a hive and eat just about anything, including larvae. They seem to be attracted to pollen patties, so try and feed the bees only what they can consume in less than a week. Better to err on the side of caution if you live in a place where SHB (small hive beetle) is a problem.
Step 6: Walk Away

You've placed the package in the hive body, hung the queen in her cage between frames, and fed the bees. Now its time to close the lid. Make sure all the hive parts and pieces fit together without big gaps. If you haven't already done so, place the entrance reducer set to the smallest opening at the front of the entrance. If you're using an entrance feeder then block all but a tiny opening next to it.
Admire your new bees for a minute or two. Watch how they fly up and around in loops, getting to know their bearings in their new home. Now walk away, but set your reminder on your calendar to come back in a few days to free the queen and check on the rest of the hive.
Step 7: Check Back In

You'll need to check back after a few days to release your queen from her cage and remove the package. It's easier to move things around the hive when we know where our queen is, so let's start there.
First, remove the package from inside the hive body. No doubt you'll see bees still in the package, but resist the urge to shake them into the hive. The house cleaner bees will have to drag out all the dead bees from the hive if you dump them in, so its better the shake the bees out in front of the hive and let the living ones fly back in the entrance.
There are two methods to setting up the hive at this point. You can scoot the existing frames full of bees into the center and place the remaining 5 or 6 empty frames around them on either side. You'll start with a total of ten frames using this method. This method is fine if you live in a warm climate where the nights are above freezing.
Better still is to use follower boards to start out a new hive. Then the amount of space in the hive is equal to the amount of space the bees can fill, it's much easier for them to tend and care for daily life in the hive. To set this up you'll place five frames in the center and your follower boards on either side, and line those up with entrance opening so when bees enter they cna access the comb. (You'll notice in the image with frames that at either edge there are smaller strips- those are follower boards.) If you use follower boards, make sure to check back regularly and expand the size of your hive space by adding new frames to the middle as the bees build up.
Be sure not to make the mistake of adding too many boxes too soon. If you were to stack all the boxes while the bees are still building comb, they will only build in the center frames all the way up to the top box, which we call "chimneying". Plus, all that empty space gets cold (think of tall ceiling-ed Victorian and Edwardian homes, pretty but brrrrr!) Best to add each box as the the first one is 80-90% full.
Step 8: Free the Queen


Now that your hive body is set up, and bees are in place, its time to release the queen. You'll do this 2-3 days after the packages has been installed, is they didn't eat through a candy plug already. Reach in and pull the cage out carefully from between the frames.
Look closely at the interactions between the queen and her workers. Are the worker bees caring for their queen through the mesh? You'll see their proboscis extended as the bees feed the queen, and they all will seem calm and relaxed. This is a good sign that the queen has been accepted.
Are the bees acting aggressively and grabbing the queen's legs through the mesh? If so then you'll need to wait a few more days to release the queen, or her subjects will tear her to bits!
To release the queen, simply pull out the cork or candy* at the end of the cage and let her crawl out onto the frames.
*Sometimes the cage will be sealed with candy instead of a cork, and if the bees haven't freed her by eating the candy, you'll have to do it. If your queen is already freed, don't worry. Check back in a couple of days for eggs, and when you find them, you know your queen introduction was successful.
Step 9: Check Back Regularly


Check and replenish the sugar and pollen supplements as necessary. When the bees have drawn out comb throughout the entire box, you'll need to decide whether to keep feeding (if winter is near) or whether to add another super (if there is a nectar flow). For those using follower boards, as the bees increase their population and build comb, be sure to add frames to the center of the cluster and give them more room.
You'll be checking in regularly to see how your new bees are doing. Basic hive inspections will check for food supplies, how the queen is doing, and to monitor for pests and diseases. You'll want to confirm with every inspection whether you have a queen or not, since she is the most important bee in your hive. It can be difficult to find the queen if she isn't marked, especially as the population goes up. Eggs are the best sign that you have a queen, so learn to spot them in your hive.
Always be sure to give the hive one last check to make sure the entrance is free and bees can enter and leave freely.
That's the gist of it. If you're a first time beekeeper, then I strongly recommend you partner up with other experienced beekeepers near you. Beekeeping is a complicated process, and not only should you learn about bees and their biology, but how to manage them for your climate and local conditions.
I've broken the steps into many parts, but you'll see its not too hard to get started. Check out the next step for a synopsis of all the steps on one page.
Step 10: Synopsis

photo credit: Andria Lo
You've read the instructions and will no doubt need a one page cheat sheet, so here it is:
1. Safe travels home with sugar water and protection from the elements
2. Place package inside, five frames to side.
3. Remove syrup can and queen cage.
4. Hang queen cage in frames
5. Feed
6. Close up, place entrance reducer to small, admire.
7. Return to remove package and free queen when she's ready
8. Assemble hive body
9. Check back regularly to feed and clear entrance
10. Add frames and/or boxes as bees fill existing
Step 11: Links and Resources
Beekeeping Suppliers
Mann Lake : Free shipping Nation-wide on all orders over $100, full selection
Dadant: If they offered free shipping they'd be as good as Mann Lake, Nation-wide
Beekind in California: Expensive for most supplies, but they sell follower boards and robbing screens
Kelleybees has a great online catalogue with unique tools and supplies.
Beekeepers who know more than me:
Randy Oliver has published extensively on the hows and whys of beekeeping
Extras:
This was my first Instructables project. That was fun writing, so check back for more!
Additional projects I've written:
How to Make a Nucleus Honeybee Colony
My websites:

Participated in the
Gardening & Homesteading Contest


