

Introduction: IKEA Samtid Mood-light Upgrade


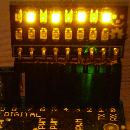

Arduino compatible WS2812B-based RGB LED ring light that can easily be added to your IKEA Samtid lamp. Runs on 5V DC (2.75A). Get all design files on github.
Step 1: Lamp Assembly


First unplug the power cord.
Remove the lamp shade by undoing the nut that clamps it down. If your lamp comes with a plastic diffuser disc, remove it as well. Place the circuit board over the threaded lamp socket, making sure that the control board faces downwards. If needed, place a spacer disc (cardboard, thin laser-cut acrylic...) on top of it. This may or may not be necessary. If the hardware holding the lamp shade interferes or touches the circuit board and components outside the marked inner circle in any way, add the spacer disc.
Put the lamp shade on again and tighten the retaining nut lightly. Over-tightening could compress the spacer disc too much and cause parts of the shade to touch the circuit board in inappropriate places.
Connect a suitable power cord to the power connector. Make sure the conductor is thick enough. You don't want to have more than 150mV voltage drop between the power supply and the circuit board. The board will still work with "bad" wires, but the brightness will suffer noticeably. Ideally don't use anything smaller than Ø1.5mm (AWG15) and keep the wires as short as possible.
Step 2: Arduino-IDE Setup + Uploading Code


Aduino-IDE setup files are part of the code repository for this project. You just need to edit one file (copy & paste a few lines) and copy a custom bootloader hex-file to the 'optiboot' subfolder.
Remove power from the lamp and unplug the control board. Pull straight down and it will come off easily. Connect an FTDI-compatible USB-serial adapter to your computer and the board and fire up the Arduino-IDE. Load example code, compile and upload to the board as usual. Use the demo code in the code repository as a starting point.
Step 3: Enjoy!


