

Introduction: Indoor FPV Drone [Setup,Design and 3D Printing]
![Indoor FPV Drone [Setup,Design and 3D Printing]](https://content.instructables.com/FGG/8B9U/IV0AIOGF/FGG8B9UIV0AIOGF.jpg?auto=webp&fit=bounds&frame=1auto=webp&frame=1&height=300)
![Indoor FPV Drone [Setup,Design and 3D Printing]](https://content.instructables.com/F4W/T8YW/IV0AQ8WK/F4WT8YWIV0AQ8WK.jpg?auto=webp&fit=bounds&frame=1&height=1024&width=1024auto=webp&frame=1&height=300)
![Indoor FPV Drone [Setup,Design and 3D Printing]](https://content.instructables.com/F05/M4D7/IV0AQ8XC/F05M4D7IV0AQ8XC.jpg?auto=webp&fit=bounds&frame=1&height=1024&width=1024auto=webp&frame=1&height=300)


![3D Printed Xiaomi FPV Camera saver [ExoYi]](https://content.instructables.com/F8G/PJV6/IVHQI934/F8GPJV6IVHQI934.png?auto=webp&crop=1%3A1&frame=1&width=130)
Hello guys! I'm back with some interesting stuff to show you. I will demonstrate the proper way of setting this thing up and I will also be demonstrating my 3D modeling session for the prop guard of this little drone.And If you like this Instructable please click on the heart button and vote. Thanks!
So recently it's been raining here in the Philippines and I can't seem to fly my racing drones during weekends due to field proximity or school work.So I decided to buy a hobby grade micro quad. The QX80 Floureon
This Hobby grade micro quad is not your ordinary toy, It does not come with its own transmitter nor receiver. Its basically a kit that may come assembled or not. Good thing I got mine assembled from GearBest. The Kit is 71.32$ and you will need an external receiver to make it work with your transmitter

Package Contents:
1 x QX80 Miicro Quad
2x sets Propeller,
2x 3.7V 600mAh Battery
1x 2s Charging plug [Balancer]
2x Foam Adhesive tape
1x Prop removing tool
1x Rubber band
Again the kit did not come with a receiver, but good thing I have a spare Frsky rx
It's an 8ch PPM Frsky Rx module

Step 1: Setup Flight Controller and PIDs


To set things up you will need to charge batteries first, while waiting for it to charge we need to make sure that our laptop or desktop is able to communicate with flight controller of the micro quad. The flight controller of the quad is based from thr SPF3 Evo Series. And since the micro quad itself is standard you can use my PID settings for your QX80

Connect you flight controller into your computer and make sure you have internet connection for it to automatically install the driver.
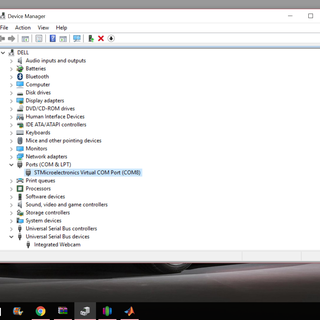
Go to your device manager to make sure that your computer is able to communicate with the FC
I uploaded A quick video that should help you Flash your Flight controller to the latest firmware.
You may or may not need to use Zadig.exe in my case I did not need the Zadig.exe which replaces the driver of a USB device.
Step 2: Soldering


We only need to solder 3 things in this step the +, -, and rx pin
So get your soldering iron ready.
There are a few Receiver boards out there in the market and each one has a different protocol to communicate with the flight controller.
In my case, i'm using a Frsky "PPM" protocol. To start this step we will need to trim the receiver wires to fit on top of the flight controller.Looking at the picture above we will use UART2. Solder the wires on the pads of the pcb respectively. and thats just about it.
Step 3: FPV Cam and Electronics
The Qx80 kit comes with a decent FPV cam, in fact compared to the FX798T the video quality is not even noticeable. The only difference between the two is that the FX798T has a switch circuit that enables it to easily switch bands and channels to match your FPV goggles. The stock FPV cam has 6 tiny DIP switches and you need to flip 2 to 6 switches to change channels. At the field or with a group of friends flying FPV, upgrading your FPV cam is a reasonable thing but in general, it's not since you are just going to fly indoors. Anyhow..... for this instructable I'm going to use my trusty FX798T.

(OPTIONAL) Liquid Tape

Flying indoors does not entirely keep your drone safe, sometimes you will crash into metal poles, metal furnitures etc. You don't want to risk shorting the FPV cam or the flight controller.
So here's what I did

Crashing can make your FPV cam lean backward and get shorted from the flight controller or the CF plate so apply a generous amount of liquid tape, enough to cover the sensitive parts.

Step 4: Final Touch

Basically it comes down to putting the receiver on top of the FC with a Nylon Cable tie


Usually, you would use the rubber band that came with the package but I don't think it's enough to hold the battery after a crash.
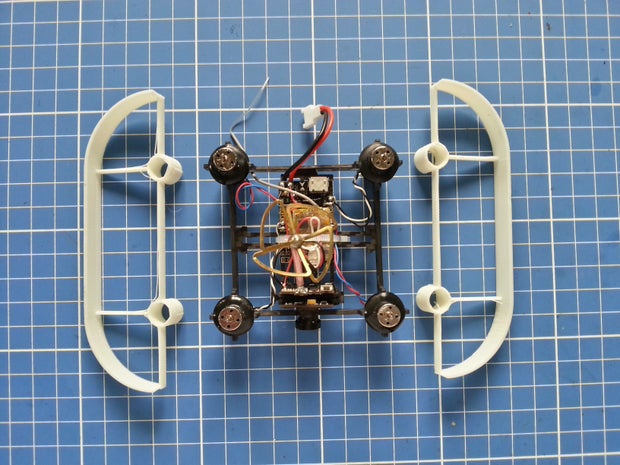
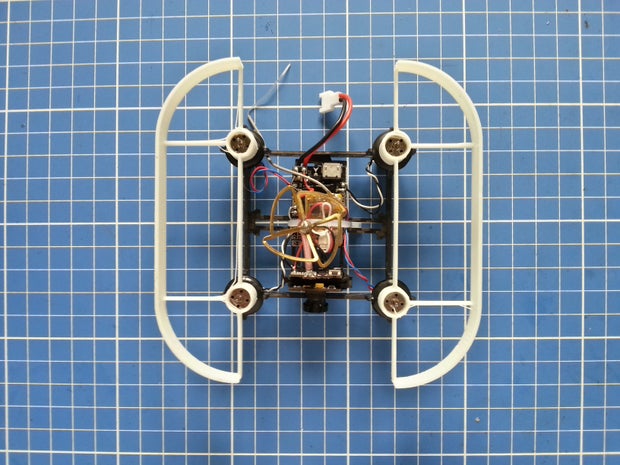
Step 5: Getting the Dimensions for Designing the Prop Guards
In this step, I decided to design my own prop guards since the ones I found in Thingiverse might not be enough to protect my props whenever I will go through tight spaces. So here I decided to 3d model my prop guard in Fusion 360. I'm use solidworks and sketchup but AutoCad was my primary 3d modeling software back in grade school, I just decided to use Fusion 360 for my 3d printing entry.
Ideally, my style of designing stuff is by first 3d modeling the exact model to have that certain accessory,but in this case, the micro drone was just too easy to get the fitting right.

Basically, I just need to get the exact distance from center motor to center motor. I know that it says QX80 as in 80mm but that is just an approximate value.

This will also big role for designing the guard

Step 6: Fusion 360
Instead of making more steps I decided to make a video of how I did it.
Since 3D printers out there have different calibrations like the X and Y offset, I suggest resizing the STL file by 1 to 2% then just making the motor holes slightly bigger using a drill bit to trim the insides.
Attachments

Step 7: 3D Printing


I printed mine using my Flashforge pro
ABS Filament 1.75mm
100%infill
.2mm layer height
print speed 60mm/sec
The holes on the 3d printed part will not come out perfectly so you might need to make the holes bigger by trimming the inside diameter using a drill with a 6-8mm dia. drillbit
Step 8: RX Binding and Channel Checking


There is a button found on the Rx to bind it with the radio like the Taranis or 9XR you must first set your Controller into bind mode. Then once the controller starts beeping prepare the battery of the drone while pressing the button on the Rx module connect the battery keep holding the button for around 3-5 seconds and your Quad is bound to your controller.
Double check your Controller setting and make sure the channels are properly arranged.
Step 9: Props Off! Check Tx Rx Com

Double check the Radio communication through your Computer
Move the sticks on your controller and see if it follows the movements on the display sometimes you will have to invert the stick command
Step 10: Maiden Flight
Make it hover using ANGLE mode and make sure the stick commands feel good and crisp. The Pitch and Roll should follow your command and if the quad feels too fast or too slow connect it to your computer and go to the PID settings to decrease or increase the rates

Step 11: Have Fun
Fly safely and remember to remove the prop guards whenever you fly outdoors
If you like my Instructable please hit the Heart button and Vote for the Contest that I will be joining in. Thanks

Participated in the
Design Now: 3D Design Contest 2016


