

Introduction: Meeseeks Box Wireless IoT Controller


"I'M MR. MEESEEKS, LOOK AT ME!"
In the show Rick and Morty, a Meeseeks Box is a device used to summon a Mr. Meeseeks for the purpose of completing a given task. Like many of the gadgets in the show, the Meeseeks Box is unfortunately very far from reality. Given the events resulting from the Smith family's use of a Meeseeks Box, this is not necessarily a bad thing. Nonetheless, the genie-like idea of the Meeseeks Box is an appealing one.
So, in this Instructable, we will bring the Meeseeks Box one step closer to reality. Our version will not be able to summon any existentially-challenged blue creatures, but it will be able to perform a near-infinite number of simple tasks for you. The Meeseeks Box we will build in this Instructable will be used to control connected home products and other IoT devices.
The device consists of a button connected to a Particle Photon. Depending upon how many times the user presses the button in succession, the Photon will trigger different IFTTT applets by wirelessly publishing events to the cloud over WiFi. The Meeseeks Box IoT Controller will be able to control just about any connected home product: lights, thermostats, security systems, music, door locks, irrigation systems, and any other IFTTT-compatible device or service.
Step 1: Gather Your Parts
Aside from the actual Meeseeks Box itself, which we will 3D print in the next step, we will need a handful of electrical components to complete the build:
Particle Photon IoT Development Board
The Particle Photon is a simple WiFi development module for creating connected projects for the Internet of Things. The board itself is equipped with a Broadcom WiFi chip, which is actually the same one used in several popular home automation products, including the Nest Protect. The board has a powerful ARM Cortex M3 microcontroller that can be programmed using a web-based IDE with the same libraries you might be used to using for Arduino microcontrollers. The board also has a selection of digital and analog GPIO pins for connecting external components.
30mm Illuminated Arcade Button
On the top of the Meeseeks Box there is a single blue button. In the show, the button is used to summon a Mr. Meeseeks to perform a task. Our Meeseeks Box will work a bit differently than the one in the show. The button will trigger different actions on your home automation devices based on the number of times the button is pressed. We will go into much more detail about the code that runs the Meeseeks Box IoT controller in a later step.
We could create our own wiring harness for the arcade button, but I prefer to go with the easy way a just order a set of wires somebody already assembled.
Rather than dealing with the time and expense of creating a custom PCB for the electronics inside the Meeseeks Box IoT Controller, we will use a solderless breadboard. This will reduce the cost of the project, make it easier to assemble, and make modifications or enhancements to the project very easy to implement.
Power will be provided to the project via an external regulated power supply. To create a place for the power supply to connect, we will install a female barrel jack connector in the side of the 3D printed Meeseeks Box.
Speaking of supplying power to the Meeseeks Box IoT controller, we will use a 5V regulated power supply to run the project. The power supply will plug into the Meeseeks Box via a barrel jack installed on the side of the 3D printed box.
We will need an extra couple bits of wire on top of the arcade button wiring kit used to connect the button. These general purpose wires will be used to connect the barrel jack to the breadboard, and the Particle Photon to the power supply.
We will need to create some custom wiring harnesses for this project. To do so, we will terminate wires with male crimp pins that will allow the wires to plug into out breadboard. If you don't already have one, you will also need a crimping tool to install the pins.
We will be painting the Meeseeks Box IoT Controller so that it looks like the device from the show. In order to get the acrylic paints below to adhere properly to the 3D printed plastic, we will need to apply primer to the part first.
After the primer is applied, we will be painting the Meeseeks Box IoT Controller; we will therefore need paint. For this project, we will use simple, cheap acrylic paints. You will really just need blue, green,white, and black.
Step 2: 3D Print the Meeseeks Box


The Meeseeks Box itself will be 3D printed and in the following steps we will install our collection of electronic parts on the inside of the box. The Meeseeks Box can be printed in one piece on most 3D printers and it should take a couple hours to complete the print. The GitHub repository for this project contains the 3D design files for the Meeseeks Box, along with the code for the project and some other resources we will be using throughout this Instructable.


If you do not own a 3D printer, you can get your Meeseeks Box made by 3D Hubs. 3D Hubs is a fantastic service that allows you to pay a 3D printer operator in your area to make parts for you in case you don't have your own 3D printer or if, like me, you find it difficult to find the time for a couple hours of printing. I have had many, many parts made by 3D Hubs and the parts were all 3D printed in high quality, delivered very quickly, and priced very affordably.
Attachments

Step 3: Paint the Meeseeks Box With Primer


The Meeseeks Box from Rick and Morty is obviously not just white. The Meeseeks Box design from the show features a blue and teal color scheme. In this step we will begin the process of painting the 3D printed part to match the design from the show. The painting process will have two major parts: in this step we will prime the part, and in the next step we will use colored paints to complete the design.
If you have ever tried to paint a 3D printed part before, you know that it can be a little tricky. Most types of paint do not like to stick particularly well to the plastics typically used for 3D printing. Therefore, in order to get the best results from the acrylic paints we will use in the next step, we will first need to apply primer to the part. I am using grey spray primer from Rust-Oleum that is formulated to bond to plastic. The primer will create a surface on the Meeseeks Box that will be much more amenable to acrylic paints.
When you are working on spray painting anything, it is critically important not to rush the process. You will get the best results if you apply many very light layers, rather than trying to get the entire painting job done in one pass. Applying too much spray paint to the part will cause an uneven paint application and can cause dripping. If you want a good demonstration of spray painting techniques, I recommend watching some of Adam Savage's One-Day Builds on YouTube.
By the time you are done applying spray primer to your Meeseeks Box part, you should have a nice even grey coating on the entire exterior of the piece.
Step 4: Paint the Meeseeks Box With Acrylics


With the primer applied, we can now use acrylic paints to apply the blue and teal color scheme to make our Meeseeks Box Wireless IoT Controller look like the Meeseeks Box from the show. The primer will allow the acrylic paint to stick better to the part than it would have on the bare plastic.
Now I am not, as you will see in the video below, a professional painter by any means. To help me get the colors right, I created a simple color pallet by sampling the colors in a screenshot from the show. On the left side of the image there are swatches that correspond, from top to bottom, to the color of the inner square, the central octagon/outer frame, the outer square, and the inner frame. When mixing your paints, you can dab a sample of your color onto these swatches to get your paint color mix as close as possible to the colors from the show.

So, using the color pallet as a guide for mixing paints, paint the exterior of the 3D printed and primed Meeseeks Box to match the design from Rick and Morty.
Step 5: Prepare the Power and Button Wires


Now that the Meeseeks Box itself is complete, we can move on to the electronics portion of this Instructable. The circuit used in this project is fairly simple. We will supply power to a Particle Photon inside the Meeseeks Box via an external regulated power supply, and the Particle Photon will connect to the button on top of the Meeseeks Box. The Particle Photon communicates to the outside world via WiFi.
Before we start assembling the circuit, we need to do a quick preparatory step. Both the button and the barrel jack connector feature quick-connect terminals. Adafruit sells pre-built quick-connect wiring kits. They have an quick-connect plug on one end that will fit both the button and the barrel jack terminals. However, the other end has a JST plug. In this step we will replace the JST plug with male pins for use with the breadboard.
This process is fairly simple. First cut off the JST plugs from three of the wiring kits; you will end up with six wires terminated on one side by quick-connect plugs. Second, strip about 2mm of insulation from the ends of the wires. Third, use a crimping tool to attach a male header pin to each wire. Last, install the pin housing.
After you get the male header pins installed on each wire, the wires can be attached to the button and the barrel jack. Wiring the button is easy. Simply attach a quick-connect wire to each of the four terminals.
The barrel jack is a little more complicated. The barrel jack has three terminals. One connects to the pin in the center of the barrel. One connects to a pin on the side of the barrel; if you look carefully inside the barrel you will see a contact protruding into the barrel from the side. The other terminal connects to the barrel itself. We will only need wires connected to the first two of these three connectors. You can tell which terminal connects where to carefully examining the barrel jack. Otherwise, if you are not sure how the terminals connect, you can use a multi-meter to test the continuity of the different terminals.
Step 6: Install Button and Barrel Jack Into Meeseeks Box


With the wires for the button and barrel jack connector assembled and connected to the two parts, in this step we will work on installing the button and the barrel jack into the Meeseeks Box.
The barrel jack installs into the small hole on the side of the box. The barrel jack connects install using a lock washer and a nut. So, from the outside of the Meeseeks Box, insert the lock washer into the hole followed by the nut. Then, from the inside of the Meeseeks Box, insert the barrel jack into the hole and thread it into the nut.
The button installs on the top of the Meeseeks Box using a large plastic nut included with the part. Insert the button down through the hole from the top of the Meeseeks Box and thread the large plastic nut onto the back side of the button.
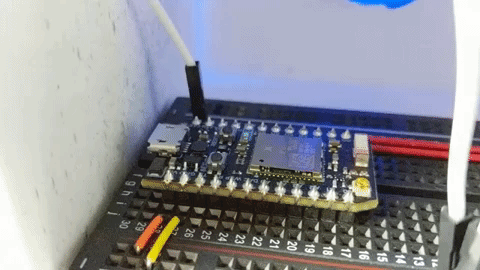
Step 7: Assemble the Breadboard


As a quick note, the colors of the wires in the images on this step do not conform to conventional wiring color codes. I am using a breadboard wiring kit for this project so I am choosing wires by length, not color.
Aside from the button and the barrel jack, all of the other electrical components (the other components are the Particle Photon, a 10k ohm resistor, and some wires) will be assembled onto a breadboard. Later on the breadboard will be mounted inside the Meeseeks Box.
The wiring diagram below shows the circuit we will build on the breadboard. The Particle Photon will be powered off the breadboard’s power rail which will in turn be connected to the barrel jack. The D5 pin on the Particle Photon will connect to ground through the 10k ohm resistor. After mounting the breadboard inside the Meeseeks Box, the button will connect between the 10k ohm resistor and the D5 pin.

The circuit for the button connection is based on the Arduino state change detection tutorial. When the button is unpressed, the D5 pin connects to ground through the 10k ohm pull-down resistor. A digital read on the D5 pin will return LOW. When the button is pressed, the D5 pin will connect to 3.3V. The pin will still be connected to ground, but because of the resistor, the path of least resistance for the electrical current will be to 3.3V. When the button is pressed, a digital read on D5 will return HIGH. The code running on the Particle Photon will detect the changes between LOW and HIGH.
Step 8: Connect Button and Barrel Jack to Breadboard


The final step in assembling the electronics for the Meeseeks Box wireless IoT controller is connecting the button and barrel jack to the breadboard. This will be slightly tricky because the barrel jack and the button are already mounted inside the Meeseeks Box. However there should be enough slack in the wires for those parts to connect to the breadboard if the breadboard is placed just outside the Meeseeks Box.
The barrel jack connects to the power rail on the breadboard. In order to avoid shorting out your Particle Photon, it is important to always check the polarity of the power supply you are using. All power supplies will have a sticker showing the polarity of the pin and the barrel. For most power supplies, the barrel is ground so it will be wired to the blue - rail on the breadboard. The pin is usually positive so it connects to the red + rail. Again though, check the sticker on your power supply before connecting the barrel jack to the breadboard.
The button has four wires. Two of these power the blue LED inside the button and the other two are for the actual button itself. The two terminals connected to the grey plastic block inside the button housing are the ones for the switch, the other two are for the LED inside the button. The LED terminals will connect directly to the power rails. If you are looking at the button with the grey block above the LED terminals, the LED terminal on the left is for ground, the one on the right is for the 5V rail. You can always double check that the LED is connected correctly by plugging in the Meeseeks Box to power via the barrel jack you just connected. If the LED does not light, just swap the wires.
Finally, the button itself needs to be connected. The polarity of the button does not matter. One wire for the button connects to the 3.3V pin on the Particle Photon. The other wire connects between the 10k ohm resistor and the wires leading to ground.
Step 9: Mount the Breadboard Into the Meeseeks Box


Now that we have everything connected to the breadboard, we need to mount the breadboard inside the Meeseeks Box. The breadboard has an adhesive backing that will allow it to be attached to the inside of the Meeseeks Box. Simply peel the backing paper off the breadboard adhesive pad and stick the breadboard to the inside of the Meeseeks Box on the side opposite the barrel jack.
Step 10: Connect to Particle Photon

At this point, the Meeseeks Box is fully assembled; good work! Now we will move on to programming the Particle Photon. The first step is to connect the Particle Photon to your Particle account. This process is really easy and it is already well-documented on the Particle website.
First plug the 5V power adapter into the barrel jack on your Meeseeks Box IoT Controller if it is not already plugged in. Then, press and hold the setup button until the LED light on the Particle Photon blinks blue.
Once your device is in pairing mode with the blinking blue LED, follow the instructions provided in the Getting Started guide to add your Particle Photon to your Particle account. The process will be slightly different depending upon the platform you are using to connect the Photon to your account, Android, iOS, or build.particle.io.
Step 11: Flash the Code Onto the Photon


Now that the Particle Photon inside the Meeseeks Box has been added to your Particle account, we can program the board using Particle's online IDE. The code for the project can be found in the GitHub repository. Open the Meeseeks_Box.ino file and copy/paste its contents into the Particle IDE.
In the menu on the left side of the Particle IDE, select Devices. The devices menu allows you to choose the board to which you will be flashing the firmware. Target the Particle Photon inside your Meeseeks Box by clicking on the star icon next to the Particle Photon name.
With the board selected, click the Flash button in the upper-left corner of the screen. This will write the code to your Particle Photon. On the bottom of the screen, various messages will appear to indicate the progress of the flashing process.
Code Explanation
For those who are interested, this subsection includes an explanation of how the code functions. If you are uninterested in the inner-workings of the code, just go to the next step.
Still here? Good. The code running on the Particle Photon inside the Meeseeks Box IoT Controller is quite simple. The code begins by initializing a few variables:
int buttonPushCounter = 0;This variable is a counter for the total number of times the buttons is pressed.int buttonState = 0;This variable tracks the current state of the button, on or off.int lastButtonState = 0;This variable tracks the previous state of the button, on or off. This variable and the buttonState variable above are used to detect when the button status changes, otherwise the code would count button presses continuously if the button were to be held down.int previousTime = 0;This variable tracks the time of the last button press in terms of program run time. This variable and the functions that go with it are explained more below.
The meat of the code begins on line 58. Each time through loop(), the Photon performs a digital read on pin D5 to determine the state of the button, buttonState = digitalRead(button);.
Next, the sketch determines whether the button status changed since the previous time through the loop. An if statement, if (buttonState != lastButtonState) {, is used to compare the current button status to the status on the previous loop. If the two statuses are different, a change occurred. Once it is determined that a change occurred in the button state, the sketch determines the direction of the change. We are only interested in changes from off to on, indicating that the button was pressed. So, if a change is detected, and the status of the button is currently HIGH, the change in status was LOW to HIGH, if (buttonState == HIGH) {.
When a new button press is detected, the sketch does two things. First, the buttonPushCounter variable is incremented to count the press, buttonPushCounter++;. Second, the time that the button press occurred is saved in the previousTime variable, previousTime = millis();.
So, the sketch can detect a change in the state of the button, detect changes from off to on, indicating a button press, and track the number of times the button has been pressed, along with the time of the last press. But how does the sketch know when to stop counting? Well, the sketch waits for a half second to pass from the most recent button press and assumes that, if the user has gone more than half a second without pressing the button, that the user is done pressing. The if statement used to determine when the button pressing is finished stars on line 29, if(millis() - previousTime > 500 && buttonPushCounter != 0) {.
Depending upon how many times the button is pressed before a half second delay, the Particle Photon publishes various events to the Particle Cloud.
// If the button was pressed once, send a message to the cloud
        if(buttonPushCounter == 1) {
            Particle.publish("MeeseeksCount1");
        }
        else if(buttonPushCounter == 2) {
            Particle.publish("MeeseeksCount2");
        }
        else if(buttonPushCounter == 3) {
            Particle.publish("MeeseeksCount3");
        }
        else if(buttonPushCounter == 4) {
            Particle.publish("MeeseeksCount4");
        }
        else if(buttonPushCounter == 5) {
            Particle.publish("MeeseeksCount5");
        }
        else if(buttonPushCounter > 5) {
            Particle.publish("MeeseeksCount5+");
        }
Last, after the event is published to the Particle Cloud, the sketch resets the button press counter to zero, buttonPushCounter = 0;, and the previous button press time to zero, previousTime = millis();.
Step 12: Create IFTTT Applets


We now have a fully operational Meeseeks Box IoT Controller! When you press the button, the Particle Photon will publish events to the Particle Cloud depending upon how many times you press the button. You can see the cloud functionality working using the Particle app.
The only part missing is a way to link the events published by the Meeseeks Box IoT Controller to your connected home products. We will create this interface using IFTTT. The basic process will consist of creating one applet in IFTTT for each of the triggers in the Meeseeks Box code. By default there are six triggers.
The first step in setting up your IFTTT applets, assuming that you've already signed into an IFTTT account, is to tap the + icon in the upper-right corner of the My Applets screen. An applet consists of a trigger (This) and an action (That). Our triggers will be the events published by the Meeseeks Box IoT Controller. Tap This and, using the search bar at the top of the screen, find Particle.
For the type of trigger, select New event published. The dialog box that follows will allow you to configure the trigger. In the If(Event Name) field, input one of the event names from the code, like MeeseeksCount1. At the bottom of the dialog box, make sure the correct device is selected in case you have more than one Particle device.
The action performed when the trigger is received can be performed on almost any connected home products. Tap the That field to add an action. You can use the search bar again to find your product or service. For example, my Meeseeks Box IoT Controller can turn on and off the lights in my office, unlock the front door, turn on and off my space heater, turn on and off my fan, turn on and off the lights in my closet, turn on and off my HTC Vive system, among other things.
The Meeseeks Box IoT Controller is flexible enough, and IFTTT is powerful enough, that you should be able to control just about any connected device.
Step 13: Using the Meeseeks Box IoT Controller


Congratulations! You now have a fully-functional Meeseeks Box IoT Controller with which you will be able to control any of your connected home devices with a few presses of the button. Using the device is simple. Just press the button on the top of the Meeseeks a few times and depending upon how many times you press the button, the Meeseeks Box IoT Controller will trigger different IFTTT applets.
In the video above, I am using Particle's device inspector to show how the Meeseeks Box publishes different events to the Particle cloud for different numbers of button presses. IFTTT picks up these events and uses them to trigger various actions on your home automation systems.
Adding New Events
The code found in the GitHub repository for this project makes it possible for the Meeseeks Box IoT Controller to publish six different events. The event names MeeseeksCount1 through MeeseeksCount5 are used for the corresponding number of button presses, the event MeeseeksCount5+ is triggered if the button is pressed six or more times.
You might find yourself wanting the Meeseeks Box to publish more events than the default six. It is easy to add new events to the code. To do so, you will add a new else if statement inside the wrapper if statement on line 29. Your else if statement will have a structure like this:
else if (buttonPushCounter == 6) {
     Particle.publish("MeeseeksCount6");
}
In theory you can add as many different triggers as you want.

Participated in the
Wireless Contest

Participated in the
LED Contest 2017


![Tim's Mechanical Spider Leg [LU9685-20CU]](https://content.instructables.com/FFB/5R4I/LVKZ6G6R/FFB5R4ILVKZ6G6R.png?auto=webp&crop=1.2%3A1&frame=1&width=306)


