

Introduction: Mini Rebel Snowspeeder Popsicle Stick Model


Here's another interesting craft from the Star Wars Universe - a modified T-47 Rebel Snowspeeder from the 1980 movie "The Empire Strikes Back". The two-man Snowspeeders were the main air support aircraft used by the Alliance during the ground Battle of Hoth. Lightly armed but highly maneuverable, the speeders were equipped with laser cannons and harpoons with tow cables, the later proving more effective in disabling Imperial AT-AT walkers.
Probably my most intricate project to date, this particular model took some time to build because of the complex shape of the fuselage that should merge seamlessly with the Snowspeeder's wings. A photo shows the scale of the vehicle alongside a standard paper clip.
Assembling the harpoon was the most challenging step in this build because of the very tiny barrel and receiver of the weapon. I also thought of modeling the airbrakes above the aft repulsor mounts but the parts proved to be too small to fabricate. I opted to make the bottom rear air brakes instead.
It also took some time to build ten (10) of these crafts. I'm thinking of raffling off one snowspeeder to one lucky subscriber (only) at the end of July. More on this later....
Step 1: Materials and Tools


Something new for this build.... I used Pine needles for the snowspeeder's harpoon gun barrel and mount. I came across some dry pine needles while walking in the park one Sunday afternoon. The pine needles were perfect for the tiny barrel and saved me the effort of sanding toothpicks to the size and shape appropriate for such a tiny part. Other than the pine needles, all other materials used for this project (small wooden dowels, toothpicks, thin/thick-sized wooden coffee stirrers (swiped from you local Starbucks!), tongue depressor-sized and regular-sized popsicle sticks) are all cheap, recycled materials that can easily be sourced by anyone. Even the Elmers glue used to bind the materials together is water-based and sourced from your local school supplies store.
This was probably my first build that did not rely heavily on parts from the "spares box". The by-products from the fuselage and wing assemblies were more than sufficient to build other sub-assemblies of the vehicle.
Tools used for the build were as follows:
- Dremel 3000 & Dremel Minimite with the following attachments:
- Coarse and Fine Drum sander
- Fine disk Sander
- Standard and reinforced cut-off wheel
- Olfa cutter -Fine tweezers
- Mechanical pencil
- Ruler
- Various Clamps
- Elmers White Glue
- Cutting mat
- "Third-hand" adjustable parts holder (available from amazon.com)
A Dremel 225-01 flex-shaft for the Dremel 3000 and mounted on a Dremel workstation proved handy in sanding and shaping tiny parts for the snowspeeder.
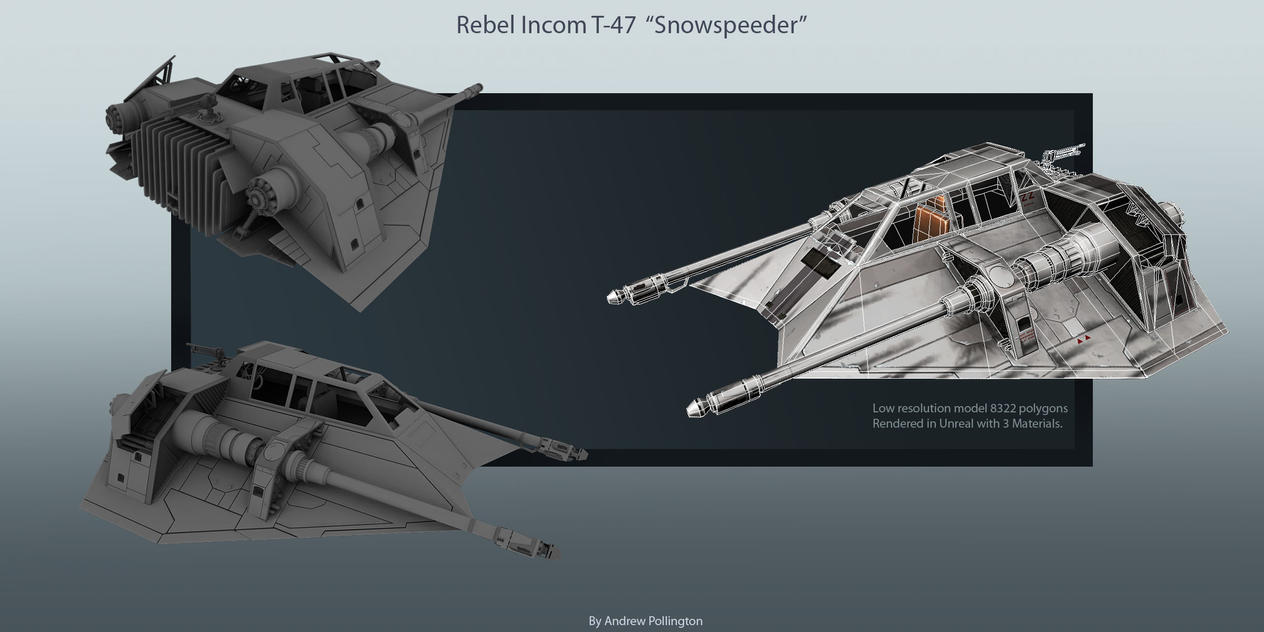
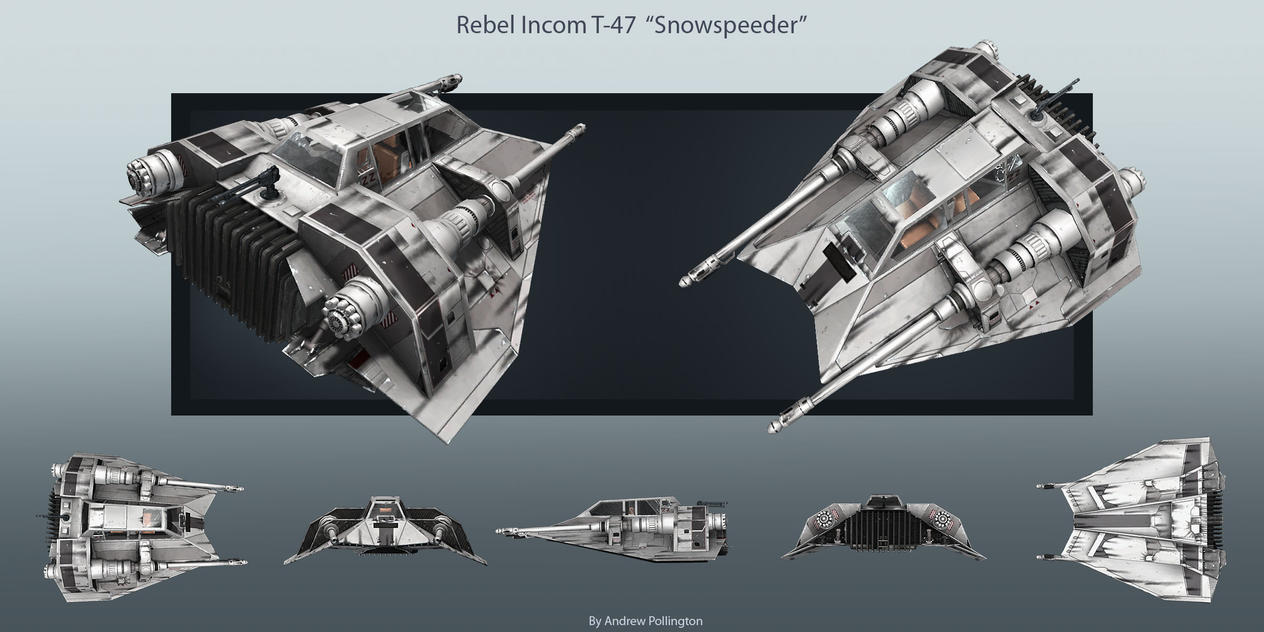
Step 2: Schematics and Images


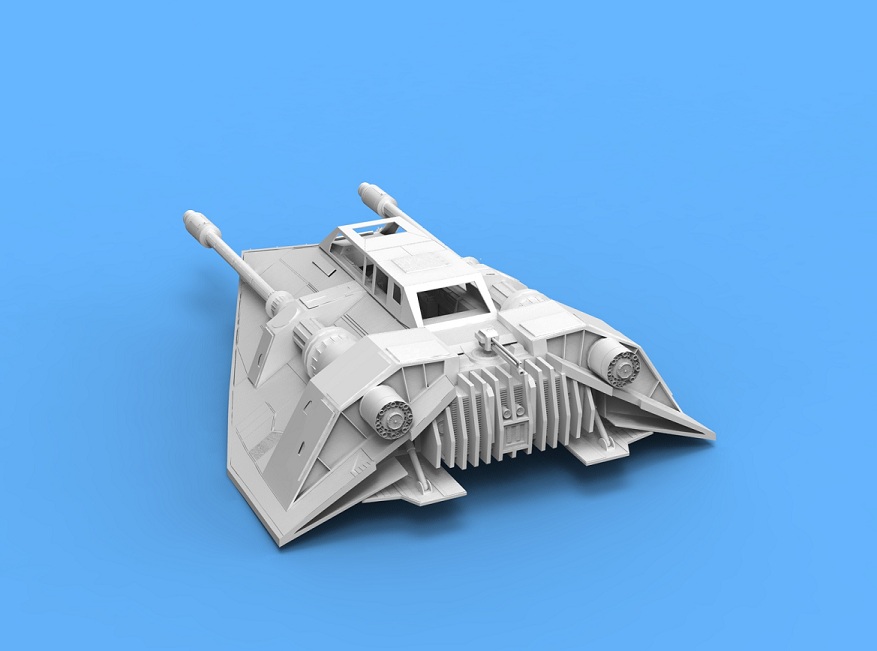
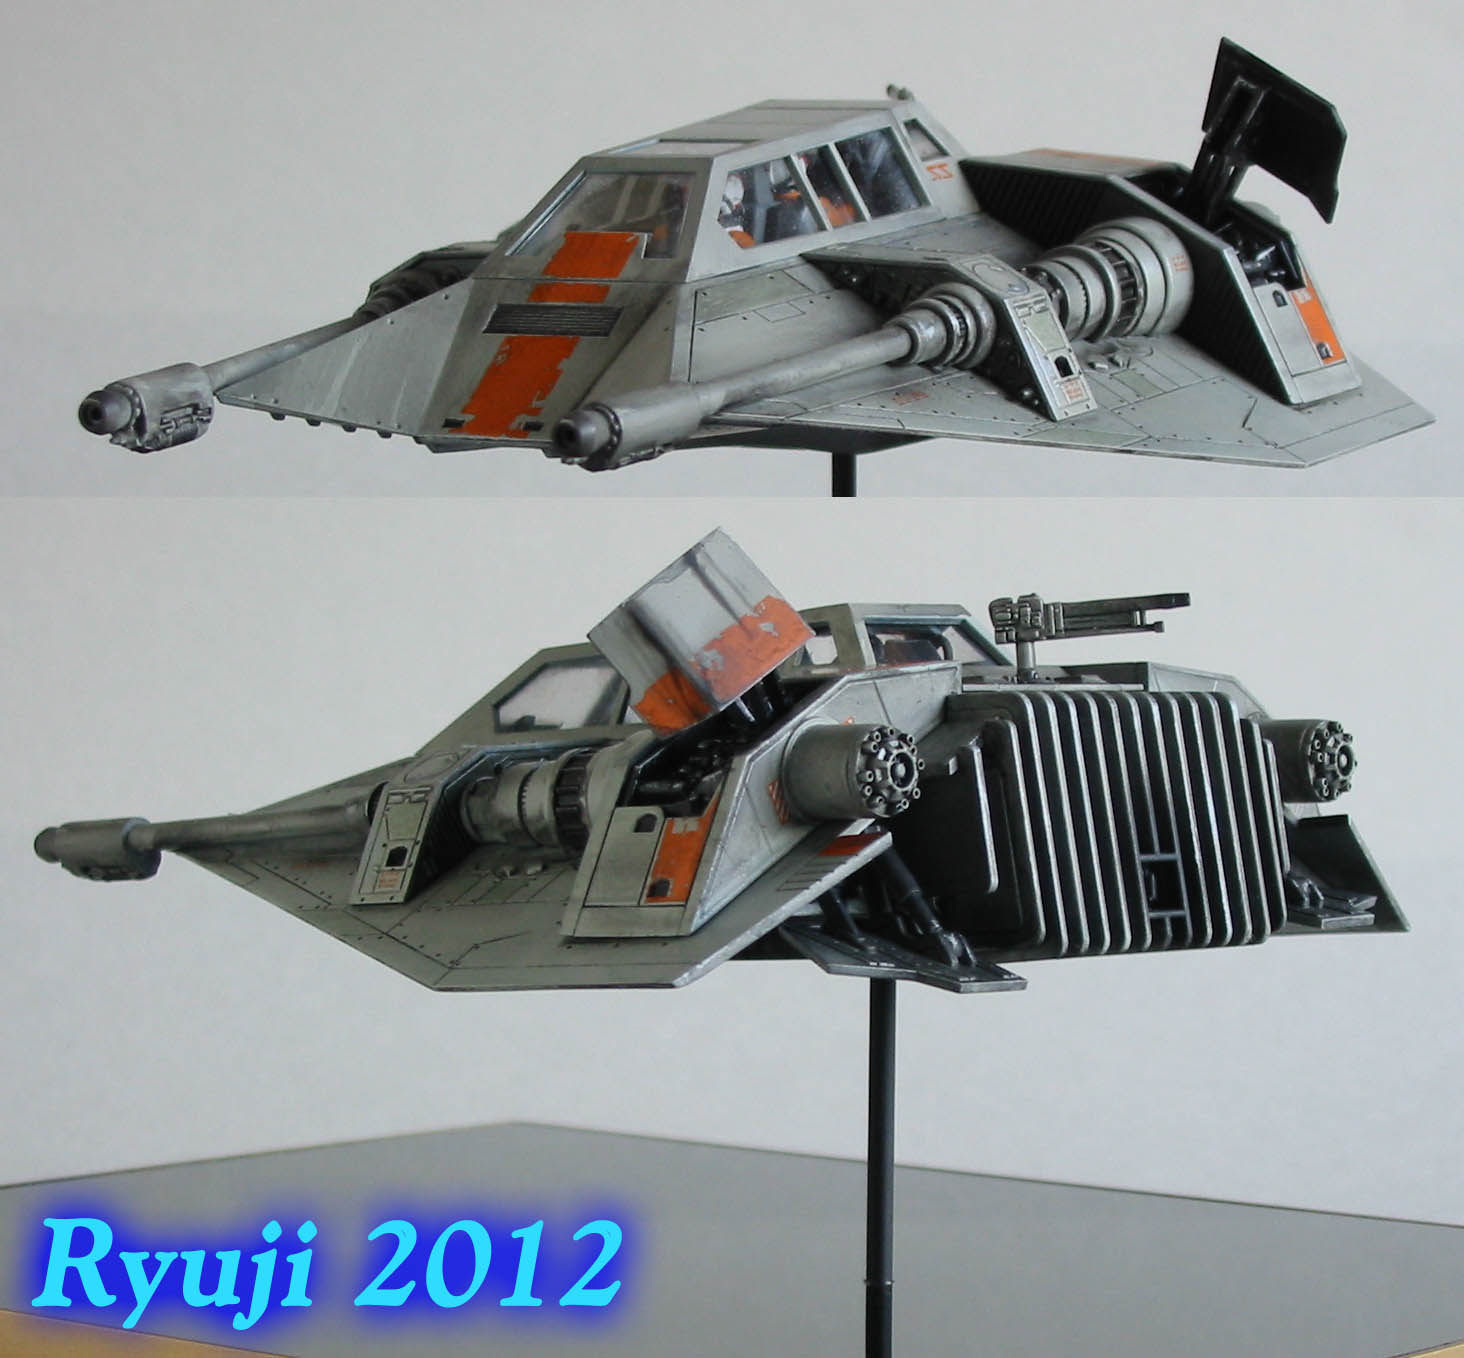
The keyword I used in google and bing image searches was "snowspeeder". The schematics were from the-blueprints.com (http://www.the-blueprints.com/blueprints/sciencefiction/star-wars- rebel/2743/view/rebel_snowspeeder/). Various CGIs from deviantart were used as reference for the various views and details of the snowspeeder.
Below are the URL for the images used in this build:
http://fc02.deviantart.net/fs71/f/2010/282/8/5/t_47_snowspeeder_back_view_by_wwarriorww-d30eoof.jpg
http://th08.deviantart.net/fs70/PRE/i/2010/237/3/d/Snowspeeder_T_47_by_cosedimarco.jpg
http://fc05.deviantart.net/fs70/f/2012/066/e/a/snowspeeder_01_by_celsoryuji-d4s0dtf.jpg
Bottom view photographs:
http://fichtenfoo.net/blog/wp-content/uploads/2010/01/snowspeeder-04.jpg
http://fichtenfoo.net/blog/wp-content/uploads/2010/01/snowspeeder-07.jpg
http://www.thesabervault.com/files/MasterReplicas/Items/Snowspeeder.jpg
Thanks again for the images guys!
Like my previous Quad Thunderfighter Instructable, I am also including my plans (to scale) that I actually used as a pattern for the build.
Attachments

Step 3: Fuselage and Wings


The base airframe was made from a combination of three (3) layers of tongue depressor-sized popsicle sticks and a single layer regular-sized popsicle stick. The single, bullet-shaped layer formed the upper part of the fuselage while the notched, double layer made up the bottom half. The notched layer was carved using a reinforced cutting wheel attachment in a Dremel 3000 moto tool.
The sides of the notched bottom half was sanded at an angle using a drum sander attachment in a moto tool. This was done before gluing the single top part to the bottom notched layer. The angled side provides a base for the wing when it is attached in the succeeding steps.
The bat-shaped wings were made from tongue depressor-sized popsicle sticks cut and shaped using a drum and disk sander attachment in a moto tool. The size and shape was patterned after the snowspeeder plans from the-blueprints.com.
Before gluing the wing to the fuselage at an angle, a portion of the front end of each wing was sliced off with an Olfa cutter to model the unusual front armor of the snowspeeder. The sliced-off parts were also glued at an angle towards the center front armor of the vehicle. The placement of the side front armor took some time to install since any mistake in shaping the notched bottom part of the fuselage will reveal the gaps between the tiny pieces.
Step 4: Other Sub-assemblies


Laser Cannons and Thruster sub-assemblies
Small wooden dowels were used for the pair of laser cannons and thruster sub-assemblies. Marks were made for the grooves based on the schematics from the-blueprints.com. The grooves were cut using a standard cutting wheel mounted on a Dremel 3000. The barrels were carved using a fine drum sander attachment in a moto tool. Each grooved piece was detached from the wooden dowel using an Olfa cutter.
Cockpit canopy
The cockpit canopy was made from a single layer, regular-sized popsicle stick. Again, the scaled schematics from the-blueprints.com were used as reference for the length and shape of the canopy. Initially cut using a n Olfa Cutter, the canopy was finished with a drum and disk sander attachment mounted on a Dremel 3000 moto tool.
Heat dispersion fins
Although pictures of the Snowspeeders rear end depicts more than a dozen heat dispersion 'fins', all I can manage to carve was five fins due to the limitations of the thickness of a standard cut-off wheel. The entire assembly was made from a thick/thin wooden coffee stirrer laminated together.
Front power couplings and Aft Repulsor mounts
The front power couplings and aft repulsor mounts secures the Laser cannon and thrust assemblies to the snowspeeder's wings. The steps to fabricate the front power couplings and aft repulsor mounts were similar with only the materials used as the main difference. A thin and thick wooden coffee stirrer was used for the aft repulsor mounts while the front power couplings used two (2) thin wooden coffee stirrers.
After the two pieces were sandwiched together, a notch was made with a standard cut-off wheel to fit the diameter of the laser cannon assembly. A fine drum and disk sander attachments were used to shape the ends of the power couplings and aft repulsor mounts.
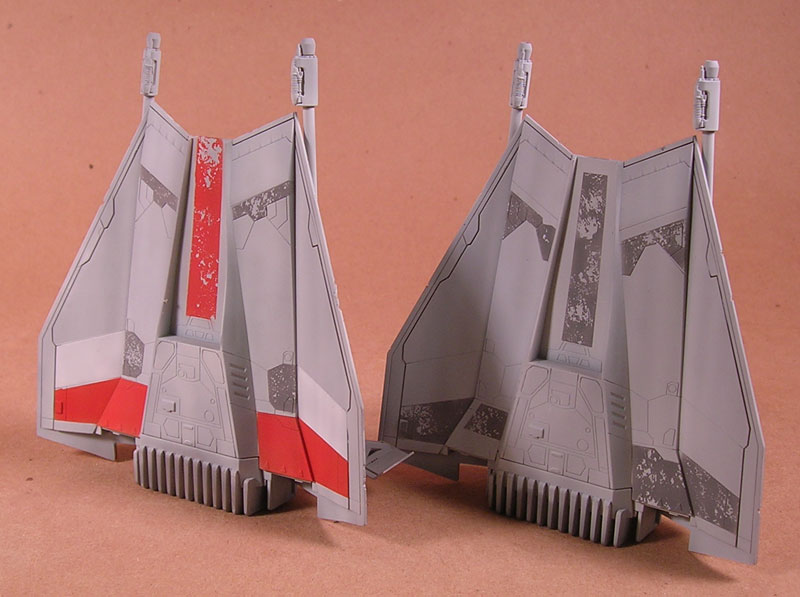
Bottom rear air brakes assemblies
A set of bottom rear air brake is composed of an air brake flap and actuator. The air brake flaps were from the popsicle stick scraps left over from the wing fabrication. The actuators were from toothpicks made thinner with a disk sander attachment on a moto tool.
Harpoon gun
For the tiny harpoon gun mounted at the rear end of the fuselage, I used pine needles gathered from a park for the barrel and gun mount of the tiny harpoon gun for the snowspeeder. I used reference photos and schematics to approximate the length of the gun barrel. The gun receiver was from a tiny scrap of popsicle stick similarly scaled using the photographs and schematics. The pine needle barrel took a while to glue to the receiver due to its small size. I repeatedly had to turn over the drying pieces to ensure that the barrel properly lines up with the receiver.
Step 5: Completing the Build


First step in completing the build is to glue the canopy to the wing/fuselage assembly. I made sure that the placement of the canopy was aligned with the reference schematics.
The heat dispersion fins assembly was glued to the rear end of the fuselage next.
Probably the most interesting parts to assemble were the two massive laser guns/thruster assemblies. Gluing each assembly to the wings required a lot of minor adjustments to make sure that the front and rear mounts (front power couplings and aft repulsor mounts) would line up to the middle of the wing and incline somewhat towards the center of the craft.
With the laser guns in place, the front power couplings and rear aft repulsor assemblies were glued next. After the glue has set, I used a fine drum and disk sander attachment to adjust the thickness and angles of the front power couplings and rear aft repulsor assemblies.
Next step was to mount the two (2) bottom rear air brakes. The actuators were glued at the gaps between the angled wing and heat dispersion fins. After the glue has set, I dabbed a small amount at the tips of the actuators and on the face of the two airbrakes. I let the glue set for a while before I placed the airbrakes at the end of each actuator. This was a trick I learned when working with contact cement - to coat the two parts first, let it set a while before joining the parts together.
For the harpoon gun assembly, the extremely tiny pine needle gun mount was glued at the rear end of the fuselage in front of the rear gunner. The harpoon gun was glued on top of the gun mount to finish the mini snowspeeder popsicle stick model.
OK, now back to the the raffle....I'll be shipping one (1) T-47s (for free) to a lucky subscriber listed by end July 2014. Each subscriber will be assigned a sequential number (left to right, top to bottom) from the subscriber list and the winning number shall be randomly generated using the free online service from random.org. I'll email the lucky winner first week of August to get the shipping details. So, good luck to all and watch out for my next project(s) :-)


