

Introduction: Starcraft 1 Terran Siege Tank Mini Popsicle Stick Model


**** Orders Sir! ***** Destination!?! *******
At long last, here's my final project for the year and this was a long time coming.
Hello everyone, how about one of the more unique vehicles from the Starcraft 1 PC game from Blizzard Entertainment- an Arclite Terran Siege Tank.
For my very first tank project, this instructable shows the steps to build the vehicle in both 'tank' and 'siege' mode. Both models share the same basic turret and body. The main differences were the extended outriggers and siege gun for the 'siege' mode vis-a-vis the twin cannons and retracted outriggers for the 'tank' mode.
The most challenging part of the project was the fabrication of the vehicle's tracks. I have to make tiny, individual track links that wrap around the wheels of the tank, and there were eight of them! It took me a while but the results turned out quite nicely.
Step 1: Materials and Tools


It was back to basics for this build. Previous projects beginning with the Millennium Falcon up to the LAAT/c used a lot of materials, particularly tongue depressor-sized popsicle sticks. This build used a fraction of the other projects' materials. Just a few regular-sized popsicle sticks, various wooden dowels for the wheels, tank cannons and outriggers, thin and thick coffee stirrers and spares from my spares box did the trick. Individual track links that wrap around the wheels were from thinly shaped toothpicks.
Tools used for this project were as follows:
- Dremel 3000 with the following attachments:
- Dremel workstation and flex tool shaft
- Coarse and Fine Drum sander
- Fine disc Sander
- #118, #125, #193, #194 High speed cutter
- #7134 Diamond Wheel Point
- #9936 Structured Tooth Carbide Wheel Cutter
- #8215 Aluminum Oxide Grinding Stone
- #541 Aluminum Oxide Abrasive Wheel
- #85622, #85602 Silicon Carbide Grinding Stone
- Standard & reinforced cut-off wheel
- Ruler
- Various plastic clamps
- Elmers White Glue
- Cutting mat
- Mechanical pencil
- Fine tweezers
- Olfa hobby knife
Step 2: Reference Images


No schematics for this project. Plans were surprisingly difficult to find in the web. Images were the main references (most from deviantart.com) for this build. There were also a lot of various depictions on how the tank looked in siege and tank mode. This was especially noticeable from images with the retracted outriggers in tank mode.
Regardless of the various versions, I used the following images from the internet:
http://www.deviantart.com/art/Arclite-Siege-Tank-7...
http://www.deviantart.com/art/Arclite-Siege-Tank-T...
http://www.deviantart.com/art/Arclite-AAV-5-Siege-...
http://www.deviantart.com/art/Siege-Tank-Desert-Sc...
http://www.deviantart.com/art/Siege-Tank-textured-...
http://www.deviantart.com/art/Arclite-Siege-Tank-4...
http://www.deviantart.com/art/Arclite-Siege-Tank-S...
My heartfelt thanks to artists posting Arclite's siege tank images in the web. Even without any useful schematics, the images made this build possible.
Step 3: Tank Turret


For this build, I started with the turret since I wanted the tank to approximate the scale of my other instructable projects.
Seven (7) layers of thick coffee stirrers made up the turret of the siege tank. After laminating the individual sticks together with white glue, the single, solid piece was finished using a coarse/fine drum sander attachment on a Dremel 3000 moto tool. The single, solid piece was actually good for about eight (8) turrets but I ended up just making four (4) sets. I will be making more tanks when time allows.
A rough shape was then drawn on the turret using the images from the web as reference. The final turret was shaped using the same coarse/fine drum sander attachment and finished with a fine disc sander and grinding stone attachment. Details for the front gun mantlet and rear slot for the siege gun were made using a regular cut-off wheel attachment on a moto tool.
"Tank Mode" Turret
The tank mode turret has two (2) twin cannons and a flat, retracted siege gun at the rear. This differs from the siege mode with a fully extended, flat siege gun at the rear and retracted twin cannons at the front.
A shaped, small wooden dowel makes up the twin cannons protruding in front of the turret. The small 'panzerfaust' shaped cannon was done using a fine drum sander and standard cut-off wheel attachment. The retracted siege gun was from a spare, regular-sized popsicle stick. Notches at the corners and edge of the retracted siege gun were made using a #85602 silicon carbide grinding stone, fine drum and disc sander attachment on a moto tool. A hole was drilled at the bottom, center of the turret for the rotating pin. The pin itself was cut from a small wooden dowel using an Olfa cutter. The twin cannons, retracted siege cannon and rotating pin were glued to the front mantlet, rear slot and bottom of the turret respectively.
"Siege Mode" Turret
The flat, extended siege gun was also from a spare, regular-sized popsicle stick. Notches at the corner and edges of the longer siege gun were similarly made using a #85602 silicon carbide grinding stone, fine drum and disc attachment bit on a moto tool. The siege gun was glued at the slot in the rear end of the turret.
The turret elevation mechanism was made from three (3) layers of laminated spare popsicle stick. The size and shape of the elevation mechanism must be slightly smaller than the circumference of the turret. The angle of the elevation mechanism was made with a fine drum sander attachment and finished with a fine disc attachment on a moto tool. The completed mechanism was glued at the bottom of the turret.
Similar to the "Tank Mode" turret, the "Siege Mode" turret was designed to rotate. A hole was similarly drilled at the bottom, center of the elevation mechanism for the rotating pin. The pin itself was also from a small wooden dowel and cut to size with an Olfa cutter.
The retracted twin cannons in "Siege Mode" were shaped from a small dowel using a fine disc sander attachment. The 'cone' was cut cleanly from the small dowel with the use of a standard cut-off wheel attachment on a Dremel 3000. Finally, the 'cones' were glued at the depressed front mantlet of the turret.
Step 4: Tank Hull, Wheels and Track Assemblies


The Arclite's hull was made from six (6) layers of laminated, regular-sized popsicle sticks. The photo shows the turret on top of the single, laminated piece with the sketched top and side configuration of the vehicle. The pattern also showed the position of each of the road wheels relative to the turret.
After the shape of the hull was established, the front fender and driver's compartment were shaped using a coarse drum sander attachment. The groove in the hull's midsection for the side outriggers were carved with a #9936 Structured Tooth Carbide Wheel Cutter and finished with a standard cut-off wheel attachment on a moto tool. A hole for the turret's pin was drilled at the rear mid-section of the hull using a ##118 and #193 high speed cutter attachment on a Dremel 3000.
The eight (8) wheels were made from large wooden dowels bought from a local crafts store. For each wheel, a hole was drilled on the end of the large dowel using a #125 high speed cutter. The wheels were then sliced off the large dowel with a reinforced cut-off wheel.
For the tracks that connects each set of two (2) wheels, thin coffee stirrers were glued side by side and cut into the desired width and length using an Olfa cutter. Tiny notches simulating individual links at the sides of the track were carved by gently scribing the edges with a standard cut-off wheel attachment. Each set of two wheels were then glued on top of the tracks. Another track was glued to the bottom of the two wheels. With the finished wheel and track assembly, individual track links were etched on the tracks using a #194 high speed cutter attachment on a moto tool.
Now for the hard part, making the individual links that wrap around the wheels. These were made from tiny shaped toothpicks that were cut to the same length as the tracks. One link at a time was glued around each wheel until the wheel ends were completely covered by the individual track links. This process was repeated for each of the four (4) track bogies of the Arclite Siege Tank.
Fenders that wrap around the front and rear track assemblies were from spare popsicle sticks scraped thinly using a coarse/fine drum and fine disc sander attachment. These were cut into the precise length of the front and rear track and glued into place using Elmers white glue.
Similar thinly sanded spare popsicle sticks made up the rear outrigger mounts. These were cut into triangular pieces and glued at the rear end of the tank's hull.
Step 5: Completing the Build


Siege Mode
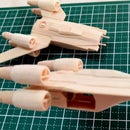
The most distinct feature of the Terran Tank in siege mode are the extended outriggers and elevated siege cannon.
Beginning with a completed hull from the previous step, tiny bits of square dowels were cut for the main outrigger "arms" and outrigger base plate. The base plate connects the arms to the tank's hull. Similar square dowels were thinly shaped with a fine disc sander attachment on a moto tool. A pair of these connected the arm to the outrigger plate. The outrigger plate was cut from a large dowel using a reinforced cut-off wheel attachment.
Front and rear ventilation grills mounted on top of each fender were from spare popsicle sticks. The grills for the front exhaust were etched using a #8215 Aluminum Oxide Grinding Stone attachment. Each coffin-shaped front grill was cut using a fine disc sander attachment. Each of the front grills was glued on top of the front fender with the pointed end towards the center of the vehicle.
A circular hatch was cut from a round dowel using a reinforced cut-off wheel attachment on a Dremel 3000. The hatch was glued at near the center of the hull just in front of the notch with the outrigger arms.
The grills for the rear exhaust were etched with a #85622 silicon carbide grinding stone attachment. The rear exhausts were glued to both sides of the rear fender.
Tiny, finger-like outrigger plate extensions were from small square dowels cut with an Olfa cutter. Three of these were glued at each outrigger plate of the siege tank. After the glue has set, a fine disc sander was used to taper the shape of each of the finger-like outrigger plate extensions.
Finally, the turret in siege mode was mounted on the rear part of the finished hull by inserting the pin into the hole in the hull.
Tank Mode
Starting from a finished tank hull from Step 4, tiny bits of square dowels were cut for the outrigger base plate that connects the outrigger to the hull.
The tiny, finger-like pad extensions were cut from a small, square dowel and glued to each of the circular outrigger plate. A fine disc sander attachment on a moto tool was used to shape each of the finger-like plate extensions. One of the completed outrigger plate was glued to the upper, rear end of the tank hull to simulate a 'retracted', rear outrigger.
For the side outrigger arms, square dowels were thinly shaped with a fine disc sander attachment on a moto tool. The ends of each arm were cut at an angle with an Olfa cutter. Each pair of outrigger arm were glued to the completed outrigger plate and allowed to dry completely. Each of the finished outrigger arm and plate assembly was then glued to the lower base plate in the tanks mid section. This simulates the retracted center outrigger of the vehicle in 'tank' mode.
Finally, the turret (in tank mode) was mounted at the rear part of the hull by inserting the pin into the hole in the hull.
And there you have it, Arclite's Terran tank in Siege and Tank mode ready to take on the Zerg and Protoss!


