

Introduction: NFC Habit Tracker "Dory" - Arduino Wearable, Gadget


This is a small pocket size gadget to help to develop habits. The user is required to do predefined tasks/habits marked by NFC tags and collect corresponding LED lights on a gadget. After collecting all markers user can reset progress by holding the button for 5 seconds. The user could do this once or more times a day. At any time user can check the status by tapping a button.
See video above.
NFC tags could be applied to tasks like:
- Taking out garbage
- Cleaning cat's litter box
- Drinking a glass of water in a morning
- Reading a chapter in a book
- Taking vitamins
- Watering plants
- Doing pull-ups
- and many more mini-habits
After habit has been developed user can re-assign tags with colorful stickers to different habits.
The idea and graphics + 3D models for cases came from my brother who is an excellent 3D artist and currently works as 3D game artist. His website is http://www.mount3d.lv/
You can watch his showreel: https://vimeo.com/231624338?utm_source=email&utm_m...
Step 1: Problem of Developing New Habits


We all have wondered how great it would be if we regularly spend 1 hour on learning a new language, going to a gym, doing meditation, running, reading a book, etc. Often it is super easy to forget about this new habit in your daily routine.
From my experience, I use journaling to remind myself of progress that I have made with new habits.
One great insight from "Mini habits" book that I referenced below is that you should set your goals for your daily habits extremely low, so that even if you have no time you can still practice your habit and do not loose its part in your routine. For example, if you want to take a run every second day for 10km, you should check habit as completed even if you run around your house or block. Or even if you just run up and down to the stairs :)
What will happen if you continue to stick to this habit you will develop it more and more and then it will not be such big effort to do 10km run and find time for it.
Two books I highly recommend on this subject:
- Mini Habits, Stephen Guise https://www.amazon.co.uk/Mini-Habits-Smaller-Bigge...
- The 7 Habits of Highly Effective People, Stephen R. Covey https://www.amazon.co.uk/Habits-Highly-Effective-P...
Step 2: Circuit Prototype of Gadget


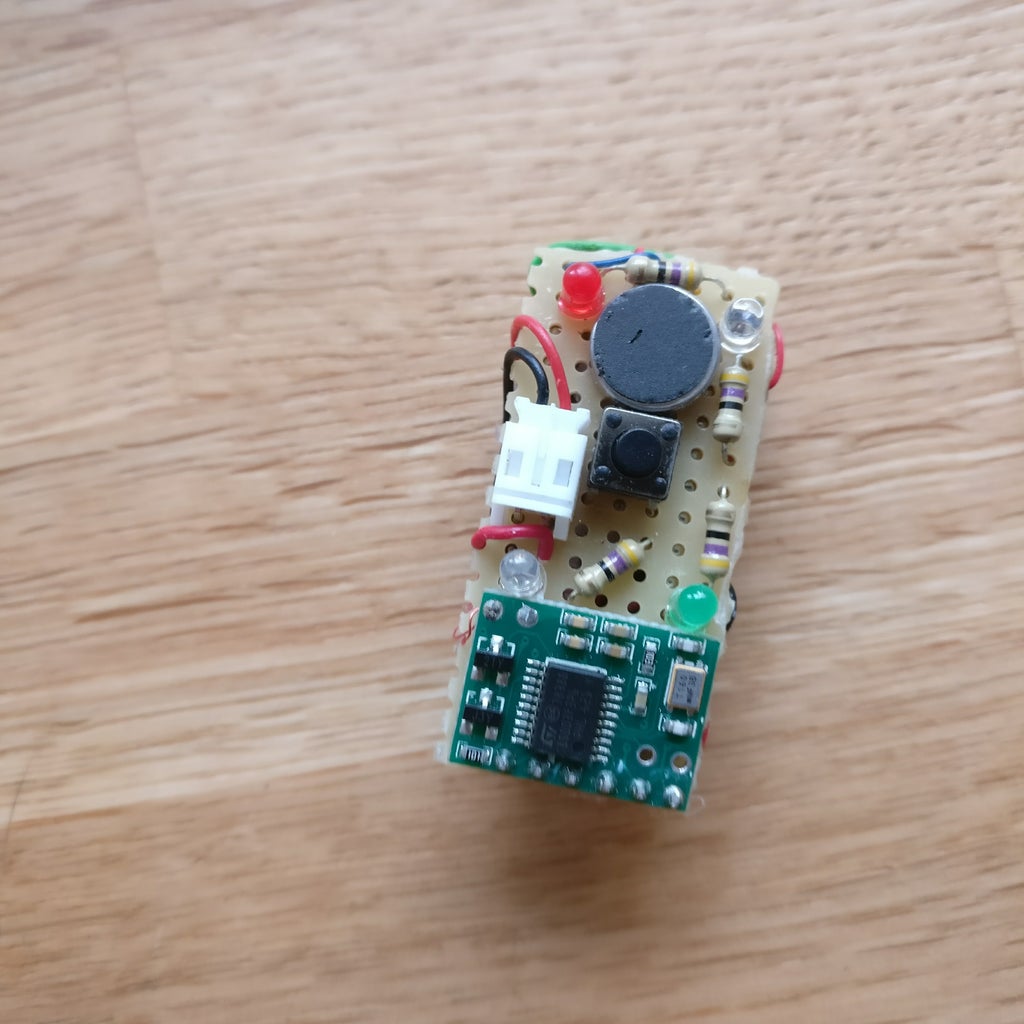
I created 2 versions of NFC trackers here are lists of components for each of versions:
Rounded version:
- Arduino Mini Pro 5V, ATMega328, 16Hz - https://www.aliexpress.com/item/Free-Shipping-New... - 2$
- NFC reader PN532 for 13.56MHz RFID tags - one of following:
- NFC module V3 https://www.aliexpress.com/item/PN532-NFC-RFID-Mod... 4$
- Adafruit PN532 https://www.adafruit.com/product/789 40$ (guess which one I used :) )
- 3V to 5V step-up circuit (because PN532 works badly with 3V) - one of following:
DC-DC Mini Step Up Power Module 1-5V To 5V Step-up Boost Converter For Arduino https://www.aliexpress.com/item/2Pcs-500mA-DC-DC-M... - 1$
SparkFun 5V Step-Up Breakout - NCP1402 https://www.sparkfun.com/products/10968 - 6$
- Vibration motor - one of following:
- 2 x NPN transistors
- 4 x Colored 3mm LEDs
- 4 x 150 ohm resistors
- PCB perf-board
- 110mah 3.6V rechargeable battery https://www.sparkfun.com/products/13853 5$
- 12mm x 12mm push button https://www.aliexpress.com/item/25Pcs-Tactile-Pus... <1$
- Micro-usb battery charger https://www.sparkfun.com/products/10217 8$
- 4 x NFC 13.56MHz RFID tags
- Small female plug for battery https://www.aliexpress.com/item/M89C50-Sets-Mini-... <1$
Total cost of components: ~30$
Rectangular version (smaller):
- Arduino Mini Pro 5V, ATMega328, 16Hz - https://www.aliexpress.com/item/Free-Shipping-New... - 2$
4 x Colored 3mm LEDs https://www.aliexpress.com/item/200PC-3MM-5MM-Led-... < 1$
4 x 33 - 47 ohm resistors https://www.aliexpress.com/item/Free-Shipping-600-... < 1$
Mini 125Khz RFID Module, 125kHz RFID tag reader - Pre-Soldered Antenna (works well with 3.3V) https://www.seeedstudio.com/Mini-125Khz-RFID-Modul... 10$
Micro-usb battery charger https://www.sparkfun.com/products/10217 8$
110mah 3.6V rechargeable battery https://www.sparkfun.com/products/13853 5$
Small female plug for battery https://www.aliexpress.com/item/M89C50-Sets-Mini-M... < 1$
Vibration motor https://www.aliexpress.com/item/10pcs-lot-Vibratio... <1$
PCB perf-board https://www.aliexpress.com/item/Hot-Free-shipping-... <1$
6mm x 6mm push button http://www.ebay.ie/itm/10x-buttons-style-button-SW... < 1$
NFC 125KHz tags https://www.aliexpress.com/item/10pcs-RFID-keyfobs... 4$
Total cost of components: ~30$
For programming Arduino Mini Pro you will need also FTDI programmer (USB interface):
https://www.sparkfun.com/products/9716 ~ 14$
When planning circuit for Arduino Mini Pro, important to remember following:
- PWM: 3, 5, 6, 9, 10, and 11. Provide 8-bit PWM output with the analogWrite function. This is useful to make LEDs not so bright & vibration motor not so intense and to save some power on them.
- External Interrupts 2 and 3. This is useful for using a button or NFC module as an interrupt to wake up Arduino from sleep where it is saving battery.
For battery saving purposes NFC reader module is powered up only when needed. Also, all power indicator LEDs are desoldered.
I also measured the power consumption of elements while they are running:
- NFC module V3 ~ 70ma
- Vibration motor ~ 70ma
- LED up to ~ 100ma
To pack all components together tightly I used hot glue but left cable to battery easily detachable for charging.
There are many types of NFC tags that have different protocols and frequencies for reading. I chose 125kHz that in theory with powerful NFC reader can be read even at 25 meters / 80 feet distance http://blog.atlasrfidstore.com/rfid-vs-nfc
Mini 125Khz RFID Module with Pre-Soldered Antenna is capable of reading the tag at 35mm / 1.3 inches distance. It is not as responsive as NFC Module V3, but it is more compact.
And 13.56MHz RFID tags that are more available and in general cheaper.
If you are interested more about different types of NFC and building your own NFC reader module, here is a good tutorial: http://blog.nonan.net/2013/11/simple-nfc.html

Step 3: 3D Printed Shell


In order to make 3D printed shell I took pictures of assembled gadgets from the top, left, front views and sent to my brother for 3D modeling :)
We used 3D programs like Blender and FreeCAD to create STL files that we printed on Zortrax, M200 3D printer.
It is very precise with < 1mm precision so it was possible to make an engraved button and that it is sitting in the clickable enclosure over real button underneath it.
We also painted with color and clear coat gadgets.
We hold them together with small bolt screws. It is necessary to open them for charging.
3D models & STL files are added to this post.


Step 4: Source Code


NFC
For this project I used ready made NFC readers with libraries that communicate with them. I also emphasized importance on battery saving by design circuit and code so that gadget can last a long time, unfortunately, ready-made NFC readers are not very battery efficient.
EPROM
Another interesting feature is that we gave these gadgets to people to use them and to test them, so we wanted to collect statistics on their use for this purpose we used Arduino built-in EPROM non-volatile memory. It will persist also after battery is disconnected https://www.arduino.cc/en/Reference/EEPROM
Depending on how many times you power down Arduino in between EPROM writes it can last up to 100000 write cycles, but it could be also much less: http://forum.arduino.cc/index.php?topic=902.0
ATmega328 have following memory:
- Flash 32k bytes (of which .5k is used for the bootloader)
- SRAM 2k bytes
- EEPROM 1k byte
If you want much safer persistent memory I advise using FRAM modules: https://www.adafruit.com/product/1897
Interrupts
An interesting thing about interrupt PIN numbers is that they are not the same as PIN numbers for digitalRead(PIN) etc. It is the case for many micro-controllers. In my case, I programmed it so that when INPUT_PULLUP button gets grounded Arduino is woken up from sleep mode (battery saving mode).
For example:
//INT0 = PIN 2
attachInterrupt(0, wakeUpFunction, LOW);
Or you could use function digitalPinToInterrupt(pin)
attachInterrupt(digitalPinToInterrupt(pin), wakeUpFunction, LOW);
https://www.arduino.cc/en/Reference/AttachInterrup...
LED PWMs to control brightness
For controlling brightness of LEDs and intensity of vibration motor, I used PWM function. To control it you can use analogWrite(PIN, Level) on digital pins that support PWM, see picture added to this step.
Source code
Library for making easy low power modes and interrupts: https://github.com/rocketscream/Low-Power
Library for making EPROM permanent memory operations easy: https://github.com/thijse/Arduino-EEPROMEx
Library for SeedStudio 125Hz mini NFC reader (rectangular gadget): https://github.com/Seeed-Studio/RFID_Library . Caution! I modified and included it in github in order to optimize battery performance.
Library for NFC module V3 (rounded gadget): https://github.com/adafruit/Adafruit-PN532
Source code of both gadgets available in GitHub: https://github.com/evaldsurtans/dory-nfc-arduino-t...
Step 5: Conclusions


Obviously, this problem can be solved using a smartphone app. It could be an app that read NFC tags or it could be just app that you use to track your progress of habit development.
The problem arises when this app does not get used frequently enough. Imagine your work desk filled with papers and somewhere in the bottom there is your checklist with habits that you would like to develop today. What is the likelihood that you will actually remember to find this paper under other high importance work papers? The same applies to apps in your phone - all of them compete for your attention span, so having this gadget attached to your keys in the pocket will increase the probability that you will remember about a new habit you are trying to develop.
Here are 2 great apps for iOS and Android that I use and advise for habit development:
- Android, Loop - Habit tracker https://play.google.com/store/apps/details?id=org...
- iOS, Productive https://itunes.apple.com/us/app/productive-habit-...


