

Introduction: Organized Organization - Tiered Zip Pouches


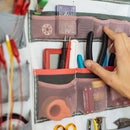

Transparent zip pouches are so useful for transporting stuff from A to B, but they always end up in a pile on the floor or in a bag or box. And I find myself rummaging through them over and over again in search of the one whose contents I'm looking for. To end this rummaging, and as part of my Wearable Studio Practice, today I implemented a snap fastener system that lets me snap together a series of same-size zip pouches so that they can be hung like a tiered pouch organizer. It works better than I expected.
Step 1: Materials and Tools


MATERIALS:
Transparent zip pouches:
>> https://www.modulor.de/en/handy-zippered-pouch-tr...
Snaps (here I used9mm metal snap fasteners, for larger pouches that can carrier more and get heavier, you might want to use larger snaps, or add an extra snap to the center)
Some ribbon
Some thread for sewing
TOOLS:
Ruler
Marker
Snap tool
Scissors
Sewing machine
Step 2: Mark the Snap Locations


Use a ruler and marker (or if you're good at measuring by eye, this will work fine too) to measure the position of your snaps. I placed them roughly 1.5cm from the side edges and 1cm up from the bottom and down from the top.
Step 3: Add Lower Snaps


I chose to attach the male snaps to the bottom side of the pouches. It is not easy to get into these corner with the hand-held snap tool. This is probably the hardest step of this process.
Insert the spiky back side of the snap to the inside of the pouch and press it through the material to keep it somewhat in place. Maneuver the snap tool into place and crimp the two snap halves together.
Add a second snap to the other lower corner.
Finish one pouch first before doing all, just to make sure you're doing it right.
Step 4: Add Upper Snaps


The upper snap are much easier to add. I placed them to that they about half attach to the zipper fabric and half to the transparent netted tarp.
Step 5: Test


When you have the first two pouches done, snap them together to make sure it works as expected before moving on. If all is good, repeat the last two steps until all your pouches have snaps.
Step 6: Assemble


Now you can snap together all your pouches, but how can you hang them?
Step 7: Add Strap


Take a piece of ribbon or similar and sew on to the inner side of one of the pouches (this will always have to be your top pouch). Look at the photos to see how it is sewn.
Step 8: Finished


Since these are relatively small zip pouches the two 9mm snaps are sufficient even to hold the weight of heavier items. If you replicate this method on larger zip pouches, you might want to use bigger snaps and/or add some more to distribute the weight along the width of the bag so that it won't droop in the middle.
Enjoy.

Participated in the
First Time Authors Contest 2016


