

Introduction: Pumpkin Heads - Costume


Halloween 2021 ... the year I took a break. Chalk it up to lack of time, higher priority deadlines, and partial burnout. Trick r' Treat numbers have also been dwindling, which is a bummer. I still stood outside and doled out candy per tradition, I just wore an existing costume from days gone by - Animal from 2013. It turned out that 8 years had been enough time for the population to cycle, so very few visitors had ever seen the costume.
My initial plan for 2022 was to reuse Edward Scissorhands from 2010, but I'm heading to a Percussion Convention in early November and didn't want to be baby face/clean shaven. Some form of a pirate theme was also a consideration, but I was Jack Sparrow in 2018 and that seemed too recent.
Eventually, I decided it would be fun to take a break from kid friendly and revisit scary. Due to the afore mentioned Percussion Convention, time was not on my side, so I decided on a quick and easy costume ... which of course escalated in true BALES fashion.
One pumpkin head became two ... then an accessory ... followed by yard/stage enhancements. The typical work until the very end and love every minute of it scenario.
Supplies
- EVA foam floor mats
- Barge contact cement
- Rattlecan & acrylic paint
- 3/4" PVC
- 3/4" plywood
- Window screen
Step 1: Foam Heads


I started on October 20th, so designing a pumpkin and templates from scratch wasn't ideal. Luckily, I found an excellent YouTube video within minutes of searching AND it had a link to download the template for free.
Much Props Template Direct Link [You never know when a YouTube video will disappear]
On the first night, I made one foam head. The second day I couldn't decide on a Jack O' Lantern face, so I opted to make a second foam head. This would give me options and I figured The Warden could wear one if she was feeling festive.
Each head requires six templated shapes and I was able to fit three on each EVA foam floor mat. One pack of floor mats from Harbor Freight is enough for two heads and leaves extra from stems.
Cut out all the parts, remember to mark the darts for easy alignment during assembly, apply your adhesive of choice (contact cement, hot glue, etc), and stick the parts together.
Once assembled, the bottom hole was undersized, so I just enlarged it until it fit over my head. Scribe an offset using a combo square or just your hand like old school carpenters and remove the foam. Repeat as necessary.
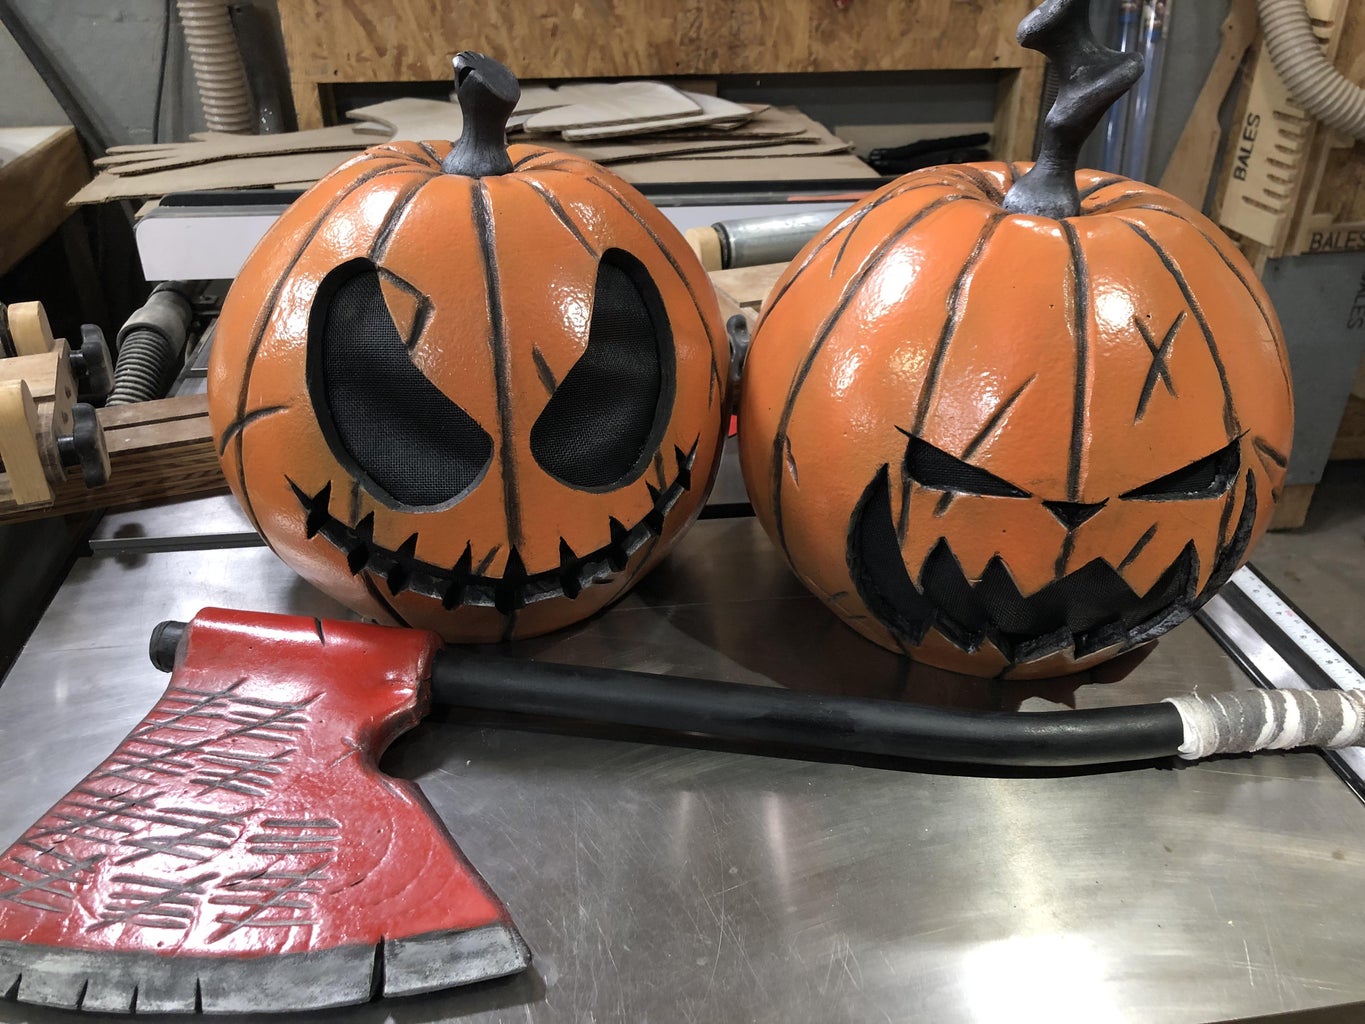
Step 2: Stems and Faces


You could buy and use foam dowels for the stems, but I just used foam offcuts. Four layer lamination, extremely vague sketching, and shaping on the orbital belt sander until I was satisfied with the shape.
The faces were drawn directly on the foam. I gave my self some reference marks to help with symmetry and just scribbled away.
Note: Pen ink will bleed through Plasti-Dip, so unless you are removing the lines with cutting and/or sanding, I'd recommend using a pencil.
The faces were carved using a razor knife and any ragged eyes were smoothed using a sanding drum and Dremel. The Dremel was also used to carve ribs and decorative blemishes/scars.
Step 3: Axe


While waiting for contact cement to tack up on the heads, I decided it make an accessory. A scythe was the initial idea, but I didn't have enough PVC on hand, so I opted for an axe.
A length of 3/4" schedule 40 PVC with EVA foam folder around it like a taco. The blade shape was drawn directly on the foam (several times), cut out using the bandsaw, and shaped using the OSB. The cutting edges was shaped using the Dremel, which I also used to break sharp edges, add blemishes, and also a victim count. Notches in the blade were cut out using a razor knife.
I wanted the handle to have some arch/deformation, which was easily achieved by softening the PVC with a heat gun and bending by hand.
Note: I had the air filtration and exhaust fan running, but a respirator would also be wise.
Step 4: Plasti Dip


Once all the foam fabrication was complete, they were heat sealed and sprayed with two coats of Plasti Dip. Heat sealing with a heat gun reduces the porous surface of the EVA foam, which in turn reduces it's tendency to absorb paint. I don't know if the Plasti Dip actually keeps the topcoat from cracking, but I does make a nice base for a more even paint job.
Step 5: Adjustable Suspension


For a tight and comfortable fitting head, I used what I call adjustable suspension. It's just a 2" wide strip of foam with a centered stand off/mounting block. The centered block is adhered to the back of the head interior. Then you just stack up foam on both ends until you have a comfortable fit. I first used this design on my Michelangelo costume and I find it simple, yet effective.
Step 6: Paint


Base paint was rattlecan - pumpkin orange for the heads and red for the axe. The orange was oddly translucent, so I used the entire can - easily 8+ coats.
Eye/mouth edges, ribs and blemishes were filled in with black acrylic via a paint brush. Axe blade received an iron base paint and silver top coat. I also used the silver to dry brush highlights on the blade edge, blemishes, and pumpkin stems.
Step 7: Concealment Screen


In the past, I've used a somewhat see through black spandex to conceal my face within masks, but I ran out and can't seem to find more.
This time around, I decided try window screen. One layer isn't enough, but if you offset two layers, it's perfect. The hardest part is gluing it to the inside of a round head because it doesn't have any stretchability. You could probably use contact cement, but I chose hot glue because I knew it was going to be a struggle and needed the ability to reposition as necessary.
Step 8: Sign


On the night before Halloween, I decided a sign would be a great idea. Spice up the yard display/stage and further enhance the theme if you will.
I found a reference photo online, drew myself a grid on 3/4 plywood, and went to work sketching. Painting was done the day of using acrylic paint. I started out using masking tape for clean lines, but as the deadline drew closer, that was abandoned for free hand.
It's very apparent that I lack a steady hand, but the final product was good enough for my purposes.
Step 9: Glamour Shots


I was initially going to pair the pumpkin head with an older "skeleton pirate" costume, but the glued on rib cage was one dimensional and cheesy looking. A long sleeve shirt and overalls did the trick. A black balaclava concealed my neck and skeletal gloves covered my human hands.
Step 10: Trick R' Treat


For Trick r' Treat night, I added a colored T-shirt for a little pop of color. I figured The Warden would wear a pumpkin head for the first few minutes and tap out, but she enjoyed it and stayed in character most of the night ... granted she was a nice pumpkin who talked to the kids and sent candy down the chute, while I was the menacing pumpkin with an axe.
Per usual, I ran power to several flood lights - three out front and one under the sign. The two street lights near my house are/were out, so these really came in handy this year.
The candy chute has become a fixture since it's conception in 2020 for the Luigi's Mansion costume. I ended up adding an LED puck light in the basket because the kids couldn't see the candy in the dark.
Overall, Halloween was a success. I'd say around 40-50 kids, which is a third of what it used to be, but still an increase from the past few years.
Total cry count was 2. One of them might need some therapy.

Runner Up in the
Halloween Contest


