Introduction: Rage Rifle. High Power Pump-action Rifle


More by the author:


About: i like destroying, fixing, making, altering, and customizing stuff.
have really messy "workshop" (A.K.A room) and cant be bothered fixing it.
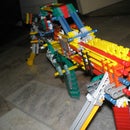
This is my latest design pump action RBG. it has full-auto capability and can be altered to fit most rubber band sizes. it has an extendable barrel and removable barrel and stock, and is fully designed by me.
i have made it possible to be made from the pictures, but i have included writing for those who need it. this design was thought of by me, and any similaritys to other instructables is purely coincedental.
it can hold more than 8 rubber bands, but with the extended barrel, it has a possibility of snapping underr pressure.
i have not included a piece count, but if anyone counts the pieces, please message me or add a comment with the amount.
Step 1: Trigger System


1. make/get these
2. put together like this
3. alternate view
4. make this
5. make/get these
6. put together like this
7. make/get these
8. put together like this
9. get these
10. put together like this
11. get these
12. put on rubber band
13. add this part
14. get this
15. make this
16. you should have these parts
17,18,19. put them together
20. add rubber bands
Step 2: Handle


this is not the most comfortable handle, but it is fairly stong and serves its purpose.
1. what we are making
2. get these
3. put them together with the white rod
4. make these
5. close up of a part
6. put A here
7. put B here
8. put C here
9. put the assembled parts together
10. attach to the trigger assembly
1. what we are making
2. get these
3. put them together with the white rod
4. make these
5. close up of a part
6. put A here
7. put B here
8. put C here
9. put the assembled parts together
10. attach to the trigger assembly
Step 3: Barrel


pic 1 shows the finished inner barrel. it is what you hook the bands on, and supports the sides and extended barrel.
2. get/make the parts
3. group the three plates together, with the odd one in the middle, and attach the first white rod
4. attach the second white rod....
5. and the third...
6. and the fourth
7. attach the blue rod and yellow connectors
8. attach the blue rod and green connectors
9. attach to the trigger and handle
Step 4: Pump


this is the system for the pump.
1.
1,2. make this
3. make these
4,5. make this
6. make these
7. make this
8. attach right frame
9. attach left frame
10. put together pump, rods and link section
11. attach
12. add the link
1.
1,2. make this
3. make these
4,5. make this
6. make these
7. make this
8. attach right frame
9. attach left frame
10. put together pump, rods and link section
11. attach
12. add the link
Step 5: Rubber Bands!


this is the bands for the pump system.
1,2. add the band on the left and right
3. add the pump band
1,2. add the band on the left and right
3. add the pump band
Step 6: Barrel


this is the sides of the barrel.
1,2. build this.
3,4,5,6. attach.
1,2. build this.
3,4,5,6. attach.
Step 7: Rear Decoration


this is the rear decoration, and it is optional
1. make this
2,3. attach
4. attach the joiner
1. make this
2,3. attach
4. attach the joiner
Step 8: Stock


1. this is the detachable stock
2. make these parts, and the bottom part twice
3. attach A
4. Attach B
5. attach two white rods and C
6. attach the last white rod
7. bend the bendy rods
8. attach
2. make these parts, and the bottom part twice
3. attach A
4. Attach B
5. attach two white rods and C
6. attach the last white rod
7. bend the bendy rods
8. attach
Step 9: Barrel


1. this is the barrel. it needs to be made to the correct size of your rubber bands. I had a bit of trouble putting this together, and there is no really easy way. just try to find a way that works.
2. what to make. just make it until its long enough
3. the end you loop the bands on
4. the end you attach to the gun
5. this is how it attaches
6. add this on the sixth bottom connector going away from the gun
7. the other end of the grey rods
8. the other end of the blue rods
2. what to make. just make it until its long enough
3. the end you loop the bands on
4. the end you attach to the gun
5. this is how it attaches
6. add this on the sixth bottom connector going away from the gun
7. the other end of the grey rods
8. the other end of the blue rods
Step 10: Adding Rubber Bands


1. stretch rubber band from the cog wheel.....
2. ......to the end of the barrel.
3. then click the cog wheel back a position.
2. ......to the end of the barrel.
3. then click the cog wheel back a position.
Step 11: Complete!
the rage rifle is finished! have fun, but dont hurt anyone.
ideas.....
put multiple rubber bands on one peg to make a shotgun effect
set up knex targets, and test you aim
have fun with a friend, shooting each other!
ideas.....
put multiple rubber bands on one peg to make a shotgun effect
set up knex targets, and test you aim
have fun with a friend, shooting each other!


