

Introduction: Rustic Blanket Ladder


Easy Project
Warning: although the project is a ladder, it is assembled in a manner which cannot bear the load of a person (even a child sized person). Do NOT climb.
Using some salvaged reject pine lumber found in a storage space, a couple of rustic looking blanket ladders are made.
The instructable will show how to use some dark wood stains, cheap white primer, cheap gloss spray paint and coarse sand paper to hide the inexpensive pine lumber used for this project.
The fact that the lumber is imperfect (splintered in some areas, dented and pitted in other spots) will actually help with the final look of the project.
Since the ladder will not be bearing heavy loads, nails were used to assemble the whole thing.
Step 1: Materials and Tools

Materials:
Pine lumber: One board 8 or 10 feet long, 1 inch by 3 inches. One board 8 feet long, 1 inch by 2 inches.
Nails
Wood stain: Ebony and/or other dark brown color.
White primer paint
Gloss white spray paint
Rubber feet (optional)
Tools:
Saw
Tape measure
Square or right angle
Pencil
Sandpaper: 80 grit, 100 - 200 grit
Hammer
Paintbrushes
Sanding block
Clamps
Something to cover the floor
Step 2: Cut the Rails


Using your hand saw, cut 2 equal lengths of the 1”x3” lumber. The lengths of 4 feet or 5 feet seems to be a good size for blanket ladders.
Lean one of the rails against the wall at an angle that looks desirable to you. Take the other piece of lumber and lay it on the floor against the one leaning on the wall. Draw a line on the one leaning against the wall using the one on the floor as a straight edge.
Cut along the line. Put the cut piece of rail over the other rail and copy the angle that was just cut. Cut the same angle on the other rail.
Lean one of the rails against the wall again making sure the newly cut bottom is flat on the floor. Place the other rail on the wall and put it against the rail leaning on the wall. Draw a line on the rail leaning against the wall using the rail flat on the wall as a straight edge.
Cut the new line with your hand saw.
Place the rail with the two cuts over the other lumber. Copy the angle to the uncut rail. Cut angle on the second rail.
Step 3: Cut the Rungs

Take the lumber that is 1”x2”. Cut it into 3 or 4 equal lengths. Rungs that are 18” seem to be good. Make them wider if you like. Make sure they are all equal.
Step 4: Attach the Rungs to the Rails


I have found that blunting the tip of the nails with one tap of the hammer prevented the wood from splitting. If the wood you are using splits too easily, drill pilot holes for the nails.
Measure out the positions of the rungs on one of the rails. On my ladder example I put the first rung 6 to 10 inches from the top. Then each rung is 12 inches apart. I marked the spot with my pencil.
I leaned one rung on the wall and nailed the top rung in. I angled the rung so that the flattest part of the rung is parallel to the ground. I hammered a second nail through the side of the rail into the rung to hold the angle.
Repeat for each rung.
Lay the rail and rung assembly on the floor.
Lay the second rail on the other side of the rungs. Use the wall or a piece of two-by-four to make sure the bottom (or top) of the rails are even. Use a right angle to make sure the both rails are at 90 degree to the wall (or 2x4). Use clamps to hold the second rail in place. Hammer two nails through the second rail into each of the rungs.
Step 5: Sand the Wood

Starting with 80 grit sandpaper on a sanding block, sand the ladder to remove splinters and to round the edges. If there are notches in the wood, use the sand paper to smooth out the notches but do not sand them flat. Keep as much of the woods imperfections as possible while removing snags and splinters.
Sand with 120 grit then 200 grit until the desired finish is achieved. For me, I used 80 grit to remove splinters and snag points, then 120 and 200 to smooth out the rungs and the edges of the rails.
Step 6: Stain the Wood


Lay out tarp or some sort of floor protection. Paint an
uneven coating of really dark wood stain. Paint with the grain of the wood.
For my ladder I used a dark reddish brown over the whole thing. Then while the stain is still wet I went over some areas with ebony (almost black). The end result was a very blotchy stain.
Let stain dry for at least 24 hours.
Step 7: Paint the Ladder


After the stain has dried for a day, take a rag and wipe it down. Some stain may wipe off, that is ok.
Brush on the white primer. Do NOT try to be perfectionist when applying the primer. Just brush in on unevenly. It should be thicker coats in some spots and barely there in other spots. It should be a very sloppy paint job.
Let the primer dry for about an hour.
Use the glossy spray paint and randomly cover some areas of the ladder. There is no need to cover the entire ladder with glossy paint. Perhaps cover 25%-40% of the ladder in random spots.
Let the paint dry for an hour.
Step 8: Sand the Ladder (again)


This is where the rustic effect happens. It is very important that the sanding be done by hand without any electric assistance. That is, no power sanders. We want a lot of control on how much paint is removed and where it is removed. The only way to achieve this is to sand by hand.
Use 80 grit sand paper.
Sand with the grain of the wood. Sand the edges to wear down the white paint. Sometimes the sanding will cause the dark stain to show, and sometimes the sanding will take it down all the way to the natural pine color.
As much as possible, avoid sanding the stain off. Sand just enough to remove the primer and the glossy layer to make the dark stain appear.
After the edges are done, sand the flat areas.
Think about how a ladder is used. Where would paint chip or wear off because of repeated use or exposure to elements. Think about where the paint would wear off with countless gripping and rubbing of hands. How about how shoes would cause paint to rub off. With the in mind, sand accordingly.
Once you achieved the worn look you desire, move to 100 or 120 grit for fine touches to the wear pattern.
Once done, wipe down with a rag again to remove all the dust.
Let dry for at least 2 days.
Attach rubber feet.
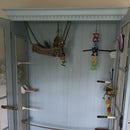
Step 9: Usage – Not Just for Blankets


So, this looks great for displaying your quilt collection.
However, the ladder can also be used to display other things. Some suggestions
* String lights on it
* Hang picture frames
* Hang small potted plants
* Use for towels
Please feel free to give other suggestions.

Participated in the
Furniture Contest 2017

Participated in the
Hand Tools Only Contest 2017

Participated in the
Reclaimed Contest 2017


