

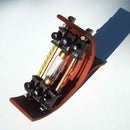
Introduction: Steampunked Dream Guardian Night Light


Hi everybody
A close friend of mine asked me to create an engagement gift (of course besides the ring!) for his girlfriend some weeks ago. Both of them are like myself, volunteer firefighters and they love Steampunk Objects. My friend thought of a steampunk stylish and practical night light with one or two firefighting elements. Well I accepted this challenge and created this Steampunked dream guardian night light.
Watch this short film for a small impression
The following description also reports the latest and thrilling results of my research for using a HV-flash unit of a disposal camera as a driver of a curved LED filament. As far as I know no one else has written about this possibilty up to now. Further information you will find at the end of this instructable -STEP-9 (results of my own tests) and in general at wikipedia
LED Filament stripes and as well curved LED Filament strings, can be directly driven with an AA- battery (1,5 Volts) and this HV-flash unit. In some cases -depending on the product- it is also possible to light up a complete LED filament bulb in the same way. During my attempts I also wanted to find out how long one 1,5 Volts AA-battery lasts for spending light. I hope these results will inspire you too to create your own fantastic lights with LED Filament stripes and curved LED Filaments. Some more objects using these Filaments are still in progress and I will present them soon at instructables.
Disclamer: Don´t wreck your health ! Use gloves, a dust mask, ear and eye protection when it is necessary while working with loud and noisy maschines, sharp metal edges, glass parts and all other maybe dangerous things. Also be very careful when using a soldring iron.....
And now it is time to start with describing the making of this Steampunked dream guardian night light. This project is also an entry to the actual Light Challenge and if you like it please vote for me......
I hope that you enjoy it .
Step 1: Materials and Tools You Need


Material
Nearly all parts of this Steampunked dream guardian night light are taken from the scrapyard. I only ordered a batterycase for 6 AA-batteries and the LED chain with 20 blue LED at ebay. If you cant´t find a broken down bulb with a curved LED-filament, take a bulb from supplyers like SEGULA , Philips, bulbrite or LIGHTME.
LIGHTME bulbs can also be lighted up directly by using the HV-unit an you can also choose between different colours of the filament stripes eg. blue, red, green and pink!
An old bulb holder E27 made of brass and procellaine from scrap
An old bulb socket E27 made of brass from scracp
An old bulb socket E27 „centra“ brassmade from scrap
Some pcs of coppertube 12 and 15 mm from scrap Coppermade pressfitting 15/12 mm from scrap
Coppermade pressfitting 12 mm, bow 90° from scrap
Some pieces of brass and copper tube with different diameters from 10 to 6 mm from scrap
One Light bulb glass jar or Light bulb Drinking glass mason jar, clear
One piece of decorating wire net ball (brassmade) from an old decorative LED chain
0,5 m of thick copper wire for winding a ring
One brassmade hose connection valve of a former wall hydrant from scrapyard
A piece of plywood
A piece of red fiber
A lamp base of a former desk lamp
Different screws made of brass M3 and DIN 95
Different washers made of brass and copper
Water stain for wood (mahogany type)
Synthetic resin varnish, silk matt
Zapon varnish
One 1-0-1 switch
One potentiometer between 100 K to 470 K will work well
A battery caseholder for 6 pcs AA-size bought at ebay
One flash unit of a disposal camera (Fuji works best)
Some copper wire 30 gauge / 0.25 mm
Tools
Standing drill
Different drills
Hollow glass drill 30 mm in diameter.
Rotary tool
Diamond milling cutter for rotary tool
Router with DIY router-table
Soldering iron
Cordless screwdriver
Different Pliers
Different screwdrivers
Thread cutter M3
Hot glue
Super glue
Epoxy resin
Different brushes
Step 2: Preparing the Parts: LED Filament, Lightbulb Mason Jar Mahoghani Ring .......


The first step is drilling a hole with 30 mm in diameter in the bottom of the light bulb mason jar . Therfore I built a holder made of plywood to fix the glass bulb in the right position under the standing drill. Some drops of water will cool the drill and prevent glass dust. Wear eye porotection, saftey gloves and a dust mask.These glass bulbs are of a weak quality and you will be very astonished how quick and easy it is to drill in.
Next step ist to take the curved LEDFilament out of its glass hood. Don´t forget to wear protection gloves at this step. In this case I took a broken down bulb with a wrecked pcb but th filament was still working well.
Cut the bulb socket carefully of and cut of the connecting wire from the pcb inside the socket. A short tip with a prick punch then will destroy the glass and you can take out the curved filament. With a plier you can cut of last glass parts at the "foot" of the glassmade filament holder if necessary. Then solder some wire to the connection wire of the filament and insulate them with a piece of a shrinking hose. Now put this holder in a small piece of a plastic straw (i took one from a burger shop) and fill it up with hot glue.
The wooden mahogany ring was deepend a little bit with a forstner drill and a dremel so that it would fit best at the curved surface of the former lamp base. Then a hole with 53 mm in diameter was cut in the middle with a fret saw. In this hole the valve will be put in later and then fixed with resin.
The brassmade valve needed a bath in water with vinegar and was polished later on with an iron brush at the standing drill.
Step 3: Create the Plywood Base and Its Cuved Metal Top


A piece of plywood was first cut with a jig saw and the got it´s peferct cicular form with the router. Next step was to mill a profile to this plywood plate. Then several holes had to be cut and drilled for the battery caseholder and the holder of the copper made bracket. last step was to stain the plywood in dark mahogany colour and cover it with Synthetic resin varnish, silk matt. I also marked this object -as ever- with a stemp of UV inked Junophor logo.
The plywood base will contain the battery case holder and the flash unit from a disposal camera and it is covered with curved metal plate which was a former lamp base too. Now I tell you the secret clou:
I took the bulb light glass mason jar upside down through the valve and mahogany plate and screwed in the curved metal lamp base. So the whole costruction ist hold together in one.
The former lampe base made of metal fit so tight to the plywood plate that the ring of the big screws with the copper washers is only a decorative but needed element.
Step 4: Insert the Blue LED Light and the Curved LED Filament


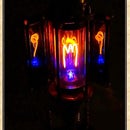
In germany fire engines drive with blue signal lights on their tiops. So my friend asked me to integrate a blue light into this lamp. So Ichose a chain of 20 very small blue LED formed a ring and placed and fixed it with som drops of silicone it in the internal thread of the valve top. So it is covered by and shines through the lightbulb.
To insert the curved LED filament was a little bit more complicated. First I had to find a solution to fix a bulbsocket holder with the bottom of the glass made lightbulb. Therefore I took a small piece of red fiber drilled a hole for the socketholder in the center and drilled some 3 mm treads to screw it with the glass. Then another former bulb socket called "centra-socket" covered this construction on top. No I fixed the curved filament with hot glue in an E27 brassmade socket, screwed this in the prepared socket holder and screwed this once again into the red fiber hole. Last step of assembling later was to put the "centra-socket" on top.
Step 5: Insert a Symbolic "treasure"


Another challenge was to hide a small symbolic "treasure" in this lamp as a special wish of my friend . So I took a globe made of woven brasswire (from an old x-mas LED light chain) and placed it in the bottleneck. I used a piece of cork and some other brass wire to fix it there. Another ring of thick winded copperwire was put around the bottleneck outside as a "nest".
Step 6: Viewing Glass


To cover the third open part of the valve, I created a small window which looks like a technical inspection glass with a ring of red fiber, eight screws and and a slice of 2 mm acrylic glass. Through this glass one can directly see the symbolic "treasure" in different lights.
Step 7: The Bracket


A bracket made of copper tubes with different sizes, should hide the two wires which lead to the curved filament LED. This LED Filament runs with High Voltage from the flash unit.
First a small piece of copper tube (15 mm) was fixed with super glue to the hole in the plywood base. Then follows a reducing press fitting 15/12 mm in addition with a piece of copper tube 12 mm. The 12 mm 90° bow comes next. At the end some short pieces of copper and brass made tubes with different sizes but fit all in another lead to the "centra-socket" Where they had been glued with very strong epoxy reysin.
All other parts of the bracket except of one side of the reducing pressfitting had also been fixed with resin. The "loose" part of the reducing fitting got two brassmade screws 3 mm for fixing and decoration. So this bracket can be re-opend easyly if necessary
Step 8: Electric Equipment


As I wrote before, the curveld LED Filament runs with High Voltage from a flash unit of a disposal camera. To all reders who have not heard before from this technical possibilty, I suggest to read this instructable first:
High Voltage Power Supply for Nixies, CFL, Neon-Glow-Bulbs Etc. for My Steampunk Objects
The picture of the flash unit pcb show and explain in short the different connection points.
For this curved LED filament (and of course also for LED filament stripes) you should use AC!
This sort of flash unit can also be driven with 3,0 volts as supply but the filamentlight emitted wil sometimes very bright. So I integrated a potentiometer (100 K up to 470 K will work well, for dimming effect about 60 K to 70 K Ohms resistance is only needed) in one HV wire to the filament.
I took only one 1-0-1 switch because either the blue light or the golden filament light should shine.
So the wiring is quite simple as you can see.
The power supply for the flash unit is 3 Volts (AA-type) and the blue LEDs runs with 4.5 Volts (AA-type.) Normally they could be drivven with 6 Volts but 4.5 Volts are already enaugh. Both battery packs are placed in the same battery case holder but they are seperated.
Step 9: Results of Tests With Filament LED


Here is a short summary of my testings:
LED Filament stripes or curved ones can be enligthed with HV-flash units of a disposal camera in general.
A lot of filament bulbs can be directly activated with this flash unit without any damage. Especially all! the bulbs from LIGHT-ME work in a fantastic way This is also the only supplier I know, who offers beside the curved ones the filament bulbs in blue, green, red and pink colour.
They can be used single or in groups like you find them in the bulbs. If a filament bulb is broken down under normal conditions, the internal pcb and there escpecially one capacitor, has failed. The filament stripes very often will be ok. In some cases the broken down bulb can be reactivated by using the flash unit because the capacitor collapsed while being treated with 50 Hz. The flash unit pulses with 30 kHz and then some caps will do their job once again.
I experienced that you need a resistor of about 66 k Ohms for 8 filament stripes together to let it shine as long as possible with only 1,5 Volts AA-type battery. The filament stripes can give light for about 20 hrs with one fresh battery. After nearly 6 hrs one or two stripes will shine weaker then the others but this is no problem. The voltage of the battery at the end of the long lasting tests goes down to 0.49 Volts or in one case to 0.34 Volts!!! This is very impressing!!
I hope you are now thrilled like me and don´t forget to vote for me in the Light Challenge!
Yours Aeon Junophor

Participated in the
Lighting Challenge


