

Introduction: Sugar Coated Honey Bees -or- How to Test for Varroa Mites


Colony Collapse Disorder got you down? You can wave your arms in the air, share tear drop text emoticons with your friends about how much you loved your dead bees, hashtag your disappointment, blame it on pesticides, but whatever you do, DON'T do a sugar roll test when your replacement hive starts showing signs of trouble. It will tell you how many varroa mites you have, and then you will be faced with the need to take action to save your hive.
What is a sugar roll test, you ask?
Its the best way to get a rough estimate of your mite count with the least amount of injury to the bees. In this Instructable I'll tell you everything you need to know to get a good count of mites with the Sugar Roll Test.
Step 1: Gather Your Materials
For the Sugar Roll Test you'll need to assemble the following:
1. Powdered Sugar
2. Tablespoon measure
3. Half-cup measuring cup (exactly half a cup- I'll explain why later)
4. Quart mason jar with canning lid
5. Plastic washing tub, light color
6. A 5 inch square piece of 1/8 inch hardware cloth
7. A few cups of clean wash water
8. Paper towels (optional)
Step 2:

Make your screened shaker jar
It's easy, just take a pair of tin snips and use your mason jar lid to trace out a circular screen to fit. I make the screen tight so it doesn't want to slip out, and then I also glue it with a little titebond to keep the screen in place. The screw cap will help hold the screen in place.
Step 3: Measure Your Powdered Sugar in the Shaker Jar


You'll need between one and two scoops of powdered sugar, a little more than one tablespoon is all you need. The point is to coat each bee with enough powdered sugar to cover them and to knock off any varroa mites. Varroa mites have little barbed feet that hook into the bees so they can ride on their exoskeletons. The powdered sugar gets in those barbs and makes it difficult for the mites to hang on, so they fall off. Then you can count them!
Once you have your sugar in the jar, make sure your shaker lid is close by so as soon as those bees go in you can cap them.
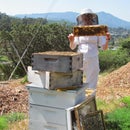
Step 4: Shake Your Bees Off a Brood Frame


Find a good brood frame with a mix of newly hatched brood, larvae and eggs. Look for the queen! If you don't find her, look again! You don't want your queen to come to any harm, so be doubly sure she doesn't go into your shaker with the worker bees.
Make sure you have your measuring cup and shaker jar and lid close by. Once you've determined there is no queen on that frame, give it a good shake over your dish tub.
(I usually put the tub on top of the open hive so that any bees who miss the tub go back into the hive. )
Then give the tub a gentle jiggle to settle the bees into the bottom.
Step 5: Pour Yourself a Half Cup


of bees into the measuring cup. Its important that you have a vessel that measures exactly one half cup, since you're not going to want to lean in and read the tick marks on the side of the cup, or even worse, have to fill the vessel more than once.
Quickly pour the bees into the jar and place the lid on top.
Step 6: Sugar Roll!


This is where the sugar roll gets its name. Gently roll the bees around to coat them in the sugar. Set them aside for about 5-10 minutes while you inspect the rest of the hive.
Then invert the jar and shake it hard and rapidly over the tub to shake all the powdered sugar free and with it any mites. You'll need to be a bit brutal here, and do it quick. The bees when shaken will begin to "sweat" with the stress, and that moisture makes the sugar stick. It will mess up your results if you aren't quick and vigorous enough.
Expect a few bees to stick to the screen, and if you shook hard enough, some bees might even be in bad shape. That's unfortunate, but the reality is that there are literally thousands of bees in each hive, so losing a few makes very little impact on the hive as a whole.
Step 7: Release Your Bees


This isn't scary, not at all like releasing bees from a bee vacuum. These bees are covered in sugar so they don't fly or buzz at you aggressively. In fact, they're rather vulnerable at this point. I usually shake the bees out over my inner cover or at the entrance. They will stagger and look miserable for about 10 minutes while their sisters happily clean off the sugar and calm them all down.
Step 8: Now Count Your Mites

Look back into the tub again and count he mites. This is where your clean wash water comes in. The water makes the sugar translucent so you can see all the mites.
Your half cup measured about 300 bees. Divide the number of mites by 3 and you'll have the percentage of mite infestation. Depending on what your threshold is to mites and the time of year, you may decide to take action to reduce the mite infestation at this point. My favorite beekeeper blogger Randy Oliver recommends treatment at levels above 6 mites per sample in the summer, and 10 to 15 in the fall. Mite counts are typically highest when the nectar flows begin to slow and in the fall. This is because the mites have had all summer to increase their numbers, and the bee population begins to drop.
If you have a strong hive in the fall and they begin to rob out weaker, mite infested hives for their honey, the mite count can jump up rapidly and cause collapse within a couple of weeks.
This is believed to be the main cause of colony collapse by many professional beekeepers and scientists.
Step 9: Record Your Results

I record mite levels and hive information right on top of the hive lids with the same Posca pens I use to mark my queens. The ink will come off with a little elbow grease, and stays on for months without fading. Its a good idea to get in the habit of doing a sugar roll test with every inspection, especially as the nectar flow wanes and fall comes around.
Now use those paper towels to wipe out the water and sugar, and set up your jar again for the next sample. Shake shake shake!
Step 10: Thanks for Reading, and More Information...
Beekeeping Suppliers
Mann Lake : Free shipping Nation-wide on all orders over $100, full selection
Dadant: If they offered free shipping they'd be as good as Mann Lake, Nation-wide
Kelley Bees: fellow beekeeper Robert MacKimmie recommended them and their catalogue is enticing
Country Rubes: for hive beetle bottom board solutions and robbing screens
Beekind in Northern California: Expensive for most supplies, but they sell follower boards and robbing screens
Beekeepers who know more than me: Randy Oliver has published extensively on the hows and whys of beekeeping. Check out his articles on treating for varroa as a follow-up to this Instrcutable.
Extras: This was my third Instructables project.
Additional projects I've written: How to Make a Nucleus Honeybee Colony, and Hiving a Package of Bees.
My websites: www.jennifer-berrybees.com


