

Introduction: The Simple Guide to Flashing Your ESP8266 Firmware


This instructable is about updating or reverting the firmware on your ESP8266 to the Factory version.
It’s a continuation of the other instructable: https://www.instructables.com/id/ESP8266-WiFi-Module-for-Dummies
If you intend only uploading your own code to the ESP8266 then you don’t need to restore the factory firmware to the ESP8266. Your code is the firmware! So you don't need to worry about this.
There isn’t really a “Standard” Factory version of firmware. There are many versions and flavours out there. The “Factory” have in fact stopped producing new firmware. The files have become so large that they might not fit onto all modules. There is however a handy facility that has been provided for you to generate customised firmware with the components according to your needs.See: http://nodemcu-build.com/
The last factory version produced (Version 2 – July 2016) though should be good enough for most purposes.
In this instructable I’ll show you how to install the factory firmware and how to use some “AT” commands to make your ESP8266 do things.
What you’ll need:
- The same breadboard setup as in my ESP8266-WiFi-Module-for-Dummies instructable. The LED is optional and GPIO 0 should be grounded
- A “flasher” program to update the firmware
- A firmware file
Step 1: Firmware Flashing Breadboard
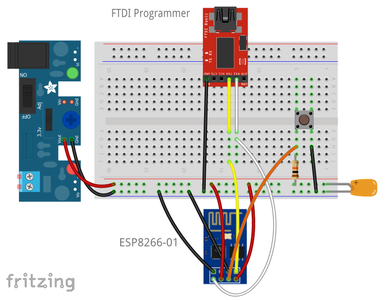
Setup your breadboard as per the above.
For the details see the instructable: ESP8266 WiFi Module for Dummies
As mentioned in that instructable you should use a separate power supply for the ESP8266 as the USB to Serial Programmer (or an Arduino) is not able to supply sufficient current to your 8266. Without full power your ESP8266 will be erratic. A separate power supply and RESET button will save you many hassles.
Step 2: Schematic

Note that RESET is held high by a 10k ohm resistor to avoid any unpredictable results as a result of it floating.
Step 3: Get the Firmware Flasher Software

To get the flasher, download the zip file from here: https://github.com/nodemcu/nodemcu-flasher
This is the Windows Version. Click on Clone or download, and Download the Zip File.
Unzip these files and copy them into a suitable location eg: on your C: drive.
There is a 32 bit version and a 64 bit version.
To launch the App, depending on your PC, double click on “ESP8266Flasher.exe” inside the “Release” folder under the appropriate version: ie: The Win32 or the Win64 folder
Step 4: Get the Latest Firmware File
To get the the firmware (Version 2 - July 2016) go to:
http://www.electrodragon.com/w/Category:ESP8266_Firmware_and_SDK
Click the link: Official ESP V2 Firmware and download the zip.
As mentioned this seems to be the last factory version out there.
Unzip this into a suitable folder. This file "v2.0 AT Firmware(ESP).bin" will be needed by the firmware flasher.
A good folder is in the Flasher firmware folder, eg: C:\\nodemcu-flasher-master\nodemcu-flasher-master\Resources\Binaries\
Alternatively, instead of the factory firmware, you can generate firmware according to your requirements. Go to: http://nodemcu-build.com/
Step 5: Open the Firmware Flasher Tool
To flash the firmware:
- GPIO 0 pin must be grounded for any firmware update or code upload
- Press the RESET button
- connect your USB cable
Now open the Firmware Flasher in your local folder for example:
C:\\nodemcu-flasher-master\nodemcu-flasher-master\Win64\Release\ ESP8266Flasher.exe.
Step 6: Set the COM Port

Select the port that your ESP2866 is on. In this example it is COM4. Make sure that you have closed all other serial monitors that may be on this port. Eg: The Arduino one, or CoolTerm etc.. The firmware flasher will not work otherwise.
Then go to the “Advanced” page...
Step 7: Set the ESP8266 Options

Most ESP8266’s operate at a Baud rate of 115200. If this doesn’t work try 9600 as some boards are configured with this setting.
The other settings are appropriate for the ESP-01.
This should help you identify what you’ve got:
http://www.esp8266.com/wiki/doku.php?id=esp8266-module-family
Step 8: Change the Firmware File

Initially it will usually look like the above. Click on the settings (“gear”) button and browse for the firmware file that you downloaded and unzipped.
Eg: C:\\nodemcu-flasher-master\nodemcu-flasher-master\Resources\Binaries\ v2.0 AT Firmware(ESP).bin
As mentioned you could also use your own custom bin file generated by http://nodemcu-build.com/
Step 9: Select the New Firmware File

Click on the "gear" to browse for your Firmware File.
Step 10: Start the Upload to the ESP8266

Now go back to the Operation tab and Click Flash. The flasher will get the ESP8266 MAC addresses for its Access Point and Station and you should see something like the the screen above.
Step 11: Progress...
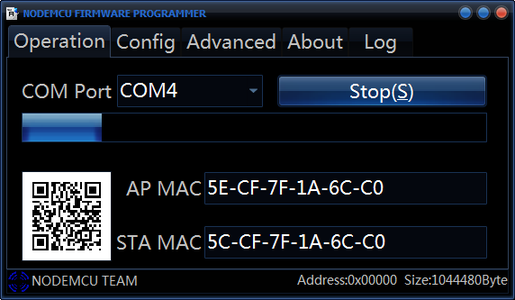
If all is well it should come back with 2 MAC Addresses for the ESP8266. One for its Access Point address and the other as a Client Station.
The progress bar should start moving and the blue light on the ESP should be flashing.
If not, there may be a problem. Sometimes one has to persevere. You may think that you've broken the ESP but invariably it comes back to life!
Some tips:
- Make sure GPIO 0 is grounded and that CH_PD is HIGH.
- Press the RESET button and try again.
- If this doesn't work try plugging the USB cable out and in.
- Wait for 10 seconds between plugging it out and in.
- If nothing works try a PC reboot – as various tools on the same COM ports tend to mess them up.
This process will run for several minutes.
Step 12: Success

If all goes well you should see this with a green tick in the bottom left.
You're done!
- Keep the Serial Programmer connected
- Disconnect GPIO 0 from ground.
- Press the RESET button.
Now you can open a Serial Monitor eg: The Arduino IDE or CoolTerm etc. and try some AT commands
Step 13: No Success?

You may see this. ie: a no go sign in the bottom left hand corner,
Don't despair just yet.
- Go through all the settings again and make sure they're right
- Check that the breadboard is correct
- Make sure GPIO 0 is grounded and that CH_PD is HIGH
- Press the RESET button and try again
- If this doesn't work try plugging the USB cable out and in
- Wait for 10 seconds between plugging it out and in
- If nothing works try a PC reboot – it can do the trick, as various tools on the same COM port can cause problems
Have a look at the messages in the Log tab.
Try Google!
Step 14: Now Open a Serial Monitor
With the Factory firmware back on the ESP8266 you should now be able to use the standard AT commands.
See AT Commands at:
https://www.itead.cc/wiki/ESP8266_Serial_WIFI_Module#AT_Commands
And this:
https://espressif.com/sites/default/files/documentation/4a-esp8266_at_instruction_set_en.pdf
- Keep the Serial Programmer connected
- Disconnect GPIO 0 from ground
- Press the RESET button.
You can either use the Arduino IDE or a tool like CoolTerm.
You don't need to have the ESP2866 Board Manager setup in the Arduino IDE to connect to the ESP with the Arduino Serial Monitor and issue AT commands. You will need the ESP2866 Board Manager setup if you want to write and deploy code to the ESP. See the Arduino board setup in:
https://www.instructables.com/id/ESP8266-WiFi-Module-for-Dummies
To get Coolterm:
http://freeware.the-meiers.org/
For Windows download: CoolTerm_Win.zip . There are also versions for MAC and Linux
Step 15: Now Some AT Commands

You can use the Arduino IDE Serial Monitor (or CoolTerm or similar) to send AT commands to your ESP8266.
Most ESP8266's have a baud rate of 115200 but you may need to try everything from 9600 and up.
Also make sure that “Both NL & CR” is selected.
Type AT and press enter. The ESP should come back with OK.
Get Version numbers, including the Firmware at Version 2.0:
AT+GMR
Get IP and MAC Address:
AT+CIFSR
Get the WiFi Mode. 1=Client Station, 2=Access Point, 3=Both:
AT+CWMODE?
Set it to Client only:
AT+CWMODE=1
Get IP and MAC Address again
AT+CIFSR
Step 16: Join a WiFi Access Point

List all Access points (WiFi's) nearby:
AT+CWLAP
Connect to a WiFi Station:
AT+CWJAP="BanditMan","YourPasswordHere"
Get IP and MAC Address again:
AT+CIFSR
(ps: the image has been edited to obscure some of the details)
Step 17: AT Reboot

Type AT+RST
This will reboot the ESP and you'll see quite a bit of interesting info
Step 18: Try Pinging Your ESP

Open the Command Prompt in "Run".
Step 19: Now PIng Your ESP

Hopefully you have success!
You are now part of the Internet of Things!
You can also login into your WiFi Router and reserve an IP address for this ESP8266, that'll make things easier.
You can also add Port Forwarding or a Virtual Server for port mapping to direct external access to your ESP.
Choose a "random" external port number to minimise any unwanted intrusions.
I suggest you also include at least some simple security in the Web pages your ESP serves up. eg: a password to get access.
Step 20: Resources
See the Complete ESP8266 Guide for Dummies with the Breadboard details for this Firmware build:
https://www.instructables.com/id/ESP8266-WiFi-Module-for-Dummies
ESP Versions:
http://www.esp8266.com/wiki/doku.php?id=esp8266-module-family
Flasher:
To get the flasher download the zip file from here:
https://github.com/nodemcu/nodemcu-flasher
ESP Firmware:
http://www.electrodragon.com/w/Category:ESP8266_Firmware_and_SDK
To get the the firmware (Version 2 - July 2016) go to:
http://www.electrodragon.com/w/File:V2.0_AT_Firmware(ESP).zip
Build your own custom firmware at. This looks very powerful:
See AT Commands at:
https://www.itead.cc/wiki/ESP8266_Serial_WIFI_Module#AT_Commands
And this: https://espressif.com/sites/default/files/documentation/4a-esp8266_at_instruction_set_en.pdf

![Tim's Mechanical Spider Leg [LU9685-20CU]](https://content.instructables.com/FFB/5R4I/LVKZ6G6R/FFB5R4ILVKZ6G6R.png?auto=webp&crop=1.2%3A1&frame=1&width=306)


