

Introduction: Tumbling Polisher for 3D Metalfill Prints


If you want to print metal filled materials then you may end up wanting a drum type polisher to finish them without a lot of manual effort. At least I did! You can buy one but the cheap ones are pretty small and not that cheap. If you are at all into 3D Printing you probably have at least some of the components to make one of these...not to mention all the parts that you can print.
The pictures above show some markers for the game Terraform Mars that were designed by Frank Strauss and are available here https://boardgamegeek.com/filepage/142444/3d-prin... These prints were done in Collorfabb Copperfill and you can see how they looked when printed and after seven hours in the tumbler.
THIS IS NOT MEANT TO ILLUSTRATE MY BEST QUALITIES AS A DESIGNER!
This is a quick and dirty project. This Instructable will also be quick and dirty. The end result looks a little like a quick and dirty project. But it works!
Step 1: The Tumbler

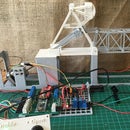
Here is the assembled and operating tumbler polisher.
The model files are on Thingiverse.
I printed the files you see with an 800 micron nozzle and a layer height of 400 microns. Any resolution will likely work. The next page shows a close up of the base with the electonics and stepper motor.
Note that inside the drum there are five printed pieces that assemble to form a mixer. You can see it in the second picture above. It should be inserted into the drum such that it scoops up the little brass bits as the drum rotates. I glued mine into the drum.
The above video from adafruit walks you through the polishing process.
Step 2: Parts of the Tumbler

The above image represents the assembly instructions! Said up front that this a short instructable!
Step 3: Software for the Tumbler
Here is the code for the Arduino Stepper Driver combination that drives the Tumbler. Not much to it really. Takes a speed input from a voltage divider configured with a variable resistor. Uses that input to set the motor speed.
ol{margin:0;padding:0}table td,table th{padding:0}.c4{color:#000000;font-weight:400;text-decoration:none;vertical-align:baseline;font-size:11pt;font-family:"Arial";font-style:normal}.c1{color:#000000;font-weight:400;text-decoration:none;vertical-align:baseline;font-size:9pt;font-family:"Courier New";font-style:normal}.c0{padding-top:0pt;padding-bottom:0pt;line-height:1.15;orphans:2;widows:2;text-align:left}.c3{background-color:#ffffff;max-width:451.4pt;padding:72pt 72pt 72pt 72pt}.c2{height:11pt}.title{padding-top:0pt;color:#000000;font-size:26pt;padding-bottom:3pt;font-family:"Arial";line-height:1.15;page-break-after:avoid;orphans:2;widows:2;text-align:left}.subtitle{padding-top:0pt;color:#666666;font-size:15pt;padding-bottom:16pt;font-family:"Arial";line-height:1.15;page-break-after:avoid;orphans:2;widows:2;text-align:left}li{color:#000000;font-size:11pt;font-family:"Arial"}p{margin:0;color:#000000;font-size:11pt;font-family:"Arial"}h1{padding-top:20pt;color:#000000;font-size:20pt;padding-bottom:6pt;font-family:"Arial";line-height:1.15;page-break-after:avoid;orphans:2;widows:2;text-align:left}h2{padding-top:18pt;color:#000000;font-size:16pt;padding-bottom:6pt;font-family:"Arial";line-height:1.15;page-break-after:avoid;orphans:2;widows:2;text-align:left}h3{padding-top:16pt;color:#434343;font-size:14pt;padding-bottom:4pt;font-family:"Arial";line-height:1.15;page-break-after:avoid;orphans:2;widows:2;text-align:left}h4{padding-top:14pt;color:#666666;font-size:12pt;padding-bottom:4pt;font-family:"Arial";line-height:1.15;page-break-after:avoid;orphans:2;widows:2;text-align:left}h5{padding-top:12pt;color:#666666;font-size:11pt;padding-bottom:4pt;font-family:"Arial";line-height:1.15;page-break-after:avoid;orphans:2;widows:2;text-align:left}h6{padding-top:12pt;color:#666666;font-size:11pt;padding-bottom:4pt;font-family:"Arial";line-height:1.15;page-break-after:avoid;font-style:italic;orphans:2;widows:2;text-align:left}
const int DIR = 3; // Stepper direction
const int STEP = 4; // Stepper step
const int SPEED = 3; // Speed input (analog)
void setup() {
Serial.begin(9600); // open the serial connection at 9600bps
pinMode(DIR, OUTPUT); // set pin 3 to output
pinMode(STEP, OUTPUT); // set pin 2 to output
digitalWrite(DIR, HIGH);
int steps1 = 200;
}
void loop()
{
int speedIn = analogRead(SPEED);
float speedFactor = (float)speedIn / float(650);
int speed = int(500.0 * speedFactor);
digitalWrite(STEP, HIGH);
delayMicroseconds(speed);
digitalWrite(STEP, LOW);
delayMicroseconds(speed);
}


