

Introduction: Building a Raspberry Pi Zero PoV Wireless Camera


This is one more project in the long list of projects that may not actually meet a need but was fun to build.
The "requirement" that this solution meets is to provide a wireless Point of View camera that can be used to photograph dioramas, model railroad layouts, or for Line of Sight previews when playing a tabletop game such as Flames of War.
The solution is a 3D Printed case that encloses a Raspberry Pi Zero that is attached to a Pi Camera. The Pi Camera is in a mount that can slide up and down a track to match a PoV elevation. The Pi supports a wireless dongle that can either attach to a network or provide one of its own (Adhoc or Otherwise). Power is supplied by a portable mini charger.
There are examples of each possible usage above. The first photo is showing a PoV looking down an N-Scale Drawbridge, the second two are showing a picture being taken of a small diorama, and the third is a representation of what a Flames of War usage might entail.
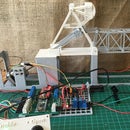
Step 1: The Bits

See annotations on the image
Note on the camera.
By default the Pi Camera is fixed focus...but only by virtue of one little drop of glue. Removing that allows the camera to be focused to a much shorter focal length than default. You do risk ruining the camera so be careful! Here is a video instruction.
There is also a variable focus camera module available here but I have not tried one though I do have one on order. I am assuming that it will work and hoping that the board is the same form factor as the Pi Camera. If not I will include a mount for this camera in V2 of the models.
Step 2: Prepare a USB Power Adapter


I bought some USB plugs but you might be able to do what you need with a salvaged jack from an extra cable. You need to be careful with soldering given the plastic under the contacts. With my purchased plugs I was able to fold over tabs of metal and then I shrink wrapped the whole thing.
Step 3: Add Power to the Pi Zero

Carefully solder another power cable to the GPIO pins of the Pi Zero. Use a small wire tie to secure the power wires to the PCB to avoid and accidental unplug or worse.
Step 4: Insert the Pi Zero

Insert the Pi Zero into the case with the Camera Ribbon Cable attached and fed out the bottom. Slide the camera cable through the camera mount as shown. Also thread the power cable through the opening on the bottom of the case.
Step 5: Attach the Camera

Carefully attach the camera to the ribbon cable. Be very careful of static electricity as the Pi Camera is really sensitive.
Step 6: Finish Assembly

Finish up the assembly by plugging the Pi Zero into power, slide the camera module onto the track, and plug in the USB Wireless adapter.
Step 7: Configure the Software As Needed

Software for the Pi Zero can be configured in a lot of different ways depending on your environment and needs. Here is a very brief overview of what I did to configure mine:
- Install the RPi image and then do a "sudo apt-get update" to make sure catalogs are all up to date.
- Run "raspi-config" to enable the camera and expand the root volume
- Install and customize "motion" to stream the images
- Setup motion to run in the background with the following command run before it to make sure motion can access the video camera :"sudo modprobe bcm2835-v4l2" - Note that in the above screen shot I am running everything in a terminal window.
- Configure your RPi to either join a network or to host its own. I chose to configure mine to host an adhoc network as it required the least effort.
I may add to this later but there are many ways to skin a cat with the Raspberry Pi in this configuration.


