

Introduction: Untitled Toddler Game! Horrible Goose Costume for Kids


Any parent will tell you, the Horrible Goose of Untitled Goose Game fame has very strong toddler energy. So for Halloween this year our daughter is starring in her very own Untitled Toddler Game.
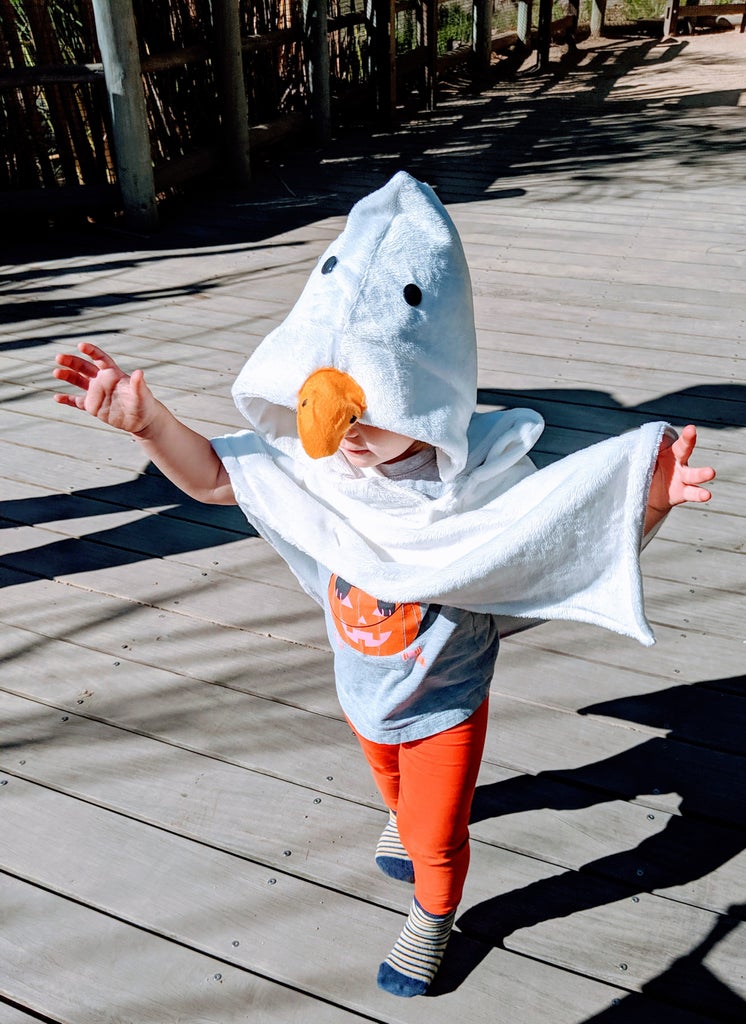
The base of this horrible goose costume is a hooded poncho made from snow white minky fabric. The hood is important because that's where we'll be attaching the eyes and beak, but beyond that, use a pattern you already have, find a new one you like, or draft it yourself. I've included a link to the free pattern I used below, but use what you like. The minky is nice because the texture actually gives it an appearance that looks a lot like the soft feathers on a bird's breast or back.
I made a beak out of orange felt and some stuffing, and it on the top of the hood with a pair of black buttons for eyes. Some orange leggings (and maybe shoes) round out the costume and your tiny, one-bird terror brigade is ready to roll out and cause mayhem.
This instructable will cover making the poncho, with a primary focus on the beak.
Supplies
Materials
- Poncho
- White Minky (I think I only needed about half a yard, but check your pattern)
- White thread
- Pattern for a hooded poncho
- Wash-away stabilizer (optional)
- Large white buttons (optional)
- Medium black buttons (I used shank buttons, but you can use flat if you like the look better)
- Beak
- Orange felt
- Black embroidery floss
- Orange thread
- poly-fill (or anything else to stuff it with, or just skip this)
Tools
- Serger (optional -- you can do this whole project with a regular sewing machine; the serger just makes the inside seams tidier if you're leaving the poncho unlined like I did)
- Sewing Machine (technically optional if you use a serger, but you'll need some way to do button holes and the embroidery if you want to include those)
- Stretch needles -- use size 90/14 if you have it, but I just used a 75/11 and it worked fine
- Walking foot for your sewing machine (optional)
- Rotary cutter, mat, and straight edge (optional; you can cut everything with fabric shears if you need to)
- Hand-sewing needle
- Seam ripper (technically optional? YOLO, I guess)
- Thread scissors
- Fabric marking pen
Step 1: Make the Poncho


A poncho is a pretty simple garment, even with a hood, and the exact look and feel of your poncho isn't important to this costume. In this step I'll describe the two major changes I made to the poncho in the pattern I linked to in the first step, along with the modifications I had to do to account for them, but none of this is required.
Skip the Lining
I decided to make the poncho unlined. Since I have a serger my seams look pretty decent and don't make a mess, so I opted to save time and effort and forego the lining. Without the lining, however, I needed to do something about the raw edges.
- The hood on the pattern I used is made of 4 pieces rather than 2, and so I cut an extra pair of the front pieces and attached them like a lining (it's called "facing" when you use your outer fabric as the lining for lapels and things like this). This made the opening to the hood a little bit more structured, and much nicer to look at and wear than if I'd just left it raw. If you go this route:
- Stitch the two front hood pieces together, right sides together.
- Invert them, so they're wrong-sides together with the seam hidden between them
- You can now think of them as a single, "outside" (not lining) piece. Place this piece right-sides together with the back piece of the hood and sew all three layers in a single seam. Be careful with your orientation here since both the "wrong" and "right" sides of your faced front piece show the right side of your fabric.
- I did a narrow blind hem all the way around the bottom edge of the poncho to give a slightly nicer finish to the remaining raw edge. Because of the nap you can't really do a "blind" hem with the minky -- there'll be a very distinct line there no matter what -- but on the other hand, the nap hides your thread, so you don't have to be very accurate with your blind hem to avoid seeing the stitches themselves.
Close the Front
The pattern I used calls for buttons all down the front. I'd recommend doing that, actually -- without the front in two pieces the hood is a royal pain to attach. Plus, the hood pattern has some extra space in it that would normally be seam allowance, but in my case I had to fold in and stitch down to the neckline to keep it away from my daughter's face. in order to attach the hood, I actually ended up cutting a slit at the bottom of the neck (where you'd cut to have the front button closed) to get space to attach the hood all the way around. Then I added a button on one side of the slit and a flap made from some scraps with a buttonhole on it to close the slit. You should probably just make the poncho button up the front and save yourself the trouble, but I've included a photo of this bit so you can kind of see what I mean.
Embellishments
- Embroidery! We recently got a fancy sewing machine that can do embroidery (it's seriously cool. Like a 3D printer for thread), so I made up a little "nametag" to embroider over the heart that says "honk" with some lines reminiscent of the honk animation in the game. I've attached the vp3 file if you've got access to an embroidery machine and would like to include this. Make sure to use a stabilizer under the minky *AND* put some water-soluble stabilizer on the *top*. This top layer helps ensure the embroidery captures all of the nap underneath it and generally makes it stand out better. Once it's done you just rinse it off and let it dry. I found that the residue made the minky a bit stiff, like hair that's been gelled, but a few passes with a boar-bristle hairbrush broke that up just fine.
- "Sleeve" buttons -- I added a button on the inside under each arm to add a little bit of shape to the poncho and distinguish her "wings". Totally optional, but for any buttonholes you do add, I'd recommend using the water-soluble stabilizer just like you would for the embroidery, for the same reasons. In practice these just come open as your goose runs around, and I didn't find that they added much to the end result.
BONUS: Tips for working with Minky
This was my first time working with Minky, and it's definitely not as easy as fabric that isn't fuzzy, but I found it generally easier to use than lightweight jerseys. Here are some tips that I found helpful, summarized below:
- Pin like crazy. Put a pin every inch and a half or so; the nap on this stuff is very slippery, so when you've got your right sides together they'll want to slip across one another as your machine tries to feed the fabric through. Plus, the slipping has a directional preference because the nap lies flatter in one direction.
- Use a walking foot. I actually didn't do this because I don't have a walking foot for my serger, but if you have one for whatever machine you're using it'll make your life just that bit easier.
- Vacuum after each cut. Grab a dust buster or the flex hose on your canister vacuum and take a quick pass over each cut you make right after you cut it. This really cuts down on (but doesn't eliminate) the fluff you'll be breathing and wearing as you make this.
- Pay attention to the direction of the nap when laying out your pattern! If don't do this you may end up with the nap pointing down on one part and up on another. It's not a huge problem, but you'll definitely see it (and feel it when you run your hand over it) when you're done, so if you have enough fabric take care to figure out which way is going to be "up" for each piece you cut from the pattern and pet the minky to make sure you align "up" with the direction you want it to go. I found that I could pet "with" the grain in 2-ish directions, and against in the other two, and oriented my pattern pieces so that I could pet "down" the garment from head to hem on all the pieces.
Attachments

Step 2: Goose Eyes and Beak


Now to take your poncho and make it into a Goose!
The eyes are simple -- Any black buttons of suitable size will do. Eyeball (ha-ha!) where you want them, then grab a ruler and measure up from the front edge of the hood and out from the center seam to make sure they're even and attach them. I used shank buttons, so the thread isn't visible on the front of the button. This let me use white thread which is subtle against the inside of the hood. If you're using buttons with holes you'll probably want to go with thread that matches the color of the button.
The beak is far more interesting. I thought I was going to cut a simple triangle out of orange felt and maybe draw in the nostrils with a sharpie, but I ended up making a little stuffed beak. I didn't follow any pattern, and don't really know what I'm doing here, but after browsing a google image search of goose beaks, here's the route I took.
- Cut out a "kite" shape of orange felt. Round the top and bottom corners a bit, and take a notch out at each of the other corners. Make the notches go perhaps 25-30% of the distance through the beak.
- Stitch the two sides of each notch together to give the beak a curve. This gives it a bit of structure as well as shape. I used a whipstitch on the underside of the beak so these seams are "creases" rather than "ridges".
- Use a running stitch along the top side of the beak from near the end of the notch down toward the tip of the beak (dotted lines in the example template I uploaded) this makes some ridges and helps give it further structure.
- Embroider the nostrils. I picked a good spot and just lay down a bunch of black embroidery floss in a vaguely oblong shape. I started doing it with black thread, but that was taking forever and then I remembered we had floss. It goes much faster that way.
- Cut another piece of felt for the underside of the beak. The width should be the same as the distance between the two sides of your beak's top when you've curved it to a shape that you like. I cut mine shorter than the top, since I was just using it to hold the sides together. I used a running stitch to attach the bottom to the top piece, wrong-sides together, for about an inch along each side, but you could probably do this any number of ways
- Stuff the beak. I pulled out a scrap of poly-fill stuffing and pushed it into the beak before attempting to attach it to the hood so I could see how it would look before I picked a spot.
- Pin the beak to the hood where you want it to be, then stitch it down. I used my sewing machine to stitch around the back of the top piece in a half circle, from the front of the hood on one side to the front of the hood on the other. You can hand-stitch it if you'd prefer not to have the thread visible on the facing inside the hood. You can also stitch the bottom piece of the beak in place so it doesn't pop out and flop around.

Participated in the
Halloween Contest 2019


