

Introduction: Upcycled Christmas Tree: Mason Jars and Soup Cans


Backstory: I moved into my house just a few days before Christmas years ago. I didn't have any furniture, let alone a tree for Christmas. So I wrapped all our moving boxes and stacked them up in a pyramid... and that was our tree that year. That sorta started a tradition. Each year since I've built our tree out of recycled or upcycled materials that I either salvage or already have on hand. I love the idea of giving stuff destined for the landfill some new life before sending them on their way.
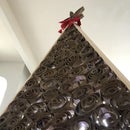
This year, I used a bunch of soup cans, tins, and mason jars that have been rattling around the garage. The result is a 2D, wall-mounted tree that I think came out really well. I like the slight monochromatic feel of the tree from the reflectiveness of all the glass and tin.
I hand punched the tins and the kids helped decorate by placing ornaments they chose into the mason jars.
Consider voting for this project in the Anything Goes contest.
Here are some links to previous trees:
Supplies
- Mason jars
- Sauce jars
- Soup cans
- Cocoa tins
- Coffee cans/tins
- 2x4 lumber (but could use other dimensional lumber as well)
- Wood screws for frame assembly
- Finish nails
- Hammer
- Drill/screwdriver
- Tape measure
- Saw
- Nice to have
- Hot glue gun
- Chop saw or mitre saw
- Optional items
- Ornaments
- String lights
- Tree topper
Step 1: Pick Your Size


- I found that taping out or using sidewalk chalk to sketch the tree in actual size helped me get a sense of scale.
- This isn't strictly necessary, but it does help maintain the triangle shape as you space out bottles and cans.
- Using your cans and jars, start experimenting with the placement.
- I recommend placing smaller cans and bottles at the top. Real trees have more petite branches near the top and this helps carry that image thru.
- I started measuring for and cutting my 2x4's about this time to help get the spacing right.
Step 2: Mount the Frame


- I used the last of my 2x4 to brace the back of each shelf for the frame. This also allowed me to screw into a vertical stud in my wall with just a couple of screws instead of one or more for each shelf.
- I installed two temporary feet to keep it in the right position while I screwed it into a wall stud
- To make this easier, I mapped out the stud with a level, studfinder, and painter's tape.
- Then I disconnected the feet for a free-floating look
Step 3: Make a Can Punching Jig


I just used scrap lumber for this. It isn't entirely necessary but it does speed up the can-punching process over just holding each can in your hand.
You could use a drill, a machinist punch, or anything sharp. I found holding a finish nail in a set of vicegrips worked the best. I got it to a point I didn't even need a hammer and could just apply enough hand pressure to make the nail holes.
Step 4: So. Many. Cans.


- I just did standard holiday icons for the punches in making the tin can ornaments
- Trees, crowns, hearts, snowflakes, reindeer, candles, etc. But make whatever you want.
- This is a great part for an energetic toddler to help with. My 7 year old loved punching the holes with a hammer.
I just did these separate from the tree once I had the frame up.
Step 5: Get Creative


I used some coffee and cocoa tins for some nicer icons and letterbox work.
Step 6: Fill Up the Frame


You can do this however you want. I thought that it looked best alternating rows of cans and jars. But the random effect looks good, too. You could do all tin cans, all jars, or any combination.
I found a beverage dispenser complete with spigot that was the perfect size to represent the "trunk"
Step 7: Add Your Flair and Your Color


The kids just love helping to decorate. So they got to add ornaments just like they would on a real tree. They just picked them out and plopped them down into the mason jars. The jars' glass made everything, even cloth ornaments, shiny and sparkle. I think the monochrome effect of this is really nice.
Step 8: Add a Little Light


It's tricky to get the lights in without knocking everything over. So I had to hot-glue a few cans and jars into place.
Just take your time and systematically tuck them into the cans and jars. If you had the $$ to buy them, having individual, battery operated lights in the cans would be amazing. It would eliminate the cluttered look of the wires. However, it would detract from the "use what's around" ethos. So I stuck with the string lights I've had forever.
Step 9: Enjoy!


Participated in the
Anything Goes Contest


