Introduction: Recycled Magazine (Faux Stained Glass?) Christmas Tree 2016


Use a few old magazines to make a recycled, DIY Christmas Tree that will glow softly from within. The magazines will blend color from both sides and from other layers and looks remarkably like old tiffany stained glass (that was an unplanned effect - just lucked out!)
Very eager to hear your thoughts, and if you like, consider voting for this project in one of the contests.
Happy Holidays!!
Backstory:
I started making our Christmas trees in 2008. We'd just moved into our house December 8th that year and didn't have time or money for a tree. So I made it with all of our moving boxes (sorry, no pictures). That sorta started a tradition and I've kept up the practice. Here's 2015's tree and then here's a gallery of previous years' trees.
Step 1: Materials and Tools


I already had everything I needed on hand except for some spray adhesive and a few extra sticks for the hot glue gun. So this project really only cost me a few bucks.
- Strips of luan plywood for the base. I had these left over from a previous project. If you don't have these, cardboard would work just as well. So would flexible plastic sheeting, or even very thin metal sheeting such as duct work. These are 4" wide and are of various lengths.
- Old magazines. You can put as much effort into these as you'd like. Use pages with less ink on them if you think you'll back light the tree. You can go for a theme and just choose pages from magazines with imagery you like, or you can go totally random. I was way too lazy and some of my pages even have ads for psoriasis. LOL.
- Lumber. I had a couple 2x4's and a 2x2 I used for a central post and some bracing. They won't be visible, so they needn't be pretty.
- Old tree stand. You could just as easy make one from extra lumber or cardboard. The finished tree is extremely lightweight.
- Screws, nails
- Duct tape
- Wood glue, hot glue, and spray adhesive. Get the light duty stuff or you'll be huffing serious fumes.
- Clamps
- Hand saw
- Drill and driver set (or screwdriver)
- Razor and straight edge
- Rags
Step 2: Make the Base


- I glued together two 8' x 4" strips of luan plywood to make a circular base.
- I recommend allowing the glue to set at least 4 hours
- You could just as easily use cardboard to make the base ring, or pool noodles, or pvc piping... i just had this lying around.
- I used a piece of duct tape on the ground to give me a rough center line so I could adjust the diameter. With these 8' strips my diameter is just about 5'.
- I set a 2x4 in the tree stand as well.
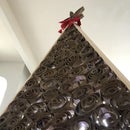
Step 3: Prepare the Crown


- I sawed off the corners at the top to make a point. This allows tapering the tree to be easier and allows installing a tree-topper.
- I also used a bunch of wadded up magazine pages and LOTS of duct tape to create a sphere about 8" down from the top. This will allow a platform to begin adhering the magazine pages. The tape needs to be clean, so wipe off any dust.
Step 4: Finish the Frame


Note: I had to take my tree inside in two pieces and then finish the frame. I couldn't fit the finished tree thru my interior doors.
- I cut a 2x4 and a 2x2 into pieces to use as braces. I cut 45° angles on each end so they'd marry up to the circular base and to the center post.
- I only did 3 braces because I wanted to be able to mash the tree up against the wall later and have the base be flexible enough to deform slightly. You need 3 braces at least to keep the circular shape, but can add more if you like
- I centered the post in the tree stand in the center of the circle base. I secured the braces to the post and the base with a couple of screws at each end.
- I cut a small, dime-sized notch in the base to run a cord thru.
- I used an led lamp, clamped to the post to back light the tree later.
P.S. Excuse my little boy's hard hat and screw driver toys. He was helping me do construction.
Step 5: Start Papering


- Use your razor and straight edge to render some magazines. A few thick magazines will go a long way. I used maybe 4 magazines total. Really thick magazines, like glamour mags with a lot of pages might go even further. Your call.
- For the very first few rows, use a hot glue gun. This is important. You want a good bond. The spray adhesive just won't adhere to much besides paper or very clean, non-porous surfaces.
- Just apply a thick bead of hot glue to the top edge of a page and affix to the duct tape sphere. Over lap is fine. Wrinkles are fine. Creases are fine. Don't be too picky.
- If you're experiencing tearing, use the magazine covers instead of interior pages at this step.
- Go all the way around the sphere.
Step 6: Switch to Spray Adhesive


- Use the spray adhesive to add pages, increasing the length of your original layer.
- Adhesive works best if you spray it on, allow it to dry to tacky, then press on the next page.
- So I recommend spraying a bead along the bottom edge of the hanging pages all at once.
- Then go back and begin pressing the next set of pages onto the bead once it's tacky.
- Press and ensure a good bond. These first few columns of pages will be your ribs.
- Repeat until your ribs get long enough to overlap the base when pulled fairly taught.
Step 7: Affix to Base


- Switch back to hot glue gun to adhere the ribs to the base.
- Just pull the length of paper taut but not overtight.
- Eyeball where it looks best and causes the fewest creases.
- Lift the paper, apply a bead of hot glue, then carefully set the paper back into the bead. Careful not to burn yourself.
Step 8: Fill in the Gaps


- Now you can fill in the spaces between the ribs
- Same procedure as for the ribs... spray on some adhesive, let it dry to tacky, then press the next page on, BEING VERY CAREFUL NOT TO TEAR YOUR WORK.
- The paper is pretty easy to work with, but it's still paper, don't overstress it.
- Just apply adhesive, then smooth layers down with your hand.
- You may find it easier to reach in behind the layer you're working on from a nearby gap in the tree. This will get harder and harder as you descend down to the base. Eventually, you'll have a good feel for what makes a good bond.
- Patience is a virtue.
- Again, hot glue at the base
Step 9: Clean Up the Base, Plug Any Gaps or Tears


- Just tidy up your work.
- Don't over apply pages or any light will have a harder time shining thru.
Step 10: Work the Crown


NOTE: Get a step ladder for this. It's easier and you won't risk leaning on and tearing your work.
- I cut a bunch of pages into triangles for the crown.
- I just applied spray adhesive to the bottom edge of a paper triangle, let it dry to tacky, and worked up from the sphere instead of down.
- Then I liberally applied some spray to all the tips and twisted them together
- Once that cures, it will support decent weight for a tree topper.
- I used a store-bought light-up star for a tree topper. This is yours to define.
Step 11: Skip the String Lights

I really don't think you need them. You can, of course, if you really want to, but they are very hard to apply. There's virtually nothing to suspend them from.
I actually tore my paper in two places trying, and had to push that part into the wall to hide it.
I think the tree back lights better with static light from inside anyway. Almost looks like an old microfiche or stained glass.
Step 12: Done!


In a dim or dark room, the tree glows beautifully.
You can move it into position fairly easily as long as your braces were made strong. All you need now are presents.
Thanks for viewing!!!

Participated in the
Make it Glow Contest 2016

Participated in the
Homemade Gifts Contest 2016


